FUEL-FILLER LID LOCK ACTUATOR SHORT-CORD REMOVAL/INSTALLATION [(US)]
FUEL-FILLER LID LOCK ACTUATOR SHORT-CORD REMOVAL/INSTALLATION [(US)]
SM2566409
id0914007011x1
Replacement Part
|
Band
Quantity: 2
Location of use: Fuel-filler lid lock actuator short-cord
|
4SD
1.Open the fuel-filler lid.
-
Note
-
• If the fuel-filler lid cannot be opened due to a discharged battery or malfunctions in the electrical system, open the fuel-filler lid referring to the [FUEL-FILLER LID LOCK ACTUATOR MANUAL RELEASE PROCEDURE]. (See FUEL-FILLER LID LOCK ACTUATOR MANUAL RELEASE PROCEDURE [(US)].)
2.Disconnect the negative battery terminal. (See NEGATIVE BATTERY TERMINAL DISCONNECTION/CONNECTION [(US)].)
3.Remove the following parts:
- (1)Rear tire (LH) (See WHEEL AND TIRE SPECIFICATION [(US)].)
- (2)Rear mudguard (LH) (See MUDGUARD REMOVAL/INSTALLATION.)
- (3)Fuel-filler pipe (See FUEL-FILLER PIPE REMOVAL/INSTALLATION [SKYACTIV-G (WITHOUT CYLINDER DEACTIVATION (US))].) (See FUEL-FILLER PIPE REMOVAL/INSTALLATION [SKYACTIV-G (WITH CYLINDER DEACTIVATION (US))].)
- (4)Trunk covering (See TRUNK COVERING REMOVAL/INSTALLATION.)
- (5)Trunk board (See TRUNK BOARD REMOVAL/INSTALLATION [(US)].)
- (6)Trunk end trim (See TRUNK END TRIM REMOVAL/INSTALLATION.)
4.Partially peel the trunk side trim (LH). (See TRUNK SIDE TRIM REMOVAL/INSTALLATION [(US)].)
5.Remove the trunk side insulator (LH). (See TRUNK SIDE INSULATOR REMOVAL/INSTALLATION.)
6.Remove the fuel-filler lid box. (See FUEL-FILLER LID LOCK ACTUATOR REMOVAL/INSTALLATION [(US)].)
7.Remove the clip.
am3zzw00028086
|
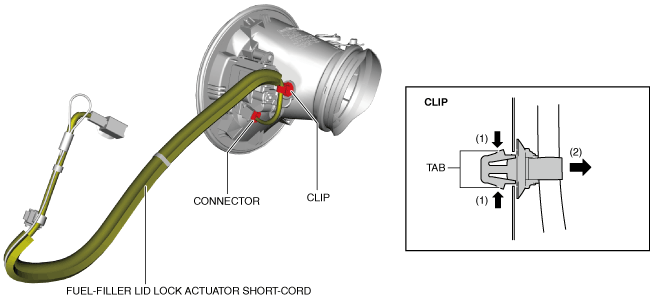
8.Disconnect the connector.
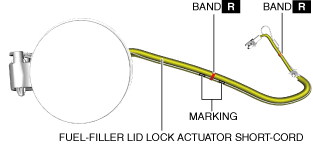
9.Cut the bands.(with fuel-filler lid opener cable)
am3zzw00028087
|
10.Remove the fuel-filler lid lock actuator short-cord.
11.Install in the reverse order of removal.
5HB
1.Open the fuel-filler lid.
-
Note
-
• If the fuel-filler lid cannot be opened due to a discharged battery or malfunctions in the electrical system, open the fuel-filler lid referring to the [FUEL-FILLER LID LOCK ACTUATOR MANUAL RELEASE PROCEDURE]. (See FUEL-FILLER LID LOCK ACTUATOR MANUAL RELEASE PROCEDURE [(US)].)
2.Disconnect the negative battery terminal. (See NEGATIVE BATTERY TERMINAL DISCONNECTION/CONNECTION [(US)].)
3.Remove the following parts:
- (1)Rear tire (LH) (See WHEEL AND TIRE SPECIFICATION [(US)].)
- (2)Rear mudguard (LH) (See MUDGUARD REMOVAL/INSTALLATION.)
- (3)Fuel-filler pipe (See FUEL-FILLER PIPE REMOVAL/INSTALLATION [SKYACTIV-G (WITHOUT CYLINDER DEACTIVATION (US))].) (See FUEL-FILLER PIPE REMOVAL/INSTALLATION [SKYACTIV-G (WITH CYLINDER DEACTIVATION (US))].)
- (4)Rear package tray (See REAR PACKAGE TRAY REMOVAL/INSTALLATION.)
- (5)Trunk covering (See TRUNK COVERING REMOVAL/INSTALLATION.)
- (6)Trunk board (See TRUNK BOARD REMOVAL/INSTALLATION [(US)].)
- (7)Trunk end trim (See TRUNK END TRIM REMOVAL/INSTALLATION.)
- (8)Trunk side upper trim (LH) (See TRUNK SIDE UPPER TRIM REMOVAL/INSTALLATION.)
4.Partially peel the trunk side trim (LH). (See TRUNK SIDE TRIM REMOVAL/INSTALLATION [(US)].)
5.Remove the trunk side insulator (LH). (See TRUNK SIDE INSULATOR REMOVAL/INSTALLATION.)
6.Remove the fuel-filler lid box. (See FUEL-FILLER LID LOCK ACTUATOR REMOVAL/INSTALLATION [(US)].)
7.Remove the clip.
am3zzw00028088
|
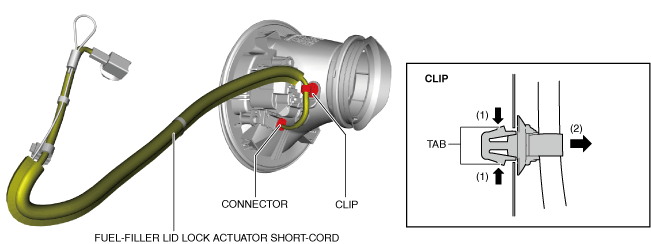
8.Disconnect the connector.
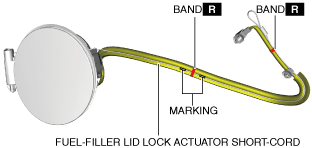
9.Cut the bands.
am3zzw00028089
|
10.Remove the fuel-filler lid lock actuator short-cord.
11.Install in the reverse order of removal.