TRUNK LID OPENER SWITCH INSPECTION
2016 – MX-5 – Body and Accessories
TRUNK LID OPENER SWITCH INSPECTION
Vehicle Interior
1. Disconnect the negative battery cable. (See NEGATIVE BATTERY CABLE DISCONNECTION/CONNECTION.)
2. Remove the following parts:
a. Driver-side scuff plate (See SCUFF PLATE REMOVAL/INSTALLATION.)
b. Driver-side front side trim (See FRONT SIDE TRIM REMOVAL/INSTALLATION.)
c. Driver-side A-pillar trim (See A-PILLAR TRIM REMOVAL/INSTALLATION.)
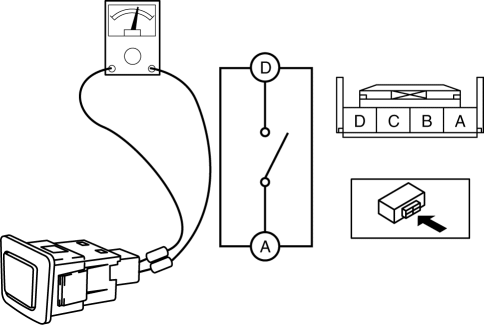
d. Remove the trunk lid opener switch (See TRUNK LID OPENER SWITCH REMOVAL/INSTALLATION.)
3. Verify the continuity of trunk lid opener switch terminals A and D.
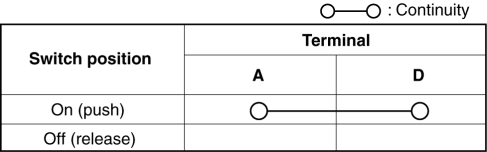
-
If not as indicated in the table, replace the trunk lid opener switch.
Vehicle Exterior
1. Disconnect the negative battery cable. (See NEGATIVE BATTERY CABLE DISCONNECTION/CONNECTION.)
2. Remove the following parts:
a. Trunk end trim (See TRUNK END TRIM REMOVAL/INSTALLATION.)
b. Trunk side trim (See TRUNK SIDE TRIM REMOVAL/INSTALLATION.)
c. Rear combination light (See REAR COMBINATION LIGHT REMOVAL/INSTALLATION.)
d. Rear splash shield (See REAR SPLASH SHIELD REMOVAL/INSTALLATION.)
e. Rear bumper stay (See REAR BUMPER STAY REMOVAL/INSTALLATION.)
f. Rear bumper retainer No.1 (See REAR BUMPER RETAINER No.1 REMOVAL/INSTALLATION.)
g. Rear bumper (See REAR BUMPER REMOVAL.)(See REAR BUMPER INSTALLATION.)
h. Trunk lid opener switch (See TRUNK LID OPENER SWITCH REMOVAL/INSTALLATION.)
3. Verify the continuity of trunk lid opener switch terminals A and B.

-
If not as indicated in the table, replace the trunk lid opener switch.
