OIL SEAL (DIFFERENTIAL) REPLACEMENT [ET6A-EL (US)]
OIL SEAL (DIFFERENTIAL) REPLACEMENT [ET6A-EL (US)]
SM2566181
id0517n11188x5
Special Service Tool (SST)
|
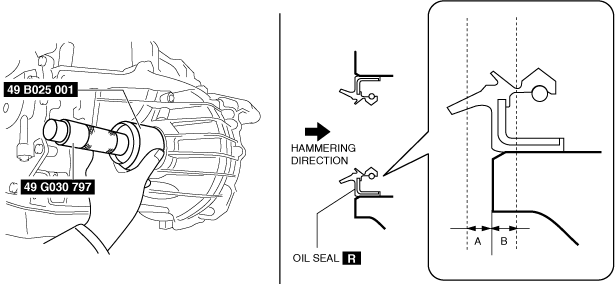
49 B025 001
Body
|
 |
49 G030 797
Handle
(Part of 49 G030 795)
|
 |
49 U027 003
Oil Seal Installer
|
 |
Replacement Part
|
Oil seal
Quantity: 1
Location of use: Automatic transaxle (Transaxle case side)
|
Oil seal
Quantity: 1
Location of use: Automatic transaxle (Converter housing side)
|
Transaxle Case Side
1.Remove the front under cover No.1. (See FRONT UNDER COVER No.1 REMOVAL/INSTALLATION.)
2.Remove the front under cover No.2. (See FRONT UNDER COVER No.2 REMOVAL/INSTALLATION.)
3.Drain the ATF. (See AUTOMATIC TRANSAXLE FLUID (ATF) REPLACEMENT [ET6A-EL (US)].)
4.Disconnect the front drive shaft (LH) from the transaxle. (See FRONT DRIVE SHAFT REMOVAL/INSTALLATION [(US)].)
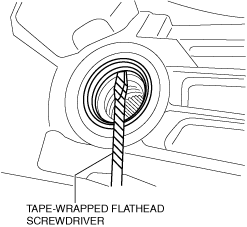
5.Remove the oil seal using a tape-wrapped flathead screwdriver.
ac5uuw00004637
|
6.Using the SSTs and a hammer, install a new oil seal.
am3zzw00022018
|
-
A: 0.5 mm {0.02 in}B: 0.8 mm {0.03 in}
7.Coat the lip of the oil seal with ATF.
-
Caution
-
• The oil seal is easily damaged by the sharp edges of the drive shaft splines. Do not let the splines contact the oil seal.
8.Connect the front drive shaft (LH) to the transaxle. (See FRONT DRIVE SHAFT REMOVAL/INSTALLATION [(US)].)
9.Add the ATF. (See AUTOMATIC TRANSAXLE FLUID (ATF) REPLACEMENT [ET6A-EL (US)].)
10.Perform the “Mechanical System Test”. (See MECHANICAL SYSTEM TEST [ET6A-EL (US)].)
11.Install the front under cover No.2. (See FRONT UNDER COVER No.2 REMOVAL/INSTALLATION.)
12.Install the front under cover No.1. (See FRONT UNDER COVER No.1 REMOVAL/INSTALLATION.)
Converter Housing Side
1.Remove the front under cover No.1. (See FRONT UNDER COVER No.1 REMOVAL/INSTALLATION.)
2.Remove the front under cover No.2. (See FRONT UNDER COVER No.2 REMOVAL/INSTALLATION.)
3.Drain the ATF. (See AUTOMATIC TRANSAXLE FLUID (ATF) REPLACEMENT [ET6A-EL (US)].)
4.Disconnect the front drive shaft (RH). (See FRONT DRIVE SHAFT REMOVAL/INSTALLATION [(US)].)
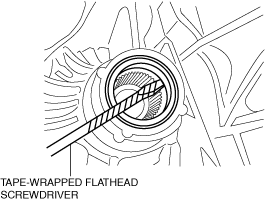
5.Remove the oil seal using a tape-wrapped flathead screwdriver.
ac5uuw00004639
|
6.Using the SSTs and a hammer, install a new oil seal.
ac5uuw00006508
|
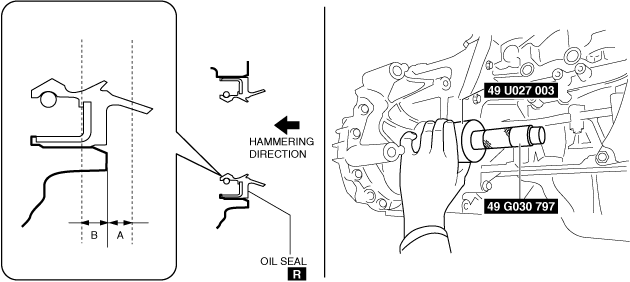
-
A: 0.5 mm {0.02 in}B: 0.8 mm {0.03 in}
7.Coat the lip of the oil seal with ATF.
-
Caution
-
• The oil seal is easily damaged by the sharp edges of the drive shaft splines. Do not let the splines contact the oil seal.
8.Connect the front drive shaft (RH). (See FRONT DRIVE SHAFT REMOVAL/INSTALLATION [(US)].)
9.Add the ATF. (See AUTOMATIC TRANSAXLE FLUID (ATF) REPLACEMENT [ET6A-EL (US)].)
10.Perform the “Mechanical System Test”. (See MECHANICAL SYSTEM TEST [ET6A-EL (US)].)
11.Install the front under cover No.2. (See FRONT UNDER COVER No.2 REMOVAL/INSTALLATION.)
12.Install the front under cover No.1. (See FRONT UNDER COVER No.1 REMOVAL/INSTALLATION.)