COOLANT CONTROL VALVE REMOVAL/INSTALLATION [SKYACTIV-G (WITHOUT CYLINDER DEACTIVATION (US))]
COOLANT CONTROL VALVE REMOVAL/INSTALLATION [SKYACTIV-G (WITHOUT CYLINDER DEACTIVATION (US))]
SM2565672
id0112u0225000
Replacement Part
|
Gasket
Quantity: 1
Location of use: Coolant control valve
|
Gasket
Quantity: 1
Location of use: Lower radiator hose component
|
-
Warning
-
• Never remove the cooling system cap or loosen the radiator drain plug while the engine is running, or when the engine and radiator are hot. Scalding engine coolant and steam may shoot out and cause serious injury. It may also damage the engine and cooling system.• Turn off the engine and wait until it is cool. Even then, be very careful when removing the cap. Wrap a thick cloth around it and slowly turn it counterclockwise to the first stop. Step back while the pressure escapes.• When you are sure all the pressure is gone, press down on the cap using the cloth, turn it, and remove it.
1.Disconnect the negative battery terminal. (See NEGATIVE BATTERY TERMINAL DISCONNECTION/CONNECTION [(US)].)
2.Drain the engine coolant. (See ENGINE COOLANT REPLACEMENT [SKYACTIV-G (WITH CYLINDER DEACTIVATION (US))].)
3.Remove the front under cover No.2. (See FRONT UNDER COVER No.2 REMOVAL/INSTALLATION.)
4.Remove the plug hole plate. (See PLUG HOLE PLATE REMOVAL/INSTALLATION [SKYACTIV-G (WITH CYLINDER DEACTIVATION (US))].)
5.Remove the air cleaner component. (See INTAKE-AIR SYSTEM REMOVAL/INSTALLATION [SKYACTIV-G (WITH CYLINDER DEACTIVATION (US))].)
6.Remove the PCM component. (See PCM REMOVAL/INSTALLATION [SKYACTIV-G (WITH CYLINDER DEACTIVATION (US))].)
7.Remove the battery and battery tray. (See BATTERY REMOVAL/INSTALLATION [SKYACTIV-G (WITHOUT CYLINDER DEACTIVATION (US))].)
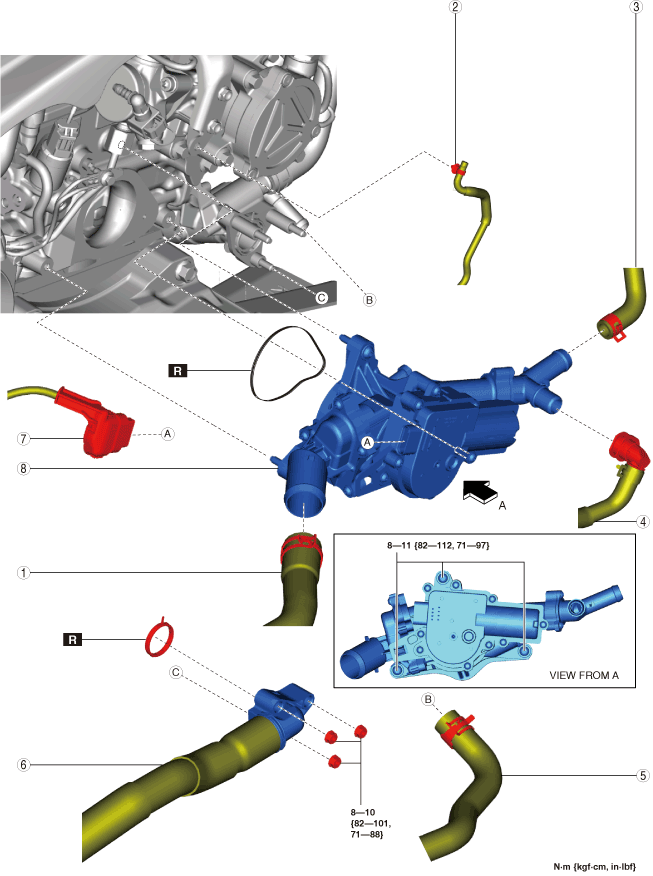
8.Remove in the order indicated in the table.
9.Install in the reverse order of removal.
10.Refill the engine coolant. (See ENGINE COOLANT REPLACEMENT [SKYACTIV-G (WITH CYLINDER DEACTIVATION (US))].)
11.Inspect for engine coolant leakage. (See ENGINE COOLANT LEAKAGE INSPECTION [SKYACTIV-G (WITHOUT CYLINDER DEACTIVATION (US))].)
am6xuw00012504
|
|
1
|
Upper radiator hose
|
|
2
|
Clip (ATX)
|
|
3
|
Heater hose (Coolant control valve side)
|
|
4
|
Water hose (Coolant control valve side) (ATX)
|
|
5
|
Water hose (Flange side) (ATX)
|
|
6
|
Lower radiator hose component
|
|
7
|
Coolant control valve connector
|
|
8
|
Coolant control valve
|
Upper Radiator Hose Removal Note
1.Remove the bolt shown in the figure.
am3zzw00031772
|
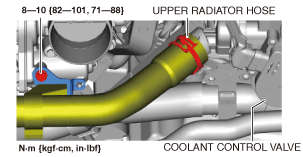
2.Disconnect the upper radiator hose.
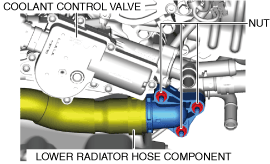
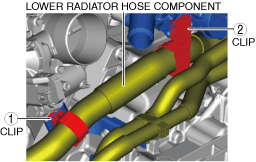
Lower Radiator Hose Component Removal Note
1.Remove the clips.
ac5wzw00010843
|

2.Remove the nuts shown in the figure and set the lower radiator hose component aside.
ac5wzw00010844
|
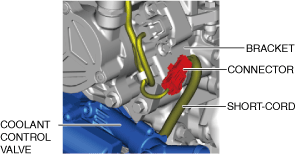
Coolant Control Valve Removal Note
1.Disconnect the connector shown in the figure.
ac5wzw00010845
|
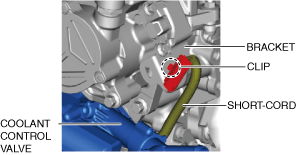
2.Remove the clip shown in the figure.
ac5wzw00010846
|
3.Remove the coolant control valve.
4.When replacing the engine coolant control valve, remove ECT sensor No.2. (See ENGINE COOLANT TEMPERATURE (ECT) SENSOR REMOVAL/INSTALLATION [SKYACTIV-G (WITHOUT CYLINDER DEACTIVATION (US))].)
Coolant Control Valve Installation Note
-
Caution
-
• Do not apply oil (such as engine oil, ATF) to the O-ring. Otherwise, the O-ring could swell causing a seal malfunction.
1.If the engine coolant control valve has been replaced, install ECT sensor No.2. (See ENGINE COOLANT TEMPERATURE (ECT) SENSOR REMOVAL/INSTALLATION [SKYACTIV-G (WITHOUT CYLINDER DEACTIVATION (US))].)
2.Insert a new gasket into the coolant control valve groove.
3.Install the coolant control valve.
Lower Radiator Hose Component Installation Note
-
Caution
-
• Do not apply oil (such as engine oil, ATF) to the gasket. Otherwise, the gasket could swell causing a seal malfunction.
1.Install the lower radiator hose component using the following procedure:
- (1)Insert a new gasket into the pipe groove.
- (2)Tighten the nuts shown in the figure.
-
 ac5wzw00010844
- (3)Secure the lower radiator hose using clips in the order shown in the figure.
-
ac5wzw00010847
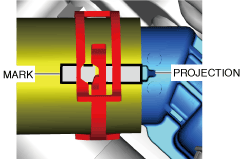
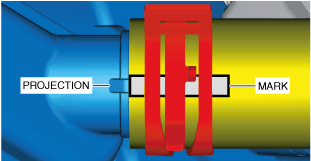
Heater Hose Installation Note
1.Connect the heater hose to the coolant control valve so that the projection position is aligned with the mark.
ac5wzw00010848
|
Upper Radiator Hose Installation Note
1.Install the upper radiator hose using the following procedure:
- (1)Tighten the bolt shown in the figure.
-
am3zzw00031772
- (2)Connect the upper radiator hose to the coolant control valve so that the projection position is aligned with the mark.
-
ac5wzw00010849