FRONT DOOR GLASS REMOVAL/INSTALLATION
FRONT DOOR GLASS REMOVAL/INSTALLATION
SM2336357
id091200000100
Replacement part
|
Grommet
Quantity: 4
Location of use: Service hole cover No.1
|
Service hole cover No.1
Quantity: 1
Location of use: Front door panel
|
1.Perform the front door glass preparation. (See Front Door Glass Preparation.)
-
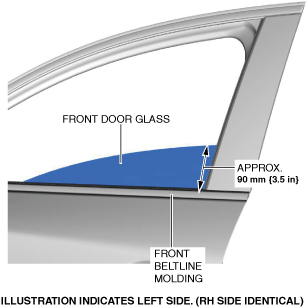
Note
-
• Before removing the front door glass, the removal procedure for the front door glass installation bolt can be facilitated by adjusting the top of the front door glass to the position approx. 90 mm {3.5 in} away from the upper part of the front beltline molding.
2.Disconnect the negative battery terminal. (See NEGATIVE BATTERY TERMINAL DISCONNECTION/CONNECTION [(US)].)
3.Remove the following parts:
- (1)Front door speaker grille (See SPEAKER GRILLE REMOVAL/INSTALLATION.)
- (2)Inner garnish (See INNER GARNISH REMOVAL/INSTALLATION.)
- (3)Power window main switch (to remove from driver’s side) (See POWER WINDOW MAIN SWITCH REMOVAL/INSTALLATION.)
- (4)Power window subswitch (front) (to remove from passenger’s side) (See POWER WINDOW SUBSWITCH REMOVAL/INSTALLATION.)
- (5)Front door trim (See FRONT DOOR TRIM REMOVAL/INSTALLATION [(US)].)
- (6)Front inner handle (See INNER HANDLE REMOVAL/INSTALLATION.)
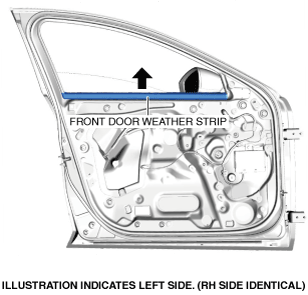
4.Remove the front door weatherstrip in the direction of the arrow shown in the figure by pulling it upward.
am3zzw00024425
|
5.Disconnect the connectors.
am3zzw00030993
|
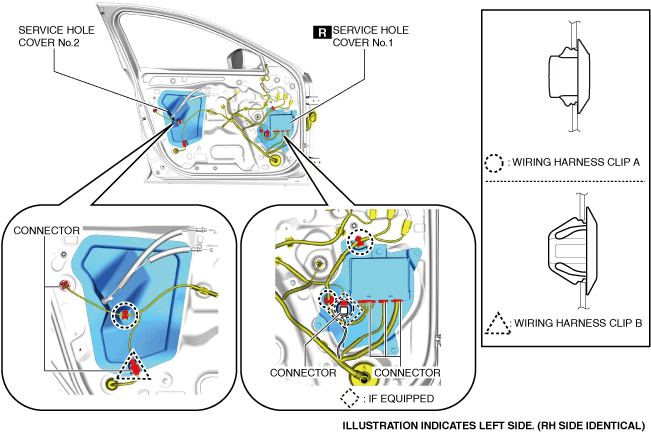
6.Remove wiring harness clips A and B.
7.Remove the screws.
am3zzw00029536
|
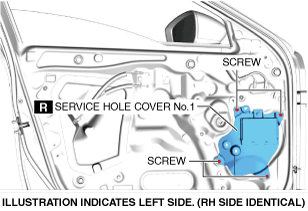
8.Insert a remover tool into the position shown in the figure, move it in the direction of the arrow, and detach the tabs from the front door panel.
am3zzw00030994
|
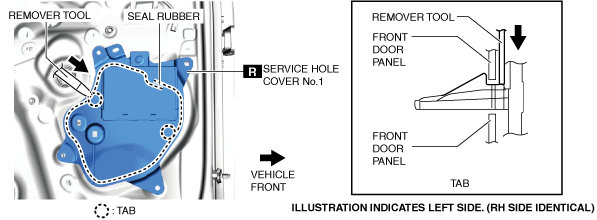
9.Remove service hole cover No.1.
10.Remove the grommet.
am3zzw00029536
|
11.Insert a remover tool into the position shown in the figure, move it in the direction of arrow (1), and detach the tabs from the front door panel.
am3zzw00030995
|
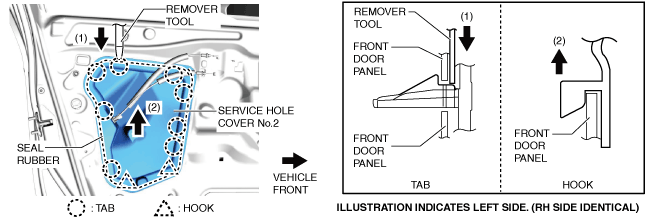
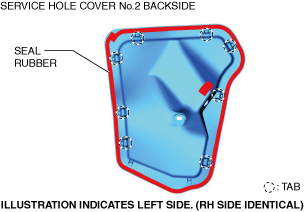
12.Lift service hole cover No.2 in the direction of arrow (2) shown in the figure and detach the hooks from the front door panel.
13.Remove the grommet.
am3zzw00029539
|
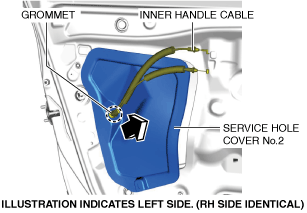
14.Move service hole cover No.2 in the direction of the arrow shown in the figure and remove it while pulling out the inner handle cable.
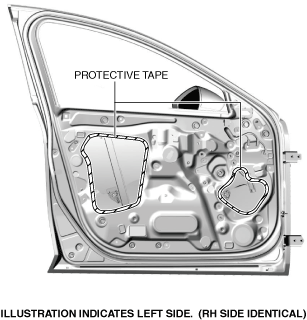
15.Apply protective tape to the edge part of the service hole cover installation holes to prevent injury.
am3zzw00024431
|
16.Remove the bolts shown in the figure in the order of (1) and (2).
am3zzw00024432
|
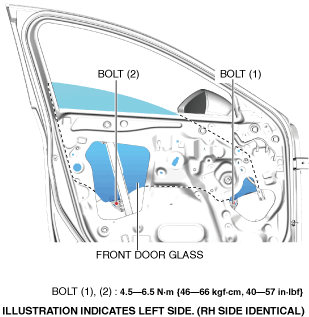
-
Caution
-
• If the bolts are removed without supporting the front door glass, the front door glass may fall off and be damaged. Remove the bolts while inserting your hand into the service hole cover installation hole to support the front door glass.
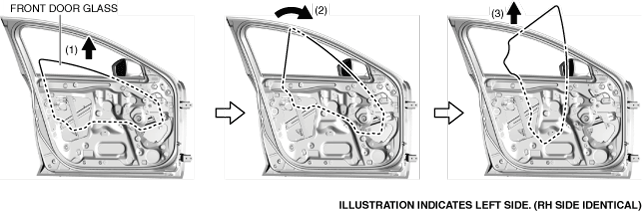
17.Lift the front door glass in the direction of arrow (1) shown in the figure, hold the upper part of the front door glass with the other hand, shift the hand which is supporting the front door glass from the service hole cover No.2 installation hole to the upper part of the front door glass, then while tilting it in the direction of arrow (2), pull it towards arrow (3) and remove it from the front door.
am3zzw00024433
|
18.Install in the reverse order of removal. (See Service Hole Cover No.2 Installation Note.)
19.Perform the power window system initialization procedure. (with auto open/auto close function) (See POWER WINDOW SYSTEM INITIALIZATION PROCEDURE.)
Front Door Glass Preparation
am3zzw00029540
|
Service Hole Cover No.2 Installation Note
am3zzw00030996
|