KEYLESS ANTENNA REMOVAL/INSTALLATION
2016 – MX-5 – Body and Accessories
KEYLESS ANTENNA REMOVAL/INSTALLATION
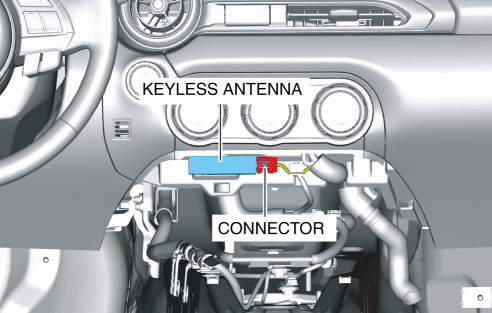
Vehicle Interior, Front
1. Disconnect the negative battery cable. (See NEGATIVE BATTERY CABLE DISCONNECTION/CONNECTION.)
2. Remove the following parts:
a. Selector lever knob (AT) (See AUTOMATIC TRANSMISSION SHIFT MECHANISM REMOVAL/INSTALLATION.)
b. Shift lever knob (MT)
c. Shift panel component (See SHIFT PANEL REMOVAL/INSTALLATION.)
d. Upper panel (See UPPER PANEL REMOVAL/INSTALLATION.)
e. Parking brake lever boot panel (See PARKING BRAKE LEVER BOOT PANEL REMOVAL/INSTALLATION.)
f. Rear console (See REAR CONSOLE REMOVAL/INSTALLATION.)
g. Front console panel (See FRONT CONSOLE PANEL REMOVAL/INSTALLATION.)
h. Front console component (See FRONT CONSOLE REMOVAL/INSTALLATION.)
3. Disconnect the connector from the keyless antenna.
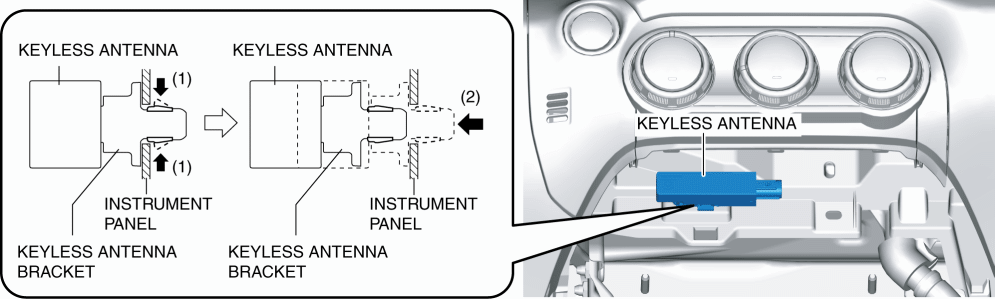
4. While pressing the keyless antenna bracket tab in the direction of arrow (1) shown in the figure, press it in the direction of arrow (2) to detach the keyless antenna bracket tab from the instrument panel.
5. Insert a tape-wrapped flathead screwdriver into the position shown in the figure.
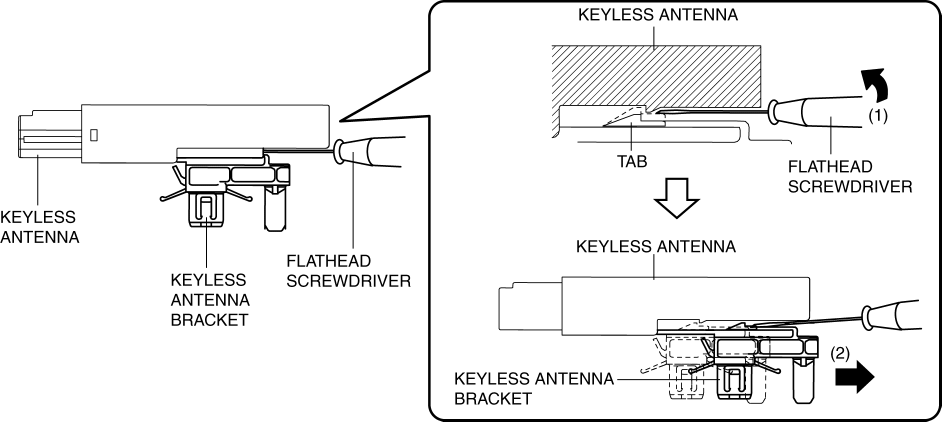
6. Move the tape-wrapped flathead screwdriver in the direction of arrow (1) shown in the figure to press the keyless antenna bracket tab, and pull it in the direction of arrow (2) to detach the keyless antenna bracket from the keyless antenna.
7. Remove the keyless antenna bracket from the keyless antenna.
8. Install in the reverse order of removal.
Vehicle Interior, Center (With Advanced Keyless Entry System)
1. Disconnect the negative battery cable. (See NEGATIVE BATTERY CABLE DISCONNECTION/CONNECTION.)
2. Remove the following parts:
a. Selector lever knob (AT) (See AUTOMATIC TRANSMISSION SHIFT MECHANISM REMOVAL/INSTALLATION.)
b. Shift lever knob (MT)
c. Shift panel component (See SHIFT PANEL REMOVAL/INSTALLATION.)
d. Upper panel (See UPPER PANEL REMOVAL/INSTALLATION.)
e. Parking brake lever boot panel (See PARKING BRAKE LEVER BOOT PANEL REMOVAL/INSTALLATION.)
f. Rear console (See REAR CONSOLE REMOVAL/INSTALLATION.)
g. Rear cup holder bracket (See REAR CUP HOLDER BRACKET REMOVAL/INSTALLATION.)
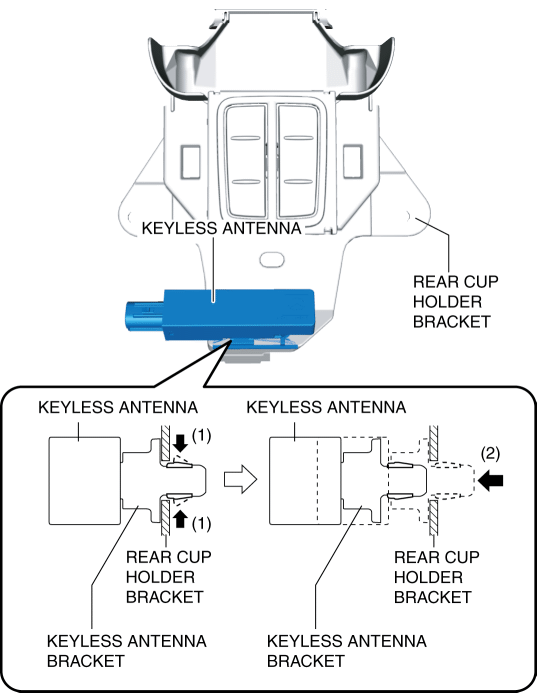
3. While pressing the keyless antenna bracket tabs in the direction of arrow (1) shown in the figure, press it in the direction of arrow (2) to detach the keyless antenna bracket tabs from the rear cup holder bracket.
4. Remove the keyless antenna from the rear cup holder bracket.
5. Insert a tape-wrapped flathead screwdriver into the position shown in the figure.
6. Move the tape-wrapped flathead screwdriver in the direction of arrow (1) shown in the figure to press the keyless antenna bracket tab, and pull it in the direction of arrow (2) to detach the keyless antenna bracket from the keyless antenna.
7. Remove the keyless antenna bracket from the keyless antenna.
8. Install in the reverse order of removal.
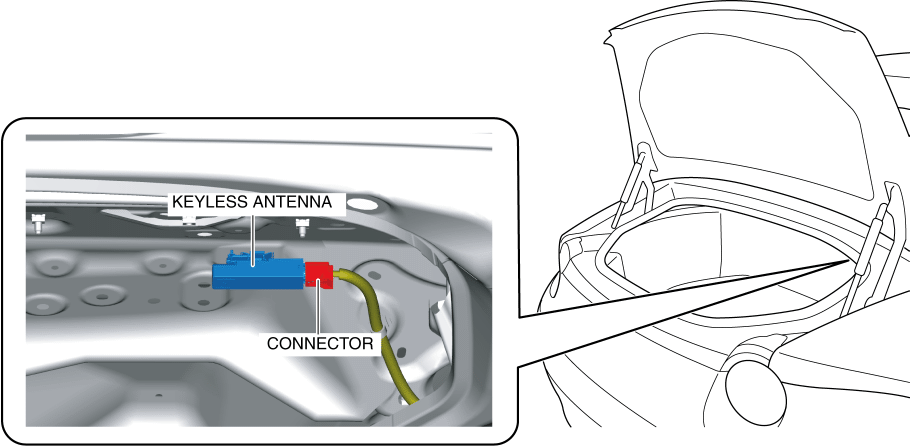
Vehicle Interior, Rear (With Advanced Keyless Entry System)
1. Open the trunk lid.
2. Disconnect the negative battery cable. (See NEGATIVE BATTERY CABLE DISCONNECTION/CONNECTION.)
3. Partially peel back the partition board to the position allowing removal of the keyless antenna. (See PARTITION BOARD REMOVAL/INSTALLATION.)
4. Disconnect the connector from the keyless antenna.
5. While pressing the keyless antenna bracket tab in the direction of arrow (1) shown in the figure, press it in the direction of arrow (2) to detach the keyless antenna bracket tab from the body.
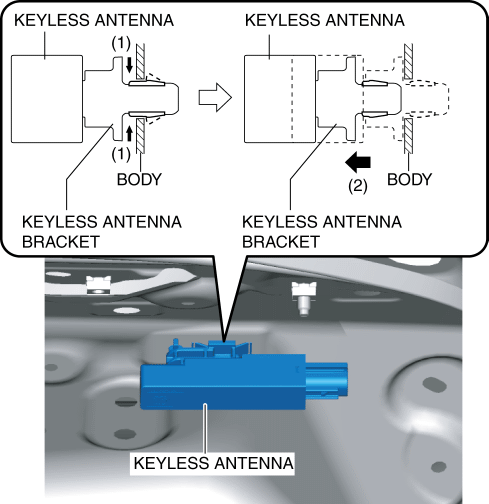
6. Insert a tape-wrapped flathead screwdriver into the position shown in the figure.
7. Move the tape-wrapped flathead screwdriver in the direction of arrow (1) shown in the figure to press the keyless antenna bracket tab, and pull it in the direction of arrow (2) to detach the keyless antenna bracket from the keyless antenna.
8. Remove the keyless antenna from the keyless antenna bracket.
9. Install in the reverse order of removal.
Vehicle Exterior, Rear (With Advanced Keyless Entry System)
1. Disconnect the negative battery cable. (See NEGATIVE BATTERY CABLE DISCONNECTION/CONNECTION.)
2. Remove the following parts:
a. Trunk end trim (See TRUNK END TRIM REMOVAL/INSTALLATION.)
b. Trunk side trim (See TRUNK SIDE TRIM REMOVAL/INSTALLATION.)
c. Rear combination light (See REAR COMBINATION LIGHT REMOVAL/INSTALLATION.)
d. Rear splash shield (See REAR SPLASH SHIELD REMOVAL/INSTALLATION.)
e. Rear bumper stay (See REAR BUMPER STAY REMOVAL/INSTALLATION.)
f. Rear bumper retainer no.1 (See REAR BUMPER RETAINER No.1 REMOVAL/INSTALLATION.)
g. Rear bumper (See REAR BUMPER REMOVAL.)(See REAR BUMPER INSTALLATION.)
3. Disconnect the connector from the keyless antenna.
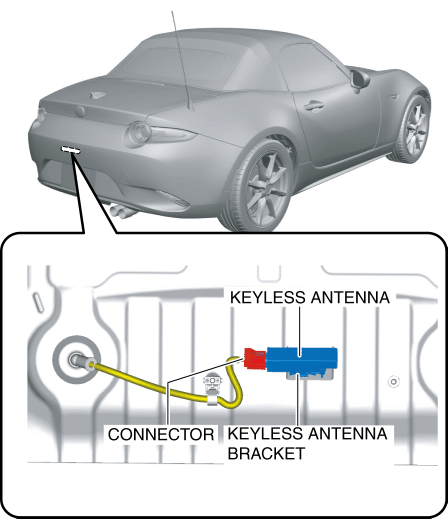
CAUTION:
-
Disconnect the connector while holding the keyless antenna, otherwise the keyless antenna bracket could be damaged.
4. While pressing the keyless antenna bracket tab in the direction of arrow (1) shown in the figure, press it in the direction of arrow (2) to detach the keyless antenna bracket tab from the body.
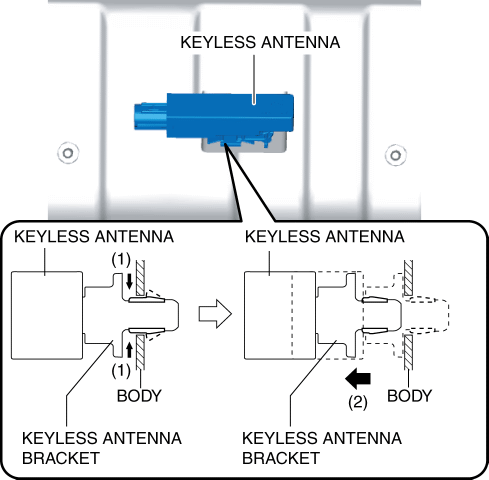
5. Remove the keyless antenna from the body.
6. Insert a tape-wrapped flathead screwdriver into the position shown in the figure.
7. Move the tape-wrapped flathead screwdriver in the direction of arrow (1) shown in the figure to press the keyless antenna bracket tab, and pull it in the direction of arrow (2) to detach the keyless antenna bracket from the keyless antenna.
8. Remove the keyless antenna bracket from the keyless antenna.
9. Install in the reverse order of removal.
Vehicle Exterior, Driver’s side/Passenger’s side (With Advanced Keyless Entry System)
NOTE:
-
The keyless antenna (vehicle exterior, driver’s side/passenger’s side) cannot be removed as a single unit because it is built into the outer handle. To replace the keyless antenna (vehicle exterior, driver’s side/passenger’s side), replace the outer handle. (See OUTER HANDLE REMOVAL/INSTALLATION.)
