Menu +
Generic selectors
Exact matches only
Search in title
Search in content
Post Type Selectors

ADVANCED KEYLESS ENTRY SYSTEM DOES NOT OPERATE [SECURITY AND LOCKS]

< Previous Next >

2016 – MX-5 – Body and Accessories

ADVANCED KEYLESS ENTRY SYSTEM DOES NOT OPERATE [SECURITY AND LOCKS]

Description

  • Door or fuel-filler lid cannot be locked/unlocked using request switch

  • Trunk lid does not open even if trunk lid opener switch is pressed

  • Door or fuel-filler lid cannot be locked/unlocked using remote transmitter

  • Trunk lid does not open even if using remote transmitter

Possible Causes

  • Trunk lid opener switch malfunction

  • Trunk lid release actuator malfunction

  • Trunk lid latch switch malfunction

  • Open circuit in wiring harness between the following terminals:

    • BCM terminal 2S and trunk lid opener switch terminal A

    • LF control unit terminal A and request switch (RF) terminal D

    • LF control unit terminal C and request switch (LF) terminal D

    • Start stop unit terminal 1P and door lock link switch (driver’s side) terminal D

    • Start stop unit terminal 1AF and ground

    • Start stop unit terminal 2A and ground

    • Start stop unit terminal 2B and ground

  • Short to ground in wiring harness between start stop unit terminal 1P and door lock link switch (driver’s side) terminal D

  • Connector poor contact or terminal damage

  • Customer’s mis-operation or misunderstanding

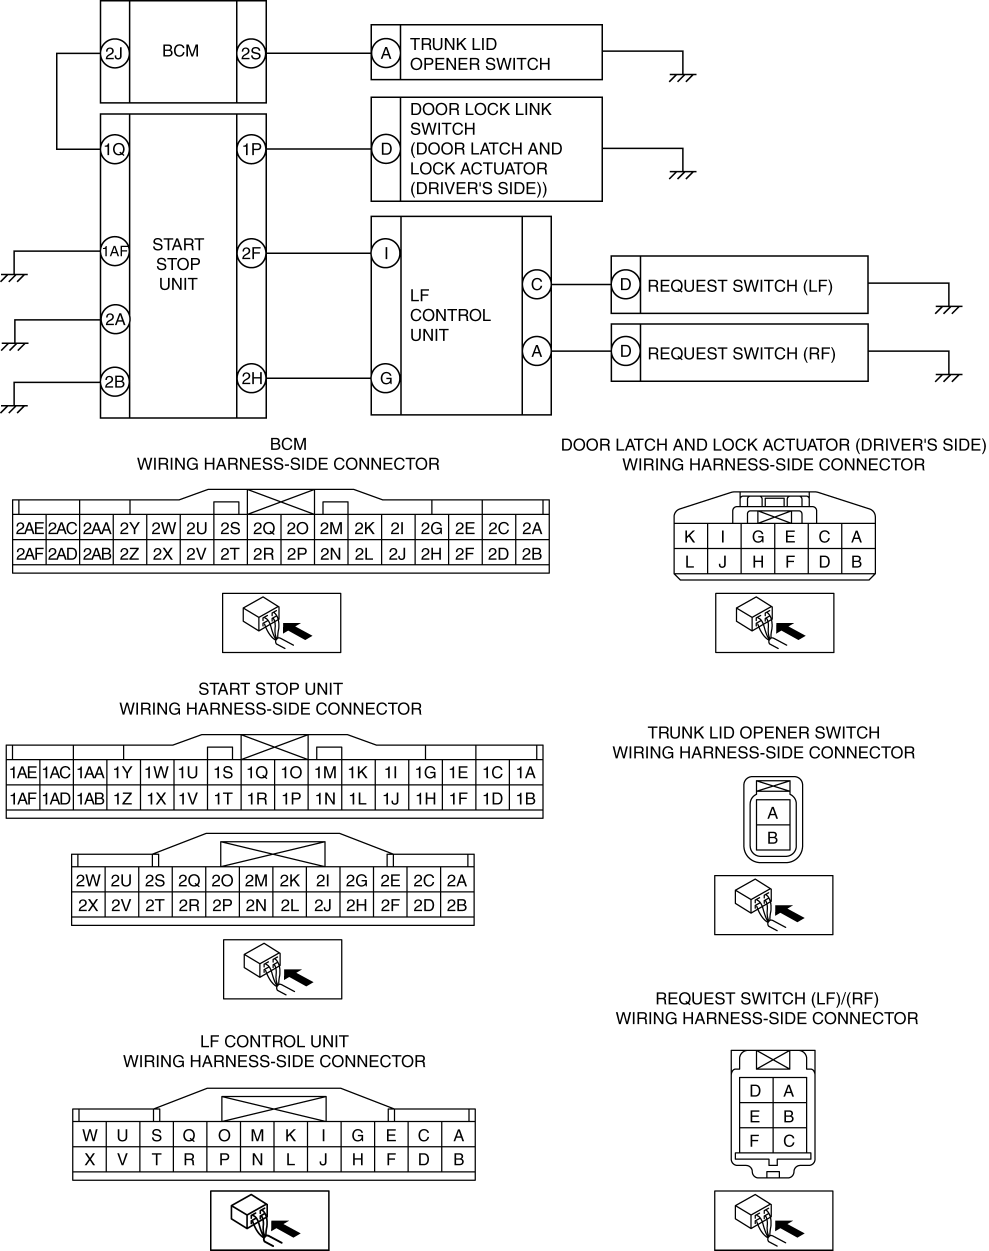
Diagnostic Procedure

Step

Inspection

Action

1

Yes

Troubleshooting completed.

(Explain the contents of the servicing to the customer.)

No

Go to the next step.

2

    VERIFY IF MALFUNCTION CAUSE IS OPERATION OTHER THAN OPERATION PERMISSION CONDITION

  • Verify the advanced keyless operation by operating each request switch and the trunk lid opener switch with all the following conditions met.

    • All doors and trunk lid closed

    • Ignition switched off

    • Remote transmitter is within reception area (80 cm radius from driver’s door, passenger’s door, and trunk lid)

  • Is the advanced keyless entry system operating normally?

Yes

System is normal.

(Explain to customer about operation range of advanced keyless entry system)

No

Go to the next step.

3

    VERIFY IF MALFUNCTION CAUSE IS EXTRINSIC NOISE

  • Ask the customer malfunction condition.

  • Does the malfunction occur at the specified place where extrinsic noise is received such as a TV tower, electric power station, or a broadcast station?

Yes

System is normal.

(Explain the customer that operation cannot be performed caused by extrinsic noise.)

No

Go to the next step.

4

    VERIFY MALFUNCTION SYMPTOM

  • Does the trunk lid open using the trunk lid opener switch operation?

Yes

Go to Step 7.

(The trunk lid latch system is normal.)

No

Go to the next step.

5

    INSPECT TRUNK LID OPENER SWITCH-RELATED WIRING HARNESS (OPEN CIRCUIT)

  • Disconnect the negative battery cable.

    (See NEGATIVE BATTERY CABLE DISCONNECTION/CONNECTION.)

  • Disconnect the BCM and trunk lid opener switch connector.

  • Inspect for continuity between the following terminals (vehicle wiring harness).

    • Trunk lid opener switch terminal A and BCM terminal 2S

  • Is there continuity?

Yes

Go to the next step.

No

  • Refer to the wiring diagram and verify if there is a common connector between the following terminals.

    • Trunk lid opener switch terminal A and BCM terminal 2S

      • If there is a common connector:

      • Inspect the common connector and terminals for corrosion, damage, or disconnection and the common wiring harnesses for an open circuit to determine the malfunctioning location.

      • Repair or replace the malfunctioning location.

        If there is no common connector:

      • Repair or replace the wiring harness which has an open circuit.

  • Go to Step 12.

6

Yes

NOTE:

  • A trunk lid release actuator or trunk lid latch switch malfunction can be considered.

Replace the trunk lid latch and release actuator, then go to Step 12.

(See TRUNK LID LATCH AND RELEASE ACTUATOR REMOVAL/INSTALLATION.)

No

Replace the trunk lid opener switch, then go to Step 12.

(See TRUNK LID OPENER SWITCH REMOVAL/INSTALLATION.)

7

    VERIFY MALFUNCTION SYMPTOM

  • Connect the negative battery cable.

    (See NEGATIVE BATTERY CABLE DISCONNECTION/CONNECTION.)

  • Verify the lock/unlock operation for all doors, fuel-filler lid and trunk lid using the request switch operation.

  • Is door or fuel-filler lid or trunk lid locked/unlocked?

Yes

Go to Step 12.

No

Go to the next step.

8

    INSPECT DOOR LOCK LINK SWITCH-RELATED WIRING HARNESS (OPEN CIRCUIT)

  • Disconnect the negative battery cable.

    (See NEGATIVE BATTERY CABLE DISCONNECTION/CONNECTION.)

  • Disconnect the start stop unit and the door latch and lock actuator (driver’s side) connector.

  • Inspect for continuity between the following terminals (vehicle wiring harness).

    • Start stop unit terminal 1P and door lock link switch terminal D

  • Is there continuity?

Yes

Go to the next step.

No

  • Refer to the wiring diagram and verify if there is a common connector between the following terminals.

    • Start stop unit terminal 1P and door lock link switch terminal D

      • If there is a common connector:

      • Inspect the common connector and terminals for corrosion, damage, or disconnection and the common wiring harnesses for an open circuit to determine the malfunctioning location.

      • Repair or replace the malfunctioning location.

        If there is no common connector:

      • Repair or replace the wiring harness which has an open circuit.

  • Go to Step 12.

9

    INSPECT DOOR LOCK LINK SWITCH-RELATED WIRING HARNESS (SHORT TO GROUND)

  • Verify that the start stop unit connector is disconnected.

  • Inspect for continuity between the following wiring harness terminals (vehicle wiring harness side) and body ground.

    • Start stop unit terminal 1P

  • Is there continuity?

Yes

  • Refer to the wiring diagram and verify if there is a common connector between the following terminals.

    • Start stop unit terminal 1P and door lock link switch terminal D

      • If there is a common connector:

      • Inspect the common connector and terminals for corrosion, damage, or disconnection and the common wiring harnesses for an short to ground to determine the malfunctioning location.

      • Repair or replace the malfunctioning location.

        If there is no common connector:

      • Repair or replace the wiring harness which has an short to ground.

  • Go to Step 12.

No

Go to the next step.

10

    INSPECT START STOP UNIT RELATED WIRING HARNESS (OPEN CIRCUIT)

  • Verify that the start stop unit connector is disconnected.

  • Inspect for continuity between the following terminals (vehicle wiring harness).

    • Start stop unit terminal 1AF and ground

    • Start stop unit terminal 2A and ground

    • Start stop unit terminal 2B and ground

  • Is there continuity?

Yes

Go to the next step.

No

  • Refer to the wiring diagram and verify if there is a common connector between the following terminals.

    • Start stop unit terminal 1AF and ground

    • Start stop unit terminal 2A and ground

    • Start stop unit terminal 2B and ground

      • If there is a common connector:

      • Inspect the common connector and terminals for corrosion, damage, or disconnection and the common wiring harnesses for an open circuit to determine the malfunctioning location.

      • Repair or replace the malfunctioning location.

        If there is no common connector:

      • Repair or replace the wiring harness which has an open circuit.

  • Go to Step 12.

11

    INSPECT REQUEST SWITCH RELATED WIRING HARNESS (OPEN CIRCUIT)

  • Disconnect the LF control unit and request switch connector.

  • Inspect for continuity between the following terminals (vehicle wiring harness).

    • Request switch (RF) terminal D and LF control unit terminal A

    • Request switch (LF) terminal D and LF control unit terminal C

  • Is there continuity?

Yes

Go to the next step.

No

  • Refer to the wiring diagram and verify if there is a common connector between the following terminals.

    • Request switch (RF) terminal D and LF control unit terminal A

    • Request switch (LF) terminal D and LF control unit terminal C

      • If there is a common connector:

      • Inspect the common connector and terminals for corrosion, damage, or disconnection and the common wiring harnesses for an open circuit to determine the malfunctioning location.

      • Repair or replace the malfunctioning location.

        If there is no common connector:

      • Repair or replace the wiring harness which has an open circuit.

  • Go to the next step.

12

    VERIFY IF MALFUNCTION CAUSE WAS CORRECTED

  • Does the advanced keyless entry system operate normally?

Yes

Troubleshooting completed.

(Explain the contents of the servicing to the customer.)

No

If the malfunction has not been resolved, repeat the inspection from Step 1.

< Previous Next >

© 2014 Mazda North American Operations, U.S.A.