FRONT OIL SEAL REPLACEMENT [SKYACTIV-G 2.0]
2016 – MX-5 – Engine
FRONT OIL SEAL REPLACEMENT [SKYACTIV-G 2.0]
WARNING:
-
A hot engine can cause severe burns. Turn off the engine and wait until it is cool before servicing.
1. Set aside the air hose and air cleaner cover as a single unit with the air flow sensor connector connected. (See INTAKE-AIR SYSTEM REMOVAL/INSTALLATION [SKYACTIV-G 2.0].)
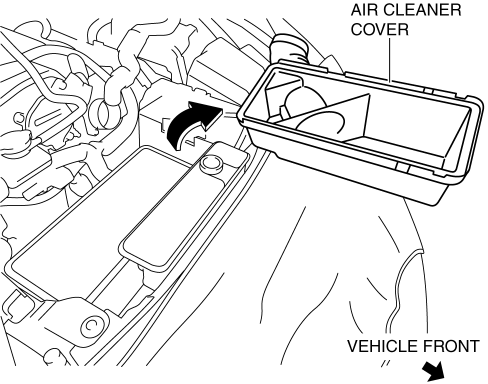
2. Remove the air cleaner case and resonance chamber No.1 as a single unit. (See INTAKE-AIR SYSTEM REMOVAL/INSTALLATION [SKYACTIV-G 2.0].)
3. Remove the drive belt. (See DRIVE BELT REMOVAL/INSTALLATION [SKYACTIV-G 2.0].)
4. Remove the air cleaner bracket, cooler pipe and the bracket securing the heater hose. (See INTAKE-AIR SYSTEM REMOVAL/INSTALLATION [SKYACTIV-G 2.0].)
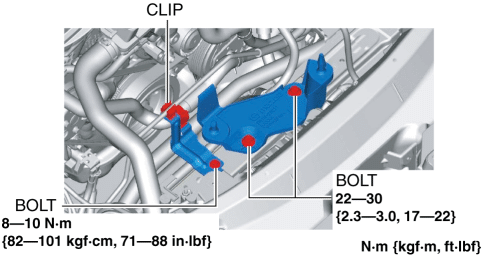
5. Disconnect the front stabilizer control link. (See FRONT STABILIZER REMOVAL/INSTALLATION.)
6. Remove the front stabilizer bracket installation nuts and set the front stabilizer aside. (See FRONT STABILIZER REMOVAL/INSTALLATION.)
7. Remove in the order indicated in the table.
8. Install in the reverse order of removal.
|
1 |
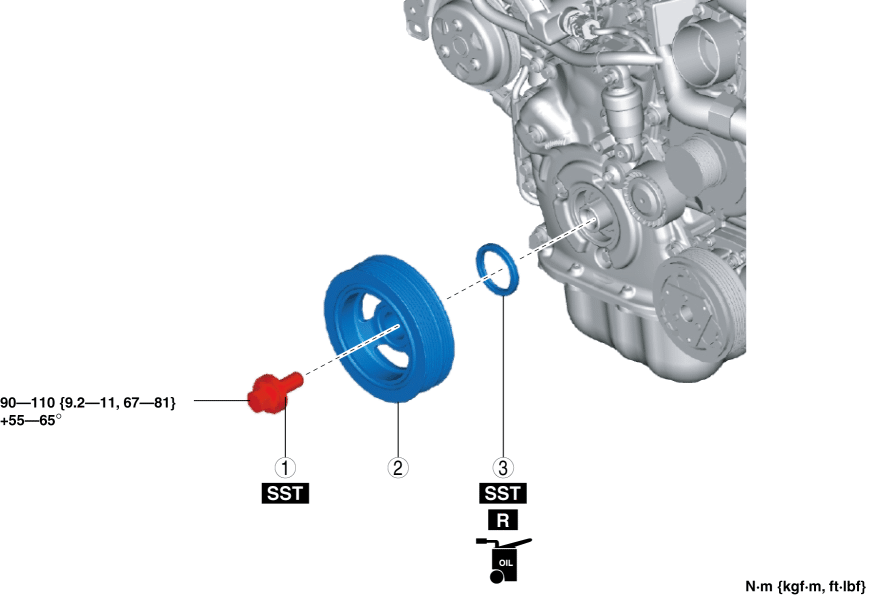
Crankshaft pulley lock bolt |
|
2 |
Crankshaft pulley |
|
3 |
Front oil seal (See Front Oil Seal Removal Note.) |
Crankshaft Pulley Lock Bolt Removal Note
CAUTION:
-
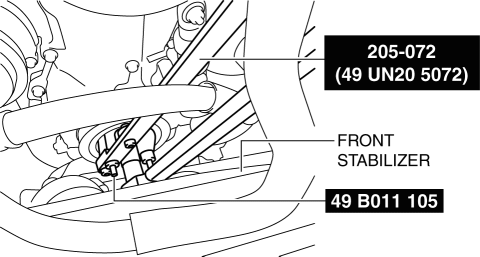
To prevent damage to the crankshaft pulley, protect the crankshaft pulley with a clean cloth so that the bar part (205-072) of the SST does not contact the crankshaft pulley.
-
To prevent damage to the engine front cover, be careful not to allow the tab part (49 B011 105) of the SST to get caught between the crankshaft pulley and the engine front cover.
1. Hold the crankshaft pulley using the SSTs.
2. Remove the crankshaft pulley lock bolt.
Front Oil Seal Removal Note
1. Remove the oil seal lip using a utility knife.
2. Using a screwdriver wrapped in a cloth, remove the front oil seal being careful not to damage the sealing surface.

Front Oil Seal Installation Note
1. Apply clean engine oil to the inner surface of a new front oil seal.
2. Insert the front oil seal into the engine front cover by hand.
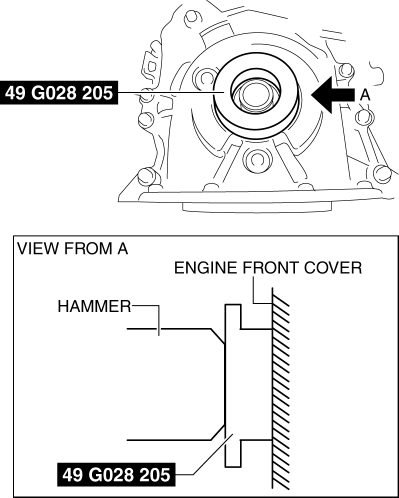
3. Tap the oil seal in evenly using the SST and a hammer.
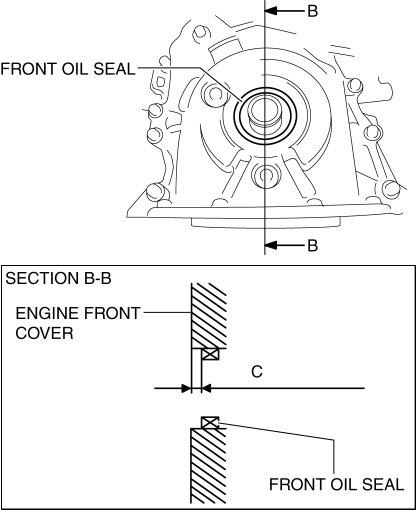
-
Front oil seal press on amount C
-
0???1.0 mm {0???0.039 in} from engine front cover
Crankshaft Pulley Lock Bolt Installation Note
CAUTION:
-
To prevent damage to the crankshaft pulley, protect the crankshaft pulley with a clean cloth so that the bar part (205-072) of the SST does not contact the crankshaft pulley.
-
To prevent damage to the engine front cover, be careful not to allow the tab part (49 B011 105) of the SST to get caught between the crankshaft pulley and the engine front cover.
1. Hold the crankshaft pulley using the SSTs.
2. Tighten the crankshaft pulley lock bolt in the order shown in the following two steps.
-
Tightening torque
-
Step 1: 90???110 N·m {9.2???11 kgf·m, 67???81 ft·lbf}
-
Step 2: 55???65°