CYLINDER HEAD GASKET REPLACEMENT [SKYACTIV-G 2.0]
2016 – MX-5 – Engine
CYLINDER HEAD GASKET REPLACEMENT [SKYACTIV-G 2.0]
WARNING:
-
A hot engine can cause severe burns. Turn off the engine and wait until it is cool before servicing.
-
Fuel vapor is hazardous. It can very easily ignite, causing serious injury and damage. Always keep sparks and flames away from fuel.
-
Highly pressurized fuel may spray out if the fuel line is cut.
Due to the following dangers occurring with a fuel spray, always complete the “Fuel Line Safety Procedure” to prevent the fuel from spraying.
-
Fuel may cause irritation if it comes in contact with skin and eyes.
-
If fuel ignites and causes a fire, it may lead to serious injury or death, and damage to property and facilities.
CAUTION:
-
If the camshaft is rotated with the timing chain removed and the piston at the top dead center position, the valve may contact the piston and the engine could be damaged. When rotating the camshaft with the timing chain removed, rotate it after lowering the piston from the top dead center position.
1. Disconnect the negative battery cable. (See NEGATIVE BATTERY CABLE DISCONNECTION/CONNECTION.)
2. Remove the seal cover. (See SEAL COVER REMOVAL/INSTALLATION [SKYACTIV-G 2.0].)
3. Remove the ignition coil/ion sensors. (See IGNITION COIL/ION SENSOR REMOVAL/INSTALLATION [SKYACTIV-G 2.0].)
4. Remove the air cleaner, air hose and resonance chamber No.1 as a single unit. (See INTAKE-AIR SYSTEM REMOVAL/INSTALLATION [SKYACTIV-G 2.0].)
5. Remove the drive belt. (See DRIVE BELT REMOVAL/INSTALLATION [SKYACTIV-G 2.0].)
6. Remove the front crossmember under cover. (See FRONT CROSSMEMBER UNDER COVER REMOVAL/INSTALLATION.)
7. Drain the engine oil. (See ENGINE OIL REPLACEMENT [SKYACTIV-G 2.0].)
8. Drain the engine coolant. (See ENGINE COOLANT REPLACEMENT [SKYACTIV-G 2.0].)
9. Remove the intake manifold. (See INTAKE-AIR SYSTEM REMOVAL/INSTALLATION [SKYACTIV-G 2.0].)
10. Set aside the exhaust manifold to the vehicle rear. (See EXHAUST SYSTEM REMOVAL/INSTALLATION [SKYACTIV-G 2.0].)
11. Remove the high pressure fuel pump and rear housing. (See HIGH PRESSURE FUEL PUMP REMOVAL/INSTALLATION [SKYACTIV-G 2.0].)
12. Remove the oil pan. (See OIL PAN REMOVAL/INSTALLATION [SKYACTIV-G 2.0].)
13. Remove the timing chain and chain guide. (See TIMING CHAIN REMOVAL/INSTALLATION [SKYACTIV-G 2.0].)
14. Remove the OCV. (See OIL CONTROL VALVE (OCV) REMOVAL/INSTALLATION [SKYACTIV-G 2.0].)
15. Remove in the order indicated in the table.
16. Install in the reverse order of removal.
17. Refill with the specified type and amount of the engine oil. (See ENGINE OIL REPLACEMENT [SKYACTIV-G 2.0].)
18. Refill the engine coolant. (See ENGINE COOLANT REPLACEMENT [SKYACTIV-G 2.0].)
19. Start the engine, and inspect and adjust the following:
-
Leakage of engine oil, engine coolant.
-
Runout and contact of pulley and belt.
-
Ignition timing, idle speed and idle mixture. (See ENGINE TUNE-UP [SKYACTIV-G 2.0].)
-
Compression pressure (See COMPRESSION INSPECTION [SKYACTIV-G 2.0].)
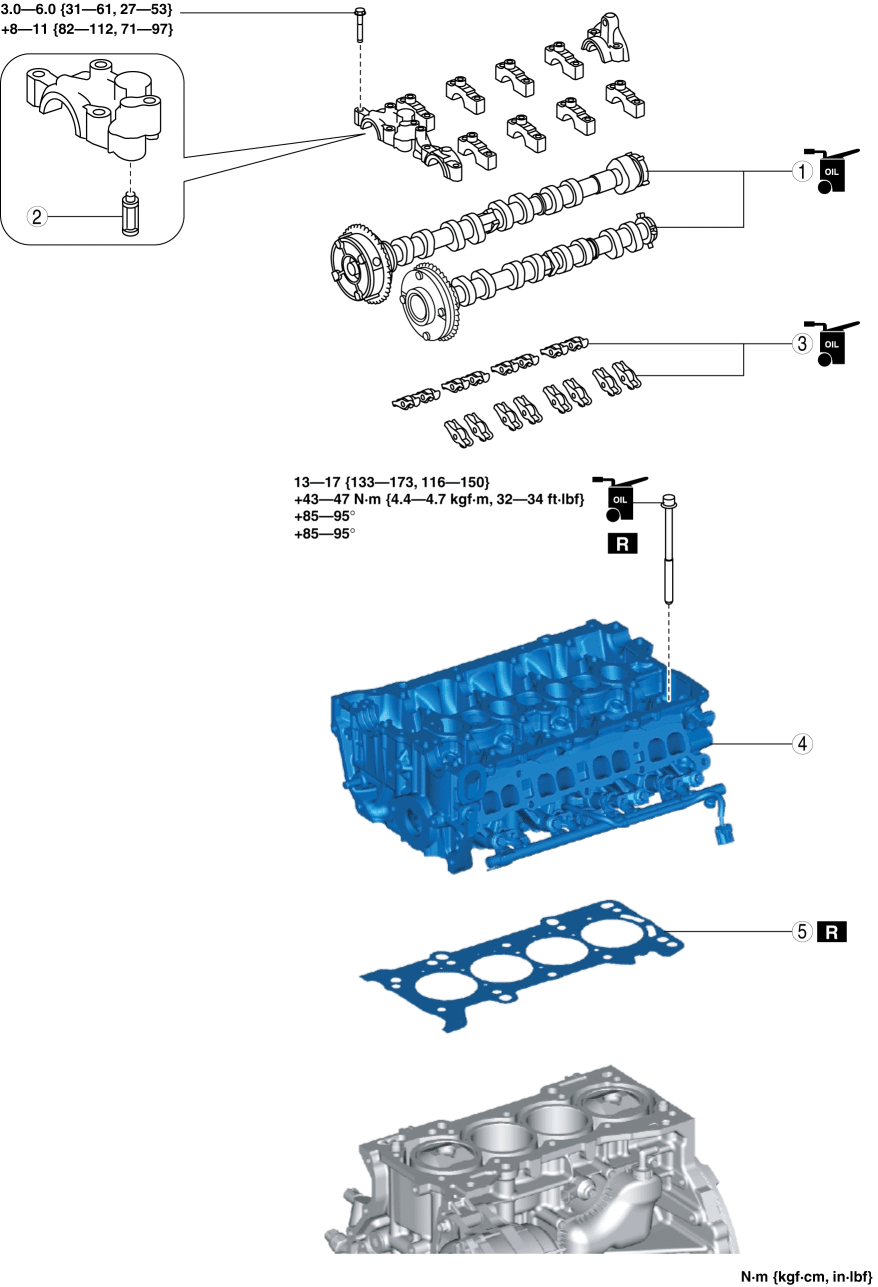
|
1 |
Camshaft (See Camshaft Removal Note.) (See Camshaft Installation Note.) |
|
2 |
OCV oil filter |
|
3 |
Rocker arm (See Rocker Arm Removal Note.) (See Rocker Arm Installation Note.) |
|
4 |
Cylinder head (See Cylinder Head Removal Note.) |
|
5 |
Cylinder head gasket |
Camshaft Removal Note
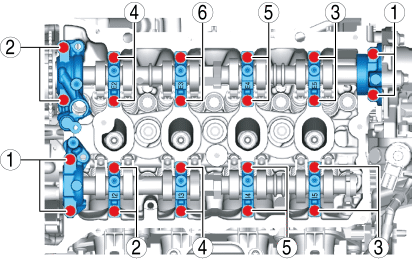
1. Loosen the camshaft cap installation bolts in a few passes in the order shown in the figure and remove the camshaft caps.
Rocker Arm Removal Note
1. Keep the rocker arms in the order of removal to enable reassembly in their original positions.
Cylinder Head Removal Note
1. Loosen the cylinder head installation bolts in two or three passes in the order shown in the figure and remove them.
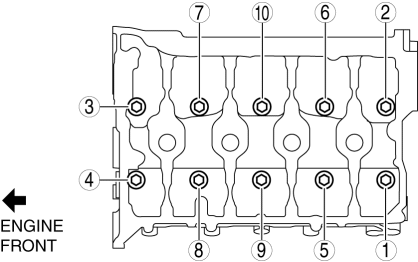
Cylinder Head Installation Note
1. Tighten the new cylinder head bolts in the order shown in the following 4 steps.
-
Tightening torque
-
Step 1: 13—17 N·m {133—173 kgf·cm, 116—150 in·lbf}
-
Step 2: 43—47 N·m {4.4—4.7 kgf·m, 32—34 ft·lbf}
-
Step 3: 85—95°
-
Step 4: 85—95°
Rocker Arm Installation Note
1. Apply engine oil to the HLAs and the end of the valve stems.
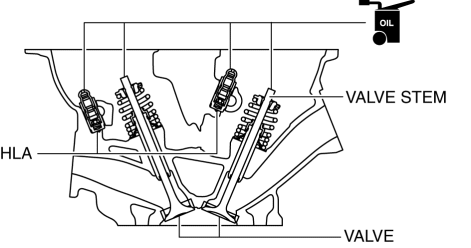
2. Install the rocker arms to the same positions as before removal.
Camshaft Installation Note
1. Apply SAE 90 gear oil or equivalent, or engine oil to the positions shown in the figure.
CAUTION:
-
Apply 0.05 ml {0.05 cc, 0.003 in3} or less of oil to area A in the figure.

2. Apply SAE 90 gear oil or equivalent, or engine oil to the following locations of each camshaft.
-
Thrust surface of front journal (both surfaces front and back)
CAUTION:
-
Be careful not to let oil adheres the engine front cover installation surface. If oil adheres to the engine front cover installation surface, a sealing malfunction may occur when the engine front cover is installed.
-
If oil adheres to the engine front cover installation surface, remove any oil completely.
NOTE:
-
If oil is applied to the front camshaft cap, oil should not be applied to the thrust surface of the front journal.
3. Install the camshaft with the timing chain alignment marks aligned as shown in the figure.

4. Apply SAE 90 gear oil or equivalent, or engine oil to the central area of each journal on the camshaft.

5. Apply SAE 90 gear oil or equivalent, or engine oil to the thrust surface of the front camshaft cap.
CAUTION:
-
Be careful not to let oil adheres the engine front cover installation surface. If oil adheres to the engine front cover installation surface, a sealing malfunction may occur when the engine front cover is installed.
-
If oil adheres to the engine front cover installation surface, remove any oil completely.
NOTE:
-
If oil is applied to the front journal thrust surface of each camshaft, oil should not be applied to the front camshaft cap.
6. Apply sealant (Loctite #962T or equivalent) to the rear camshaft cap installation area on the exhaust side or the rear camshaft caps on the exhaust side of the cylinder head.
NOTE:
-
To prevent engine oil leakage, apply sealant to the rear camshaft cap installation area on the exhaust side or the rear camshaft caps on the exhaust side of the cylinder head, and seal the journal.
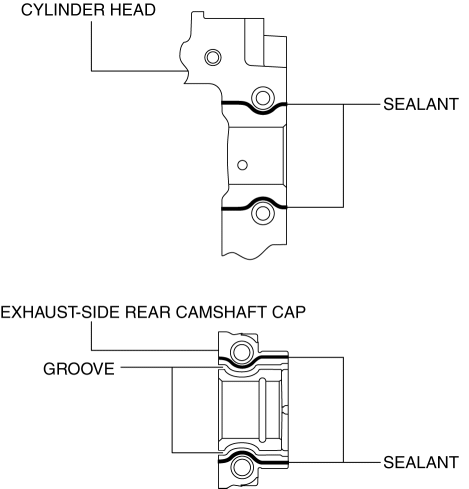
CAUTION:
-
Do not spill sealant on the journal.
-
Sealant bead width
-
1—3 mm {0.04—0.11 in}
7. Install the camshaft caps in the order of the marked numbers, and temporarily tighten the camshaft cap installation bolts evenly in 2—3 rounds.
8. Tighten the camshaft cap installation bolts in two steps in the order shown in the figure.
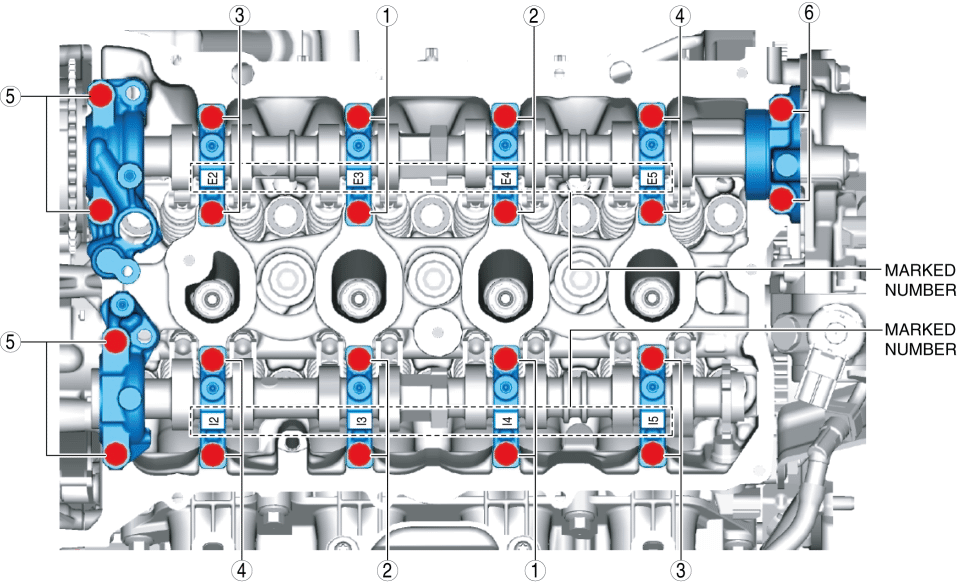
-
Tightening torque
-
Step 1: 3.0—6.0 N·m {31—61 kgf·cm, 27—53 in·lbf}
-
Step 2: 8—11 N·m {82—112 kgf·cm, 71—97 in·lbf}