HEADLINER REMOVAL/INSTALLATION [(US)]
HEADLINER REMOVAL/INSTALLATION [(US)]
SM2566413
id0917008016x1
1.Position the front seat back to the fully reclined position and slide the front seat to its furthest rearward position.
2.Disconnect the negative battery terminal. (See NEGATIVE BATTERY TERMINAL DISCONNECTION/CONNECTION [(US)].)
3.Remove the following parts:
- (1)Front map light (See FRONT MAP LIGHT REMOVAL/INSTALLATION [(US)].)
- (2)Sunvisor (See SUNVISOR REMOVAL/INSTALLATION.)
- (3)Assist handle (See ASSIST HANDLE REMOVAL/INSTALLATION.)
- (4)A-pillar trim (See A-PILLAR TRIM REMOVAL/INSTALLATION.)
- (5)Front seat belt lower anchor (See FRONT SEAT BELT REMOVAL/INSTALLATION.)
- (6)B-pillar upper trim (See B-PILLAR UPPER TRIM REMOVAL/INSTALLATION.)
- (7)Rear package tray (5HB) (See REAR PACKAGE TRAY REMOVAL/INSTALLATION.)
- (8)Trunk side upper trim (5HB) (See TRUNK SIDE UPPER TRIM REMOVAL/INSTALLATION.)
- (9)C-pillar trim (See C-PILLAR TRIM REMOVAL/INSTALLATION.)
- (10)Shift lever knob (MTX) (See SHIFT LEVER REMOVAL/INSTALLATION [C66M-R].)
- (11)Selector lever knob (ATX) (See SELECTOR LEVER COMPONENT REMOVAL/INSTALLATION.)
- (12)Shift panel (See SHIFT PANEL REMOVAL/INSTALLATION.)
- (13)Front console box (See FRONT CONSOLE BOX REMOVAL/INSTALLATION.)
- (14)Cup holder (See CUP HOLDER REMOVAL/INSTALLATION.)
- (15)Side wall (See SIDE WALL REMOVAL/INSTALLATION.)
- (16)Rear console (See REAR CONSOLE REMOVAL/INSTALLATION [(US)].)
- (17)Rear console bracket No.1 (See REAR CONSOLE REMOVAL/INSTALLATION [(US)].)
4.Remove the shift lever nuts and set the shift lever aside to the front passenger-side to rotate the headliner in the vehicle. (MTX) (See SHIFT LEVER REMOVAL/INSTALLATION [C66M-R].)
5.Remove the selector lever nuts and set the selector lever aside to the front passenger-side to rotate the headliner in the vehicle. (ATX) (See SELECTOR LEVER COMPONENT REMOVAL/INSTALLATION.)
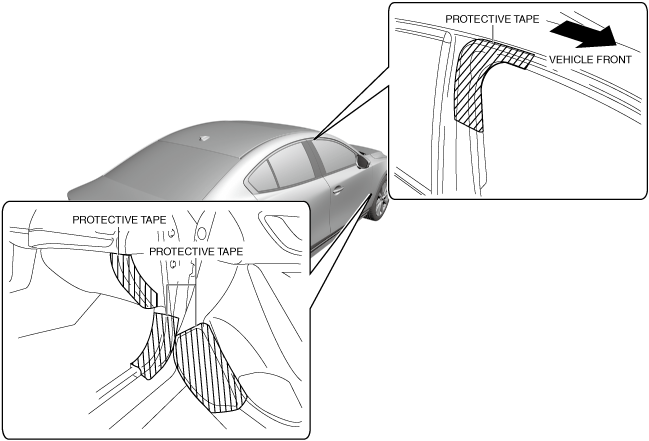
6.Affix protective tape to the position shown in the figure.
am3zzw00021807
|
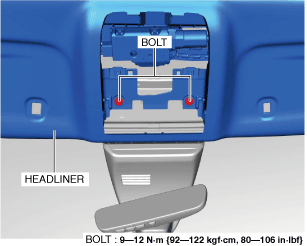
7.Remove the bolts.
am3zzw00022750
|
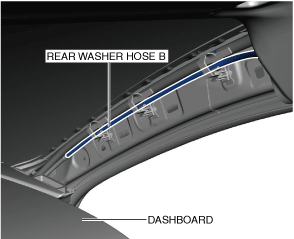
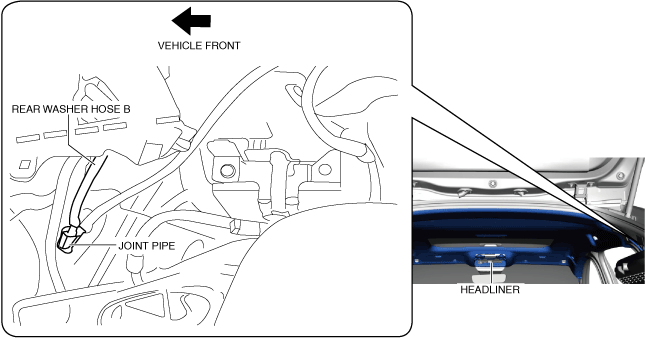
8.Disconnect rear washer hose B. (5HB)
am3zzw00022751
|
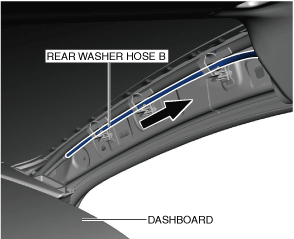
9.Pull the rear washer hose B in the direction of the arrow shown in the figure and pull them out. (5HB)
am3zzw00022752
|
10.Disconnect rear washer hose B from the joint pipe. (5HB)
am3zzw00022753
|
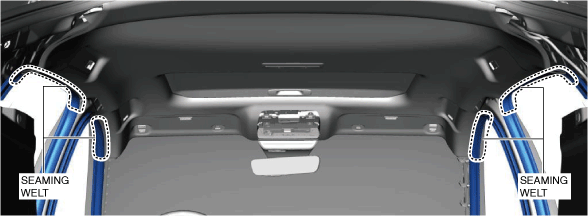
11.Temporarily install the seaming welts shown in the figure to the headliner.
-
Caution
-
• If the clips are detached without temporarily installing the seaming welts, the headliner may fall off and the part may be damaged. Before detaching the clips, temporarily install the seaming welts to prevent the headliner from falling off.
am3zzw00021809
|
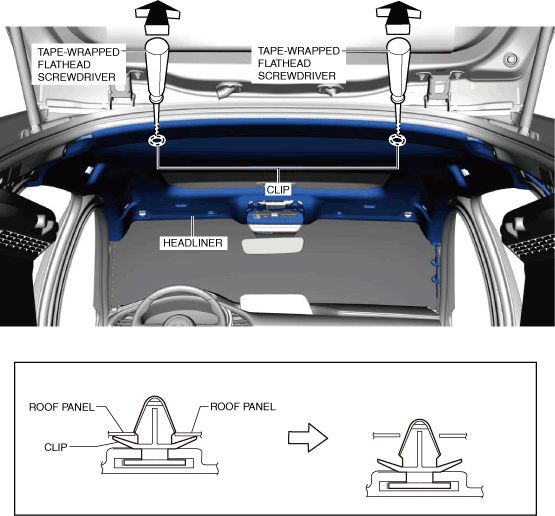
12.Insert a tape-wrapped flathead screwdriver into the position shown in the figure, move it in the direction of the arrow, and detach the clips. (5HB)
am3zzw00021810
|
13.Slide the headliner in the direction of the arrow shown in the figure and remove the clips from the headliner. (4SD)
am3zzw00029147
|
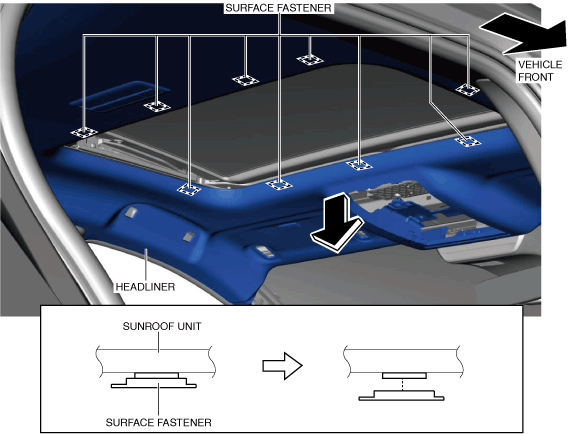
14.Move the headliner in the direction of the arrow shown in the figure and detach the surface fasteners from the sunroof unit. (with sunroof system)
am3zzw00029148
|
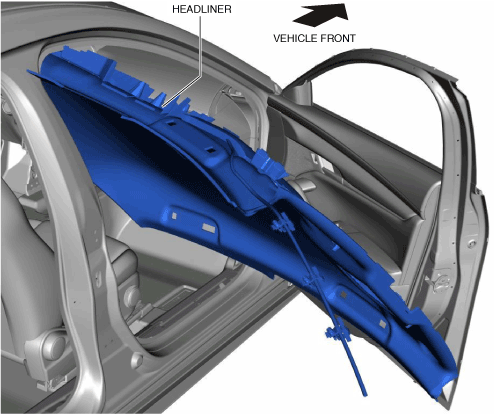
15.Partially peel back the seaming welts and take the headliner out from the opened passenger-side door.
am3zzw00021812
|
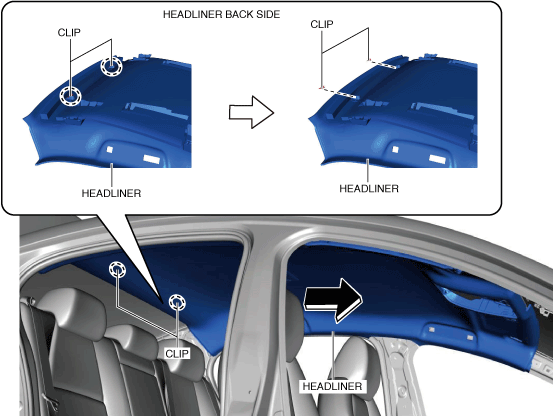
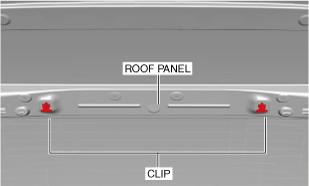
16.Remove the clips from the roof panel. (4SD)
am3zzw00029149
|
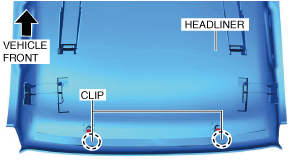
17.Install the clip removed in Step 16 to the headliner. (4SD)
am3zzw00029150
|
18.Install in the reverse order of removal. (See Headliner Installation Note.)
-
Note
-
• When replacing the headliner, remove the rear washer hose B. (5HB) (See REAR WASHER HOSE REMOVAL/INSTALLATION [(US)].)• When replacing the headliner, remove the vanity mirror illumination. (See VANITY MIRROR ILLUMINATION REMOVAL/INSTALLATION.)
Headliner Installation Note
1.Set the wiring harness to the position shown in the figure so that it does not get caught between the roof panel and the headliner.
am3zzw00027671
|
