FRONT SEAT BACK TRIM REMOVAL/INSTALLATION [(US)]
FRONT SEAT BACK TRIM REMOVAL/INSTALLATION [(US)]
SM2566401
id0913009120x1
Replacement part
|
Band
Quantity: With power seat system (6)
Without power seat system (4)
Location of use: Front seat cushion frame
|
-
Warning
-
• Handling a seat equipped with a side air bag improperly can accidentally operate (deploy) the air bag, which may seriously injure you. Read the service warnings/cautions in the Workshop Manual before handling a front seat equipped with a side air bag. (See AIR BAG SYSTEM SERVICE WARNINGS [TWO-STEP DEPLOYMENT CONTROL SYSTEM – US/CANADA SPEC.].) (See AIR BAG SYSTEM SERVICE CAUTIONS [TWO-STEP DEPLOYMENT CONTROL SYSTEM – US/CANADA SPEC.].) (See AIR BAG SYSTEM SERVICE WARNINGS [STANDARD DEPLOYMENT CONTROL SYSTEM – MEXICO SPEC.].) (See AIR BAG SYSTEM SERVICE CAUTIONS [STANDARD DEPLOYMENT CONTROL SYSTEM – MEXICO SPEC.].)• If the sliding mechanisms on both sides are not locked after assembling the front seat, it may move unexpectedly while the vehicle is driven, which could result in serious injury. After assembling the front seat, try moving it back and forth to verify that the sliding mechanism on both sides are locked. (Manual seat)
-
Caution
-
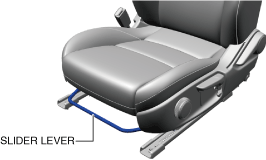
• After the front seat has been removed, if the slider lever is operated and the front seat is reinstalled with the left/right slide positions deviated, the adjuster unit could be damaged. After removing a front seat, do not operate the slider lever. (Manual seat)
 am3zzw00036671• Verify that there are no malfunctions in the forward/back slide of the seat and in the adjuster unit after installing a front seat.• When performing the procedure with a front seat removed from the vehicle, perform the procedure on a clean cloth so as not to damage or soil the seat.• When the passenger’s seat is removed, perform the seat weight sensor inspection using the M-MDS after installing the passenger’s seat. (See SEAT WEIGHT SENSOR INSPECTION [TWO-STEP DEPLOYMENT CONTROL SYSTEM – US/CANADA SPEC.].)• When the passenger’s seat is replaced with a new one, perform the seat weight sensor calibration using the M-MDS. (See SEAT WEIGHT SENSOR CALIBRATION [TWO-STEP DEPLOYMENT CONTROL SYSTEM – US/CANADA SPEC.].)
1.Remove the front seat belt lower anchor. (See FRONT SEAT BELT REMOVAL/INSTALLATION.)
2.Remove the front seat installation bolts. (See FRONT SEAT REMOVAL/INSTALLATION [(US)].)
3.Switch the ignition off.
4.Disconnect the negative battery terminal and wait for 1 min or more. (See NEGATIVE BATTERY TERMINAL DISCONNECTION/CONNECTION [(US)].)
5.Remove the front seat. (See FRONT SEAT REMOVAL/INSTALLATION [(US)].)
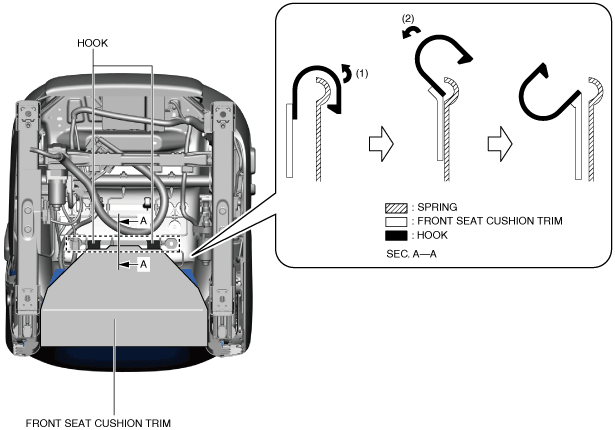
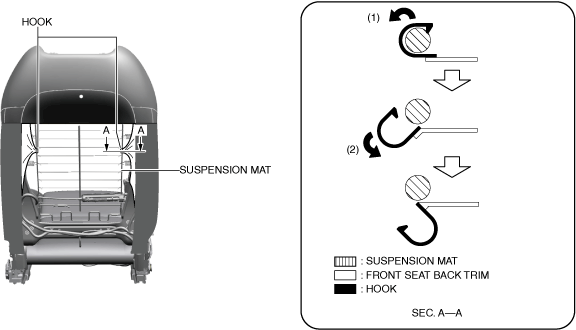
6.Move the hooks in the order of arrows (1) and (2) shown in the figure to detach the hooks from the springs.
am3zzw00036766
|
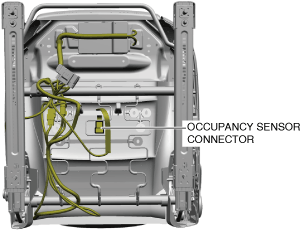
7.Disconnect the occupancy sensor connector. (Passenger’s side) (With standard deployment system, Mexico spec.)
am3zzw00036708
|
8.Disconnect the connectors at the positions shown in the figure.
am3zzw00036709
|

9.Move the seat warmer connectors in the order of arrows (1) and (2) shown in the figure and remove the connectors.
10.Remove the wiring harness clips.
11.Cut the bands.
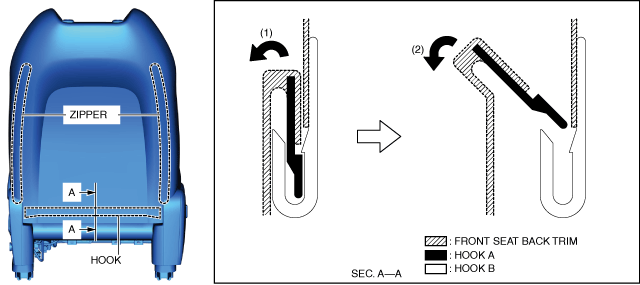
12.Move hooks A in the order of arrows (1) and (2) shown in the figure to detach hooks A from hooks B. (See Front Seat Back Installation Note.)
am3zzw00036672
|
13.Unzip the zippers.
-
Caution
-
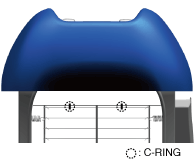
• If a C-ring is damaged when removing or installing the front seat cushion trim and the front seat cushion frame, it may not be possible to correctly install the front seat cushion trim and the front seat cushion frame. When removing or installing the front seat cushion trim and the front seat cushion frame, be careful not to damage the C-rings.• If a C-ring is damaged, replace it with a new one.
14.Remove the C-rings at the positions shown in the figure.
am3zzw00036673
|
15.Move the hooks in the order of arrows (1) and (2) shown in the figure to detach the hooks from the suspension mat.
am3zzw00036674
|
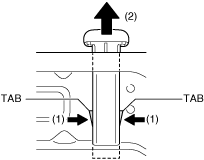
16.While pressing the pole guide tabs in the directions of arrows (1) shown in the figure, pull the pole guide in the direction of arrow (2) and remove it from the front seat back frame.
am3zzw00036675
|
17.Remove the nut.
am3zzw00036676
|
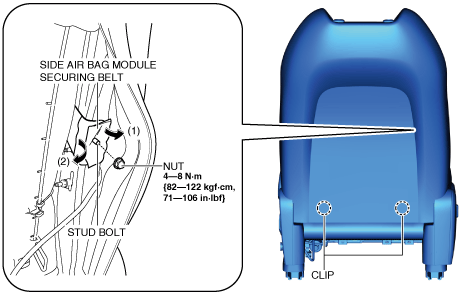
18.Pull the side air bag module securing belt in the directions of arrows (1) and (2) shown in the figure and remove it from the front seat back frame stud bolt.
19.Remove the clips.
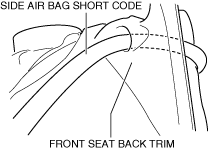
20.Pull out the side air bag short cord.
am3zzw00036677
|
21.Pull out the front seat back pad, front seat back trim, and front seat back warmer wiring harness (With seat warmer system) towards the front of the front seat.
am3zzw00036678
|
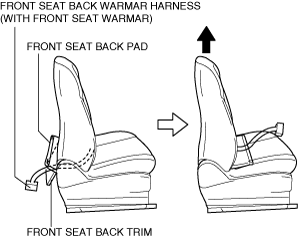
22.Lift up the front seat back trim and the front seat back pad as a single unit and remove them from the front seat back frame.
-
Caution
-
• If a C-ring is damaged when removing or installing the front seat back trim and the front seat back pad, it may not be possible to correctly install the front seat back trim and the front seat back pad. When removing or installing the front seat back trim and the front seat back pad, be careful not to damage the C-rings.• If a C-ring is damaged, replace it with a new one.
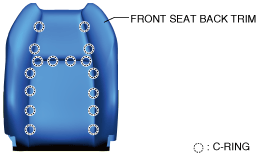
23.Remove the C-rings at the positions shown in the figure and remove the front seat back trim from the front seat back pad. (See Front Seat Back Trim Installation Note.)
am3zzw00036679
|
-
Note
-
• The positions and number of C-rings differ depending on the type of seat.
24.Install in the reverse order of removal.
Front Seat Back Trim Installation Note
-
Caution
-
• If a C-ring is damaged when removing or installing the front seat back trim and the front seat back pad, it may not be possible to correctly install the front seat back trim and the front seat back pad. When removing or installing the front seat back trim and the front seat back pad, be careful not to damage the C-rings.• If a C-ring is damaged, replace it with a new one.
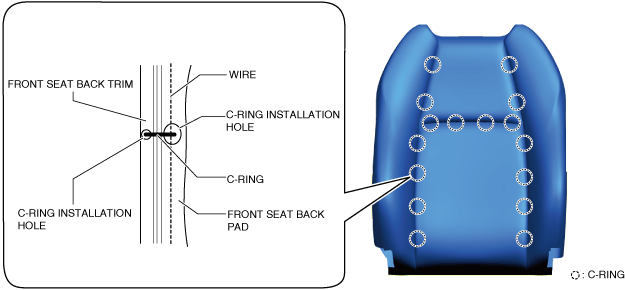
1.Align the C-ring installation holes of the front seat back trim with the C-ring installation holes of the front seat back pad and install the C-rings to the positions shown in the figure.
am3zzw00036680
|
-
Note
-
• Wrinkling can be easily prevented by installing the C-rings with a certain amount of tightening.am3zzw00036681• The positions and number of C-rings differ depending on the type of seat.
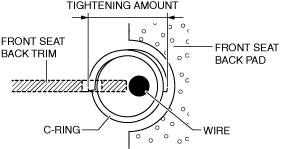
2.Press the front seat back pad inward while pulling the front seat back trim outward.
am3zzw00036682
|
Front Seat Back Installation Note
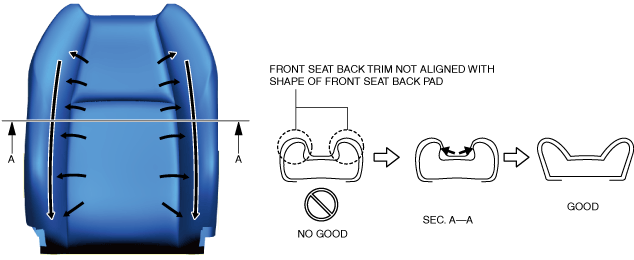
1.Align the front seat back trim with the shape of the front seat back pad while pressing the front seat back pad outward.
am3zzw00036683
|
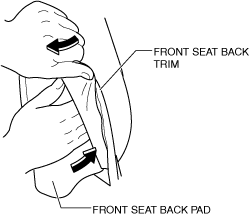
2.Pull the front seat back trim in the direction of the arrow shown in the figure and remove the wrinkles from the front seat back trim surface.
am3zzw00036684
|
