REAR SEAT BELT REMOVAL/INSTALLATION [(US)]
REAR SEAT BELT REMOVAL/INSTALLATION [(US)]
SM2566307
id0811008008x1
4SD
-
Caution
-
• If the retractor is disassembled, it will not operate correctly due to looseness and excessive play of the internal parts, therefore, do not disassemble the retractor.
1.Switch the ignition off.
2.Disconnect the negative battery terminal and wait for 1 min or more. (See NEGATIVE BATTERY TERMINAL DISCONNECTION/CONNECTION [(US)].)
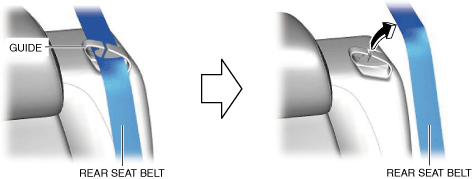
3.Remove the rear seat belt from the guide.
am3zzw00021591
|
4.Remove the following parts:
- (1)Trunk covering (See TRUNK COVERING REMOVAL/INSTALLATION.)
- (2)Trunk board (See TRUNK BOARD REMOVAL/INSTALLATION [(US)].)
- (3)Trunk end trim (See TRUNK END TRIM REMOVAL/INSTALLATION.)
- (4)C-pillar trim (See C-PILLAR TRIM REMOVAL/INSTALLATION.)
- (5)Rear scuff plate (See REAR SCUFF PLATE REMOVAL/INSTALLATION.)
- (6)Rear seat cushion (See REAR SEAT CUSHION REMOVAL/INSTALLATION.)
- (7)Rear seat back (See REAR SEAT BACK REMOVAL/INSTALLATION.)
- (8)Tire house trim (See TIRE HOUSE TRIM REMOVAL/INSTALLATION.)
- (9)Rear package trim (See REAR PACKAGE TRIM REMOVAL/INSTALLATION.)
5.Remove the bolts.
am3zzw00021592
|
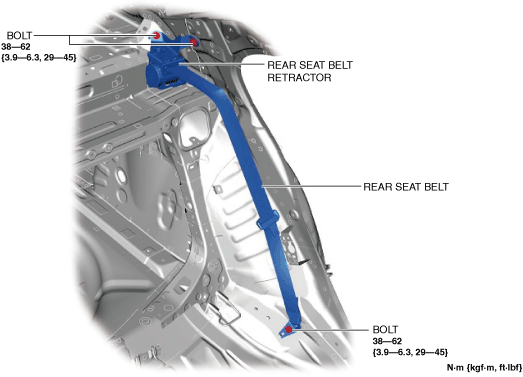
6.Remove the rear seat belt retractor.
7.Remove the rear seat belt.
8.Install in the reverse order of removal. (See Bolt installation note.)
Bolt installation note
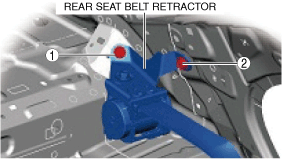
1.Tighten the bolts in the order shown in the figure.
am3zzw00034816
|
5HB
-
Caution
-
• If the retractor is disassembled, it will not operate correctly due to looseness and excessive play of the internal parts, therefore, do not disassemble the retractor.
1.Switch the ignition off.
2.Disconnect the negative battery terminal and wait for 1 min or more. (See NEGATIVE BATTERY TERMINAL DISCONNECTION/CONNECTION [(US)].)
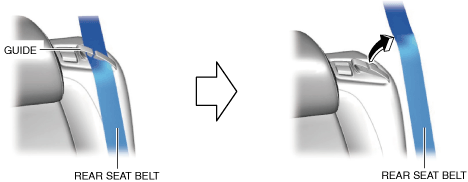
3.Remove the rear seat belt from the guide.
am3zzw00021593
|
4.Remove the following parts:
- (1)Rear package tray (See REAR PACKAGE TRAY REMOVAL/INSTALLATION.)
- (2)Trunk covering (See TRUNK COVERING REMOVAL/INSTALLATION.)
- (3)Trunk board (See TRUNK BOARD REMOVAL/INSTALLATION [(US)].)
- (4)Trunk end trim (See TRUNK END TRIM REMOVAL/INSTALLATION.)
- (5)Trunk side upper trim (See TRUNK SIDE UPPER TRIM REMOVAL/INSTALLATION.)
- (6)C-pillar trim (See C-PILLAR TRIM REMOVAL/INSTALLATION.)
- (7)Rear seat cushion (See REAR SEAT CUSHION REMOVAL/INSTALLATION.)
- (8)Rear seat back (See REAR SEAT BACK REMOVAL/INSTALLATION.)
5.Pull away the trunk side trim enough to secure a space for a hand to be inserted between body panel and trunk side trim. (See TRUNK SIDE TRIM REMOVAL/INSTALLATION [(US)].)
6.Remove the parking assist unit (ultrasonic) (rear seat belt (RH) (with parking assist unit (ultrasonic)). (See PARKING ASSIST UNIT (ULTRASONIC) REMOVAL/INSTALLATION.)
7.Detach the clip (with clip).
am3zzw00021594
|
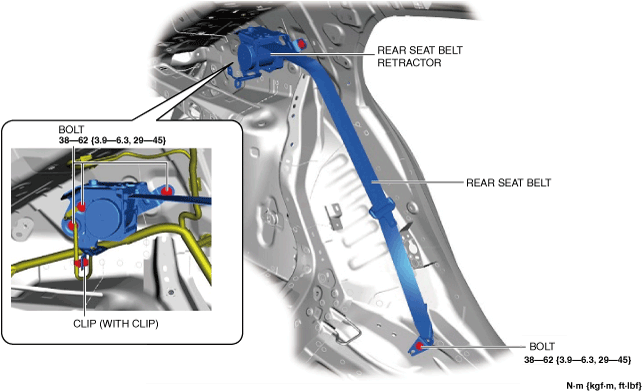
8.Remove the bolts.
9.Remove the rear seat belt retractor.
10.Remove the rear seat belt.
11.Install in the reverse order of removal. (See Bolt installation note.)
Bolt installation note
1.Tighten the bolts in the order shown in the figure.
am3zzw00034817
|
