ON/OFF SOLENOID REMOVAL/INSTALLATION [EV6A-EL, EV6AX-EL]
ON/OFF SOLENOID REMOVAL/INSTALLATION [EV6A-EL, EV6AX-EL]
SM2566189
id0517o3117100
Replacement Part
|
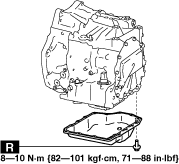
Bolt
Quantity: 16
Location of use: Oil pan
|
Oil and Chemical Type
|
Sealant
Type: TB1217E or equivalent
|
-
Warning
-
• A hot transaxle and ATF can cause severe burns. Turn off the engine and wait until they are cool.• Always wear protective eye wear when using the air compressor. If the air compressor is used, any particles of dirt or sludge could spatter and get into the eyes.
1.Disconnect the negative battery terminal. (See NEGATIVE BATTERY TERMINAL DISCONNECTION/CONNECTION [(US)].)
2.Remove the front under cover No.1. (See FRONT UNDER COVER No.1 REMOVAL/INSTALLATION.)
3.Remove the front under cover No.2. (See FRONT UNDER COVER No.2 REMOVAL/INSTALLATION.)
4.Clean the transaxle exterior throughout with a steam cleaner or cleaning solvents.
5.Drain the ATF. (See AUTOMATIC TRANSAXLE FLUID (ATF) REPLACEMENT [EV6A-EL, EV6AX-EL].)
6.Remove the oil pan.
7.Disconnect the ON/OFF solenoid connector.
-
Note
-
• Disconnect the ON/OFF solenoid connector by pressing the connector tab with your fingers.
ac5uuw00000202
|
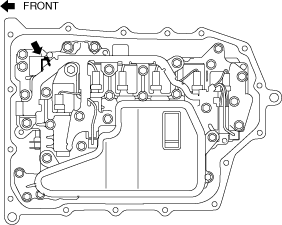
8.Remove the ON/OFF solenoid.
am3zzw00031535
|
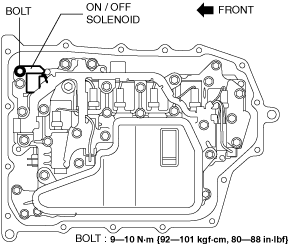
9.Install the ON/OFF solenoid.
am3zzw00031535
|
10.Connect the ON/OFF solenoid connector.
ac5uuw00000202
|
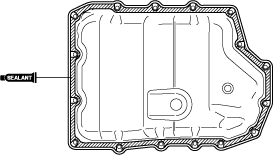
11.Apply a light coat of silicone sealant (TB1217E or equivalent) to the contact surfaces of the oil pan and transaxle case.
ac5uuw00000204
|
-
Caution
-
• Clean any remaining silicone sealant on the contact surface of the transaxle case and oil pan, and degrease the sealant area. Otherwise, oil could leak.
12.Install the oil pan with new bolts before the applied sealant starts to harden.
am3zzw00031536
|
13.Add the ATF. (See AUTOMATIC TRANSAXLE FLUID (ATF) REPLACEMENT [EV6A-EL, EV6AX-EL].)
14.Install the front under cover No.2. (See FRONT UNDER COVER No.2 REMOVAL/INSTALLATION.)
15.Install the front under cover No.1. (See FRONT UNDER COVER No.1 REMOVAL/INSTALLATION.)
16.Connect the negative battery terminal. (See NEGATIVE BATTERY TERMINAL DISCONNECTION/CONNECTION [(US)].)
17.Perform the “Mechanical System Test”. (See MECHANICAL SYSTEM TEST [EV6A-EL, EV6AX-EL].)