FRONT SHOCK ABSORBER AND COIL SPRING DISASSEMBLY/ASSEMBLY [(US)]
FRONT SHOCK ABSORBER AND COIL SPRING DISASSEMBLY/ASSEMBLY [(US)]
SM2565935
id0213001219x1
Special service tool (SST)
|
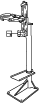
49 T034 1A0
Coil spring compressor set
|
 |
49 JP02 005
Piston rod nut wrench
|
 |
Replacement part
|
Piston rod nut
Quantity: 1
Location of use: Front shock absorber
|
Oil and Chemical Type
|
Rubber grease
Type: NIPPON GREASE RUBBER GREASE
|
-
Warning
-
• If the coil spring flies off while removing/installing the coil spring, it may cause serious injury or death, or vehicle damage. When removing/installing the coil spring, always use the SST and be careful not to allow the coil spring to fly off.
-
Caution
-
• If the cap is rotated, it could damage the tab inside of the cap. When removing the cap, pull it toward the upper side of the vehicle without rotating it and remove it.• Do not drive the vehicle for approx. 1 h after tightening the piston rod nut because the adhesive agent applied to the piston rod nut may not be hardened sufficiently.
1.Remove the wheel and tire. (See WHEEL AND TIRE REMOVAL/INSTALLATION.)
2.Remove the front shock absorber and steering knuckle component. (See WHEEL HUB, STEERING KNUCKLE REMOVAL/INSTALLATION.)
3.Remove the front shock absorber and coil spring. (See FRONT SHOCK ABSORBER AND COIL SPRING REMOVAL/INSTALLATION.)
4.Disassemble in the order shown in the figure.
5.Install in the reverse order of removal.
6.When any of the following parts is replaced, inspect the wheel alignment and adjust it if necessary. (See FRONT WHEEL ALIGNMENT [(US)].)
-
• Front shock absorber• Coil spring
am3zzw00027960
|
|
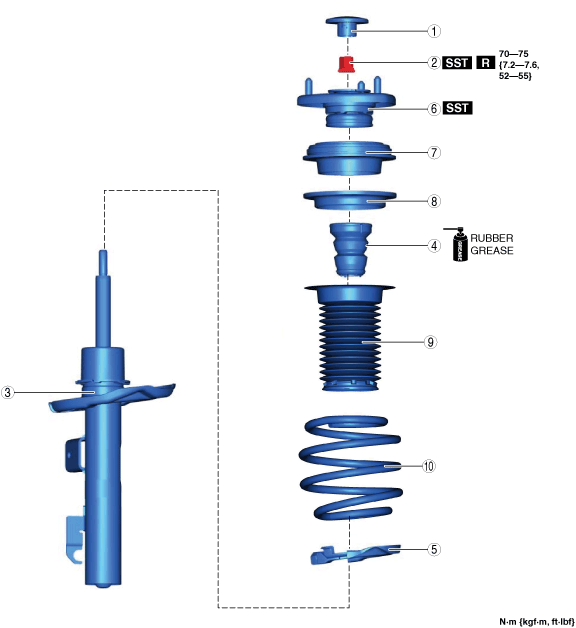
1
|
Cap
|
|
2
|
Piston rod nut
(See Piston Rod Nut Removal Note.)
|
|
3
|
Front shock absorber
|
|
4
|
Bump stopper
|
|
5
|
Lower spring seat
|
|
6
|
Mounting rubber
|
|
7
|
Bearing
|
|
8
|
Upper spring seat
|
|
9
|
Dust boots
|
|
10
|
Coil spring
|
Piston Rod Nut Removal Note
-
Warning
-
• When removing the piston rod nut, if the piston rod nut is removed before compressing the coil spring, the coil spring may fly off, which may cause serious injury or death, or vehicle damage. Set the front shock absorber and the coil spring to the SST (49 T034 1A0) first, then remove the piston rod nut.
1.Install the front shock absorber and coil spring to the SST (49 T034 1A0) using the following steps.
-
Caution
-
• The coil spring may be damaged when installing the coil spring to the SST (49 T034 1A0). Install the coil spring to the SST (49 T034 1A0) using a cloth so that the coil spring does not get damaged.
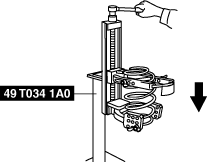
- (1)Set the attachments (tabs) of the SST (49 T034 1A0) to the position shown in the figure.
-
 am3zzw00023013
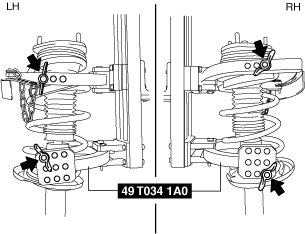
- (2)Install the front shock absorber and coil spring to the SST (49 T034 1A0) so that coil spring hooks onto the tabs in the positions shown in the figure.
-
am3zzw00023014

2.Compress the coil spring using the SST (49 T034 1A0).
3.Remove the piston rod nut using the SST (49 JP02 005).
am3zzw00026265
|

Coil Spring Installation Note
1.Install the front coil spring to the SST (49 T034 1A0) with the mark facing the vehicle lower side.
am3zzw00024751
|

2.Compress the coil spring using the SST (49 T034 1A0).
ac5uuw00000123
|
3.Align the bottom edge of the coil spring with the stepped part of the lower spring seat, and install the shock absorber.
Mounting Rubber Installation Note
1.Install the mounting rubber so that the mounting rubber stud and the front shock absorber bracket are in position A shown in the figure.
am3zzw00027645
|
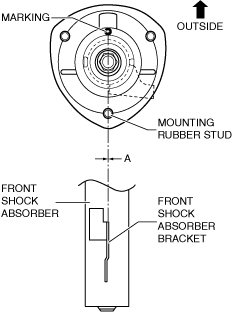
-
A: 0°±5°
-
Note
-
• Assemble the mounting rubber so that the marking faces the outside of the vehicle.