OIL PAN REMOVAL/INSTALLATION [SKYACTIV-G (WITHOUT CYLINDER DEACTIVATION (US))]
OIL PAN REMOVAL/INSTALLATION [SKYACTIV-G (WITHOUT CYLINDER DEACTIVATION (US))]
SM2565656
id0111u0800200
Oil and Chemical Type
|
Silicone sealant
Type:TB1217D or equivalent
|
-
Warning
-
• Hot engines and engine oil can cause severe burns. Turn off the engine and wait until it and the engine oil have cooled.• A vehicle that is lifted but not securely supported on safety stands is dangerous. It can slip or fall, causing death or serious injury. Never work around or under a lifted vehicle if it is not securely supported on safety stands.• Continuous exposure to USED engine oil has caused skin cancer in laboratory mice. Protect your skin by washing with soap and water immediately after working with engine oil.
-
Caution
-
• When installing the oil pan, refer to the Oil Pan Installation Note and apply the silicone sealant correctly. If the silicone sealant application position is incorrect or there is any break in the application track, engine oil leakage will occur due to a poor seal.
1.Disconnect the negative battery terminal. (See NEGATIVE BATTERY TERMINAL DISCONNECTION/CONNECTION [(US)].)
2.Remove the front under cover No.2. (See FRONT UNDER COVER No.2 REMOVAL/INSTALLATION.)
3.Remove the front splash shield (RH). (See SPLASH SHIELD REMOVAL/INSTALLATION.)
4.Drain the engine oil. (See ENGINE OIL REPLACEMENT [SKYACTIV-G (WITHOUT CYLINDER DEACTIVATION (US))].)
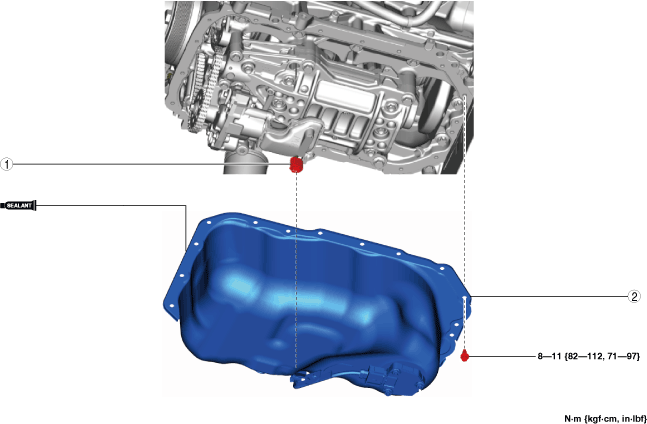
5.Remove in the order indicated in the table.
6.Install in the reverse order of removal.
7.Refill with the specified type and amount of the engine oil. (See ENGINE OIL REPLACEMENT [SKYACTIV-G (WITHOUT CYLINDER DEACTIVATION (US))].)
8.Start the engine and confirm that there is no oil leakage.
-
• If there is oil leakage, repair or replace the applicable part.
9.Inspect the oil level. (See ENGINE OIL LEVEL INSPECTION [SKYACTIV-G (WITH CYLINDER DEACTIVATION (US))].)
am6xuw00010409
|
|
1
|
Emission wiring harness connector
|
|
2
|
Oil pan component
(See Oil Pan Removal Note.)
(See Oil Pan Installation Note.)
|
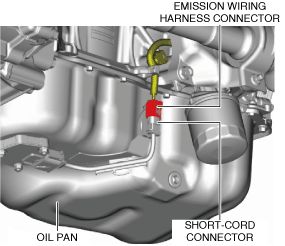
Emission Wiring Harness Connector Removal Note
-
Caution
-
• Cover the emission wiring harness connector and short-cord connector using tape to prevent engine oil from adhering to the connector terminal.
1.Disconnect the emission wiring harness connector.
am6xuw00010410
|
Oil Pan Removal Note
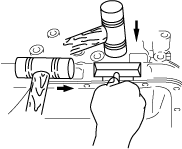
1.Remove the oil pan using a separator tool.
am6xuw00007283
|
2.When replacing the oil pan, remove the short-cord. (See ENGINE OIL LEVEL SENSOR REMOVAL/INSTALLATION [SKYACTIV-G (WITHOUT CYLINDER DEACTIVATION (US))].)
Oil Pan Installation Note
1.When replacing the oil pan, install the short-cord and a new engine oil level sensor. (See ENGINE OIL LEVEL SENSOR REMOVAL/INSTALLATION [SKYACTIV-G (WITHOUT CYLINDER DEACTIVATION (US))].)
2.Completely clean and remove any oil, dirt, sealant or other foreign matter that may be adhering to the cylinder block and oil pan.
-
Caution
-
• Using bolts with the old silicone sealant adhering could cause cracks in the cylinder block.
 ac5wzw00007109
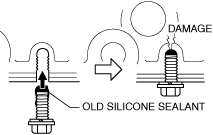
3.When reusing the oil pan installation bolts, clean any old sealant from the bolts.
-
Caution
-
• Apply silicone sealant in a single, unbroken line to prevent oil leakage.• To prevent silicone sealant from hardening, adhere the oil pan to the cylinder block within 10 min after silicone sealant is applied. Tighten the installation bolts completely soon after adhering.
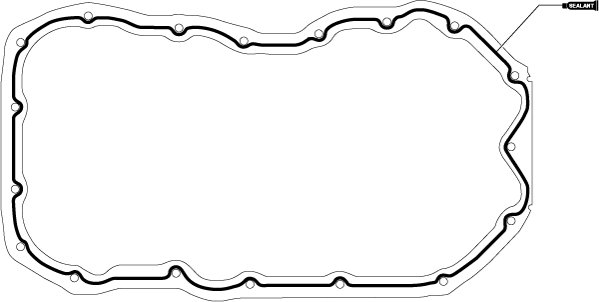
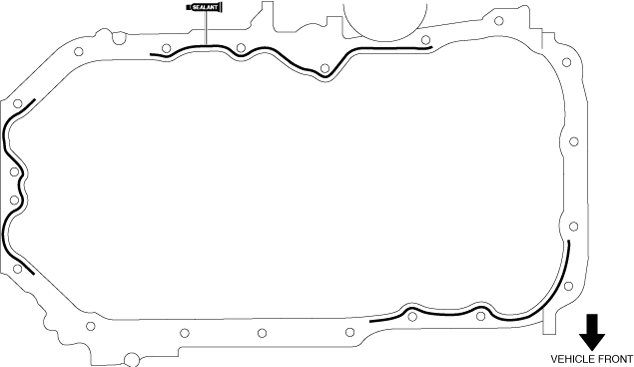
4.Apply silicone sealant (TB1217D or equivalent) to the oil pan along the inside of the bolt holes as shown in the figure.
SKYACTIV-G 2.0
am3zzw00024305
|
-
Caution
-
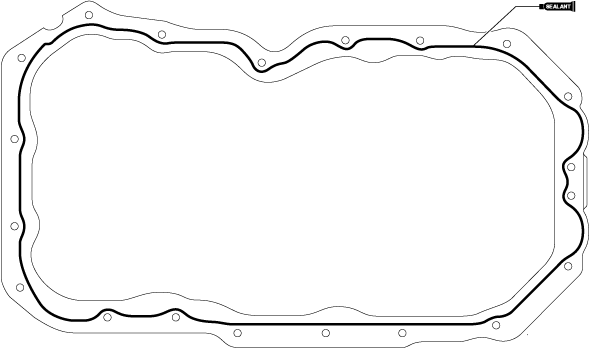
• For SKYACTIV-G 2.5, also apply silicone sealant to the cylinder block.
SKYACTIV-G 2.5 oil pan
am3zzw00024306SKYACTIV-G 2.5 cylinder block
am3zzw00024307
-
Thickness
-
SKYACTIV-G 2.0: 2.0—6.0 mm {0.08—0.23 in}SKYACTIV-G 2.5: 3.0—7.0 mm {0.12—0.27 in}
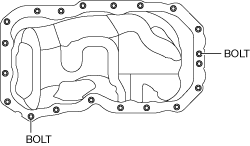
5.Install the oil pan using the following procedure:
-
Caution
-
• Remove any silicone sealant which oozes out into an oil pan installation bolt hole. If silicone sealant penetrates an oil pan installation bolt hole, the cylinder block could become damaged.am3zzw00024308

-
SKYACTIV-G 2.0
-
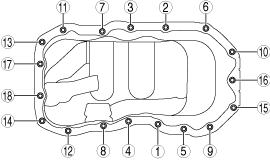
1. Install the oil pan to the cylinder block.2. Tighten the bolts in the order shown in the figure.am3zzw00024309
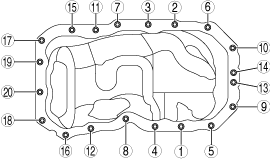
-
SKYACTIV-G 2.5
-
1. Install the oil pan to the cylinder block.2. Temporarily tighten the two bolts shown in the figure.am3zzw000243103. Tighten the bolts in the order shown in the figure.am3zzw00024311