POWER OUTER MIRROR REMOVAL/INSTALLATION
POWER OUTER MIRROR REMOVAL/INSTALLATION
SM2336381
id091200014200
1.Fully lower the front door glass.
2.Disconnect the negative battery terminal. (See NEGATIVE BATTERY TERMINAL DISCONNECTION/CONNECTION [(US)].)
3.Remove the following parts:
- (1)Front door speaker grille (See SPEAKER GRILLE REMOVAL/INSTALLATION.)
- (2)Inner garnish (See INNER GARNISH REMOVAL/INSTALLATION.)
- (3)Power window main switch (to remove from driver’s side) (See POWER WINDOW MAIN SWITCH REMOVAL/INSTALLATION.)
- (4)Power window subswitch (front) (to remove from passenger’s side) (See POWER WINDOW SUBSWITCH REMOVAL/INSTALLATION.)
- (5)Front door trim (See FRONT DOOR TRIM REMOVAL/INSTALLATION [(US)].)
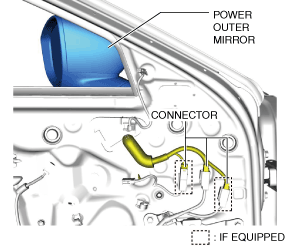
4.Disconnect the connectors.
am3zzw00024516
|
5.Move a tape-wrapped flathead screwdriver in the direction of the arrow shown in the figure and detach the hooks from the front door panel.
am3zzw00029532
|
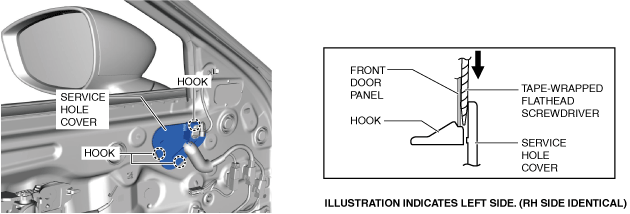
6.Remove the service hole cover.
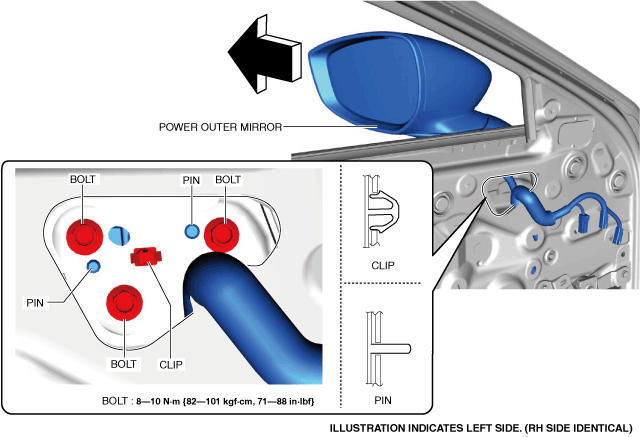
7.Remove the bolts.
am3zzw00029533
|
-
Caution
-
• If clip of the power outer mirror is detached, the power outer mirror may fall off and be damaged. When detaching clip of the power outer mirror, hold the power outer mirror by hand during the servicing.
8.Pull the power outer mirror in the direction of the arrow while removing the clip and pins.
9.Remove the power outer mirror.
10.Install in the reverse order of removal. (See Power Outer Mirror Installation Note.) (See Clip Replacement Note.)
11.Perform the 360° view monitor system aiming. (with side camera) (See 360°VIEW MONITOR SYSTEM AIMING.)
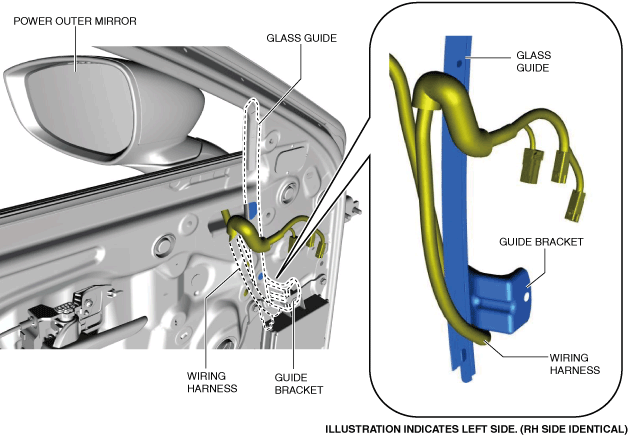
Power Outer Mirror Installation Note
1.If the wiring harness is routed mistakenly, the front door glass and the wiring harness will interfere with each other when opening/closing the front door glass which could damage the wiring harness. When routing the wiring harness, route it behind the glass guide and the underside of the guide bracket.
am3zzw00029534
|
Clip Replacement Note
-
Note
-
• If the clip has been damaged, perform the following procedure.
1.Remove the screw.
am3zzw00024520
|
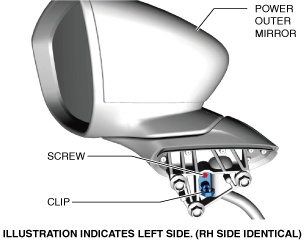
2.Remove the clip.
3.Install in the reverse order of removal.