WIRING HARNESS CONNECTION PROCEDURE
WIRING HARNESS CONNECTION PROCEDURE
SM2334351
id000000003100
Special Service Tool (SST)
|
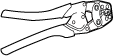
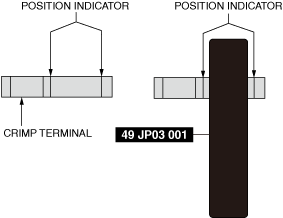
49 JP03 001
CRIMPING TOOL
|
 |
—
|
—
|
||
Connection Procedure Using Soldering
-
Caution
-
• Perform the “Connection Procedure Using Crimp Terminal” for aluminum wiring connection.
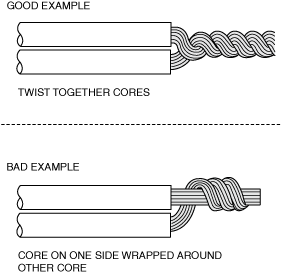
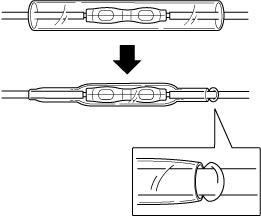
1.Line up the cores of the wiring harnesses to be connected as shown in the figure.
am6zzw00011199
|

2.Twist together both of the cores.
am6zzw00011200
|
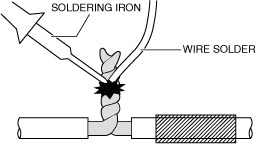
3.Apply solder to the twisted core area.
am6xuw00006208
|
-
Caution
-
• Soldering for a long period of time could affect the surrounding electrical circuit. Apply soldering for an extremely short period of time.
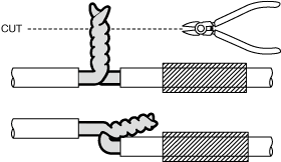
4.Cut the ends off the connected area, and apply the soldering iron tip to the wiring harness after removing any fraying.
acmzzc00000412
|
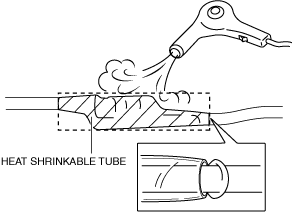
5.Set the heat-shrinkable tubing to the soldered area and shrink the heat-shrinkable tubing at a temperature of approx. 100 °C {212 °F} using a drier until the plastic melts on both ends.
acmzzc00000416
|
-
Caution
-
• Completely shrink the heat shrinkable tubing to the wiring harness leaving no gaps.• Perform the work being careful not to melt the insulation of the wiring harness by excessive heat.
Connection Procedure Using Crimp Terminal
-
Caution
-
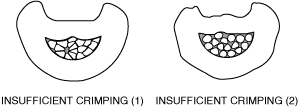
• Always use the special service tool (49 JP03 001) when performing this procedure. Even though it may appear that the crimping was done successfully using a similar tool other than the special service tool, the possibility of a poor connection occurring due to insufficient crimping is high.
 acmzzc00000417
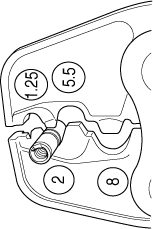
1.Select the appropriate crimp terminal and the crimping area of the special service tool according to the thickness of the wiring harness to be repaired.
|
Size (mark) |
Outer diameter |
Adaptation wiring size |
Crimping area of special service tool |
|---|---|---|---|
|
S
|
3 mm {0.1 in}
|
0.5—1.0 sq
|
1.25
|
|
M
|
4 mm {0.2 in}
|
1.25—2.5 sq
|
2
|
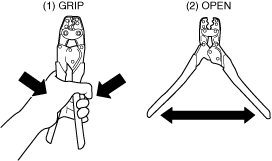
2.Squeeze the grips tightly until the ratchet of the special service tool is detached to open the handle of the special service tool.
acmzzc00000418
|
3.Place the appropriate crimp terminal on the crimping area of the special service tool, lightly close the grips so that the crimping terminal does not deform, and then secure the crimp terminal.
acmzzc00000420
|
ac9uuw00009723
|
-
Caution
-
• Set the cutter blade part of the special service tool inside the scribed line (position indicator line of special service tool) on the crimp terminal.
4.Insert the wiring harness to be connected into the crimp terminal until it reaches the contact point inside the terminal.
-
Caution
-
• Verify that all the cores have been inserted without buckling.ac5jjw00007726

5.Squeeze the grips tightly until the ratchet of the special service tool is detached to crimp the crimp terminal flat.
6.Pull on the connected wiring harness to verify that the wiring harness does not pull out of the crimp terminal.
7.Perform the same procedure from Steps 3 to 6 for the opposite side.
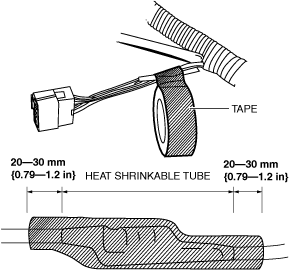
8.Set the heat-shrinkable tubing to the connection area so that it is centered and shrink the heat-shrinkable tubing at a temperature of approx. 100 °C {212 °F} using a drier until the plastic melts on both ends.
ac5jjw00007721
|
-
Caution
-
• Completely shrink the heat-shrinkable tubing to the wiring harness leaving no gaps.• Perform the work being careful not to melt the insulation of the wiring harness due to excessive heat.
Taping Work
1.Tape the surface of the heat shrinkable tubing.
am6xuw00006210
|
-
Caution
-
• Remove moisture, oil, and dust from the area to be taped before doing the taping.• Firmly tape the ends so that they do not peel off.• Always superimpose the tape while wrapping.• Wrap the tape approx. 20—30 mm {0.79—1.2 in} beyond both ends of the heat shrinkable tubing.
-
Note
-
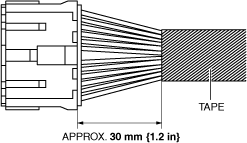
• If the wiring harness is bundled and taped, bind it approx. 30 mm {1.2 in} away from the connector.am6xuw00006211