01-19-15 – CHECK ENGINE LIGHT ON WITH P0012:00
01-19-15 – CHECK ENGINE LIGHT ON WITH P0012:00
SI121598
TSB NUMBER: 01-19-15
TSB ISSUE DATE
16/12/2019
BULLETIN NOTES
APPLICABLE MODEL(S)/VINS
2019-2020 Mazda3 (Japan built) vehicles with VINs lower than JM1BP******147795 (produced before Jul.1, 2019)
2019-2020 Mazda3 (Mexico built) vehicles with VINs lower than 3MZBP******115265 (produced before Jul.1, 2019)
DESCRIPTION
Some customers may experience the CHECK ENGINE light ON with DTC P0012:00 (Electric variable valve timing control system: Over-retarded) stored in PCM memory.
NOTE: This concern occurs only on the vehicles with PCMs manufactured by MITSUBISHI.
| PCM Identification |
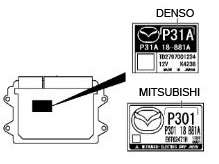 |
This is caused by improper control logic of the PCM detecting a false error. To correct this issue, the PCM software has been modified.
NOTE: The VVT actuator is damaged by the improper control logic.
Customers having this concern should have their vehicle repaired using the following repair procedure.
REPAIR PROCEDURE
1. Verify customer concern.
2. Verify the PCM is manufactured by Mitsubishi as shown in the Description.
- If the PCM is Mitsubishi, go to the next step.
- If the PCM is Denso, refer to the troubleshooting instructions on MGSS for P0012:00.
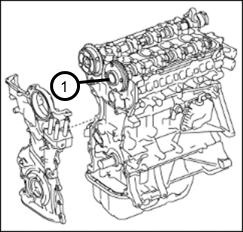
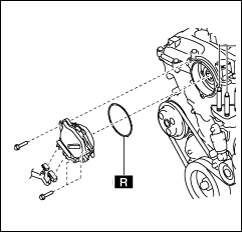
3. Replace the electric variable valve timing (VVT) actuator (1) according to the instructions on MGSS (ELECTRIC VARIABLE VALVE TIMING ACTUATOR, HYDRAULIC VARIABLE VALVE TIMING ACTUATOR REMOVAL/INSTALLATION).
NOTE: If current calibration file name in the ECU FILENAME screen is same as shown in Calibration Information or with a later suffix, reprogramming is not necessary.
5. Clear the DTC and turn the ignition off and get out of the vehicle.
6. Close and lock the door and wait for at least 10 minutes.
7. Verify repair.
NOTE: If any DTCs should remain after performing DTC erase, diagnose the DTCs according to the appropriate Troubleshooting on MGSS.
MDARS ECU Reprogramming Procedure
NOTE: This procedure explains a generic reprogramming for all Electrical Control Units (ECU) such as PCM, BCM, ESU, etc. Be aware that some sentences and screen images below mention a certain control unit such as “PCM” or “BCM” as an example.
ATTENTION: READ ALL CAUTIONS AND NOTES BEFORE AND AFTER REPROGRAMMING!
CAUTION:
- A poor connection between the vehicle and M-MDS and/or low voltage may result in abnormal termination and/or data corruption. A low battery voltage may cause a reprogramming failure resulting in unexpected ECU replacement.
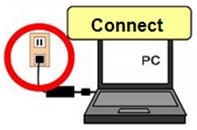
- Make sure that the following connections are firmly connected, then DO NOT touch the VCM and DLC cable to prevent noise and a poor connection.
- Between the vehicle-side connector and the DLC cable
- Between the PC-side connector and the USB port of the PC
- When reprogramming with MDARS, power consumption and voltage fluctuation are greater than with IDS. Use the Power Supply mode in the Battery Management System (GR8) and connect an AC adapter to the PC to stabilize voltage fluctuation.
 |
 |
BEFORE REPROGRAMMING
NOTE:
- Turn off all electrical loads (i.e. A/C blower, audio system, rear defogger and headlights).
- Perform a self-test and verify no DTCs are stored. If any DTCs are stored, repair the concern and delete the DTCs.
- Disconnect any aftermarket accessories (non-genuine Mazda accessories).
- Terminate all programs other than MDARS on the PC. Running other programs may interfere with the MDARS performance, resulting in the PC freezing or other problems.
- Perform reprogramming with a proper internet connection. When using a wireless network, make sure the connection is strong.
- Make sure to keep enough free space on the PC’s hard disc. Insufficient free space (less than 1 GB) may result in the PC freezing during reprogramming.
1. Connect the M-MDS to the vehicle.
2. Launch the Mazda Diagnostic And Repair Software (MDARS).
3. Turn the ignition on, then click “Start”.

4. Select the “toolbox” tab.
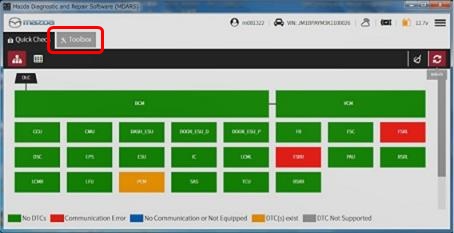
5. Select Work Support group.
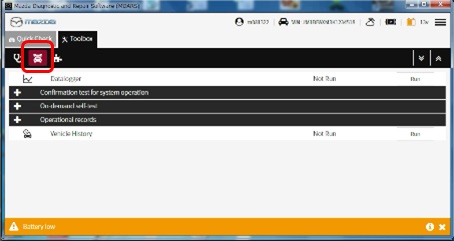
6. Select “Software update”, then click “Run”.
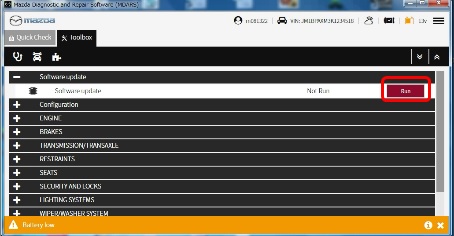
7. Select the ECU to be reprogrammed.

8. Confirm the current and new software versions, then click “Next”.
NOTE: When reprogramming the BCM, two softwares will be shown.

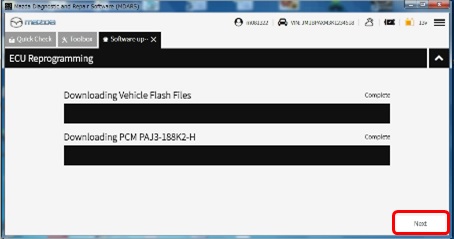
9. Wait for the download, then click “Next”.
NOTE: When reprogramming the BCM, downloading will occur twice.
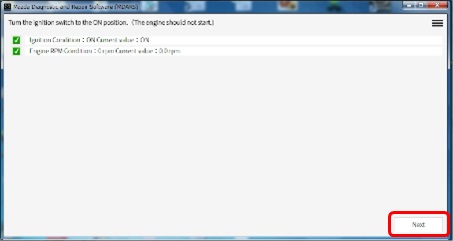
10. Read the screen instructions, then click “Next”.
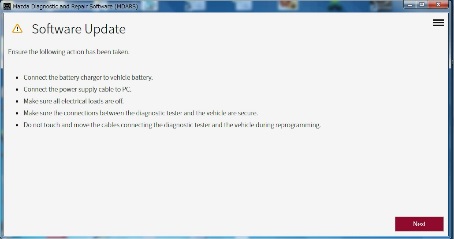
11. Follow the instructions on the screen, then click “Next”.
12. Wait for the reprogramming to complete.
NOTE:
- The progress bar will stay at 90% for 30 seconds. This is not a failure.
- When reprogramming the BCM, this process will occur twice.

AFTER REPROGRAMMING
NOTE:
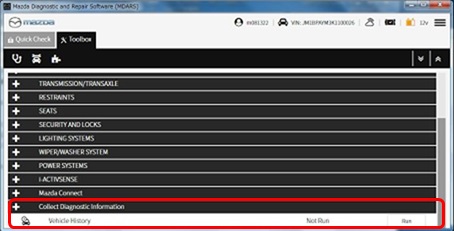
- Select “Vehicle History” under “Collect Diagnostic Information”, then click “Run”.
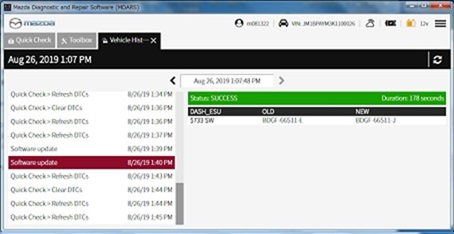
- Confirm the reprogramming on the screen and save the screen copy as a record.
Japan built
| Engine | Trans- mission |
Drive | File Name | Note |
| 2.0L | MT | 2WD | PAJ2-188K2-H | |
| AT | 2WD | PAH9-188K2-H | ||
| 2.5L | MT | 2WD | PX58-188K2-H | with cylinder deactivation |
| AT | 2WD | PXJ7-188K2-C | w/o cylinder deactivation | |
| PX05-188K2-J | with cylinder deactivation | |||
| 4WD | PX07-188K2-L | with cylinder deactivation |
Mexico built
| 2.0L | MT | 2WD | PAK1-188K2-D | |
| AT | 2WD | PAJ8-188K2-D | ||
| 2.5L | AT | 2WD | PXK5-188K2-B | w/o cylinder deactivation |
| PX13-188K2-D | with cylinder deactivation | |||
| 4WD | (TBD) | with cylinder deactivation |
Mexico spec.
Japan built
| Engine | Trans- mission |
File Name |
| 2.5L | MT | PX11-188K2-H |
| AT | PX09-188K2-H |
Mexico built
| 2.5L | MT | PX19-188K2-E |
| AT | PX17-188K2-E |
| Parts Number | Description | Qty. | Notes |
| PE02-12-4X0 | Actuator, Variable Valve Timing | 1 | |
| PE01-12-257 | Ring,’O’ | 1 | [R] For electric variable valve timing motor/driver |
| 9YA0-20-678 | Bolt | 1 | [R] Upper blind plug at timing chain cover |
| 9YA0-20-863 | Bolt | 1 | [R] Lower blind plug at timing chain cover, 2.0L |
| 9YA0-20-865 | Bolt | 1 | [R] Lower blind plug at timing chain cover, 2.5L |
| PE01-10-235 | Gasket, Head Cover | 1 | [R] [US/Mexico – Japan built] For 2.0L w/o cylinder deactivation |
| PE7W-10-235 | Gasket, Head Cover | 1 | [R] [US/Mexico – Mexico built] For 2.0L w/o cylinder deactivation |
| PY01-10-235 | Gasket, Head Cover | 1 | [R] For 2.5L w/o cylinder deactivation |
| PYFA-10-235 | Gasket, Head Cover | 1 | [R] For 2.5L with cylinder deactivation |
[R]: Replace
NOTE: Use VIN to confirm correct part number in EPC.
Location of the replacement parts [R]
 |
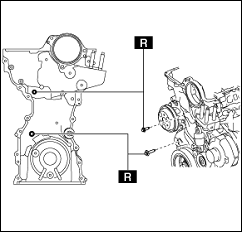 |
| Ring,’O’ | Bolt |
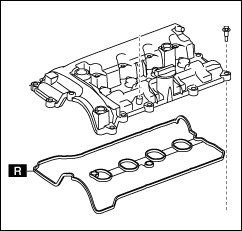 |
| Gasket, Head Cover |
- This warranty information applies only to verified customer complaints on vehicles eligible for warranty repair.
- This repair will be covered under Fed. Emission Warranty.
- Additional diagnostic time cannot be claimed for this repair.
| Warranty Type | 0 |
| Symptom Code | 6X |
| Damage Code | 9W |
| Part Number Main Cause | 5555-18-881 |
| Quantity | 0 |
| Operation Number / Labor Hours: | XXR89XFX / 2.0 Hrs (2.0L) or 2.1 Hrs. (2.5L) |
NOTE: Enter Actuator Variable Valve Timing (PE02-12-4X0, Qty=1) and replacement parts as related parts.