09-19-16 – BODY CONTROL MODULE (BCM) OR LOW FREQUENCY CONTROL UNIT (LFU) REPLACEMENT
09-19-16 – BODY CONTROL MODULE (BCM) OR LOW FREQUENCY CONTROL UNIT (LFU) REPLACEMENT
SI121479
TSB NUMBER: 09-19-16
TSB ISSUE DATE
01/10/2019
BULLETIN NOTES
APPLICABLE MODEL(S)/VINS
2019 Mazda3 5-door HB (Japan built) vehicles with VINs lower than JM1BP******142784 (produced before May 28, 2019)
DESCRIPTION
If the body control module (BCM) or the LF control unit (LFU) has been replaced and configuration has been performed, communication between the BCM and the LFU may not work properly due to a difference of the software level.
Symptoms:
- If the BCM has been replaced:
- Without a remote transmitter – the door lock switch at the liftgate will not lock doors
- With a remote transmitter – the door lock switch at the liftgate will lock the doors even when the front or rear door(s) are opened
- If the LFU has been replaced:
- Without a remote transmitter – the door lock switch at the liftgate will lock the doors with the answer back sound
Normal System Operation:
 |
–> |
LFU
|
–> | BCM |
| 1. Door lock switch pressed | –> | 2. LFU sends command to BSM | –> | 3. BCM sends command to Door ESU for door lock 4. BCM sends command to for rear side answer back |
REPAIR PROCEDURE
1. Verify customer concern.
2. Reprogram the ECU using the Mazda Diagnostic And Repair Software (MDARS). Refer to “MDARS – ECU Reprogramming Procedure”.
- BCM replaced – perform LFU software update.
- LFU replaced – perform BCM software update.
NOTE: Explain to the customer that the operation of the door lock switch at the liftgate has been modified so as not to lock the doors when the key fob is not close to the liftgate.
3. Verify the repair.
MDARS ECU Reprogramming Procedure
ATTENTION: READ ALL CAUTIONS AND NOTES BEFORE AND AFTER REPROGRAMMING!
CAUTION:
- A poor connection between the vehicle and M-MDS and/or low voltage may result in abnormal termination and/or data corruption. A low battery voltage may cause a reprogramming failure resulting in unexpected ECU replacement.
- Make sure that the following connections are firmly connected, then DO NOT touch the VCM and DLC cable to prevent noise and a poor connection.
- Between the vehicle-side connector and the DLC cable
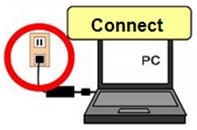
- Between the PC-side connector and the USB port of the PC
- When reprogramming with MDARS, power consumption and voltage fluctuation are greater than with IDS. Use the Power Supply mode in the Battery Management System (GR8) and connect an AC adapter to the PC to stabilize voltage fluctuation.

BEFORE REPROGRAMMING
NOTE:
- Turn off all electrical loads (i.e. A/C blower, audio system, rear defogger and headlights).
- Perform a self-test and verify no DTCs are stored. If any DTCs are stored, repair the concern and delete the DTCs.
- Disconnect any aftermarket accessories (non-genuine Mazda accessories).
- Terminate all programs other than MDARS on the PC. Running other programs may interfere with the MDARS performance, resulting in the PC freezing or other problems.
- Perform reprogramming with a proper internet connection. When using a wireless network, make sure the connection is strong.
- Make sure to keep enough free space on the PC’s hard disc. Insufficient free space (less than 1 GB) may result in the PC freezing during reprogramming.
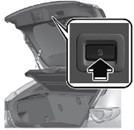
1. Connect the M-MDS to the vehicle.
2. Launch the Mazda Diagnostic And Repair Software (MDARS).
3. Turn the ignition on, then click “Start”.

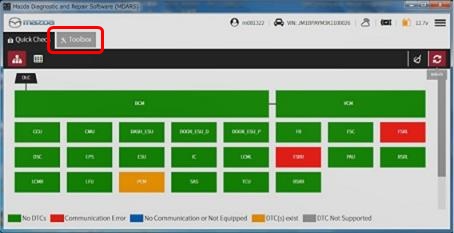
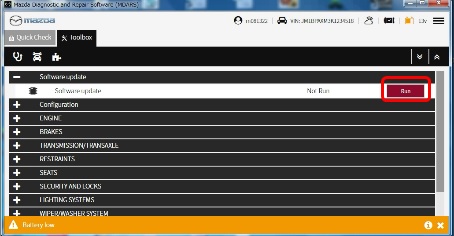
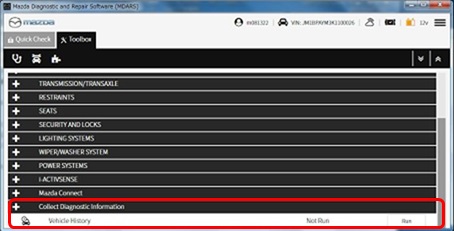
4. Select the “toolbox” tab.
5. Select Work Support group.
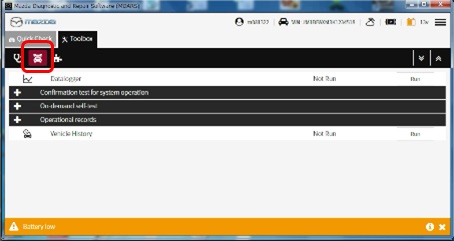
6. Select “Software update”, then click “Run”.
7. Select the ECU to be reprogrammed.

8. Confirm the current and new software versions, then click “Next”.
NOTE: When reprogramming the BCM, two softwares will be shown.

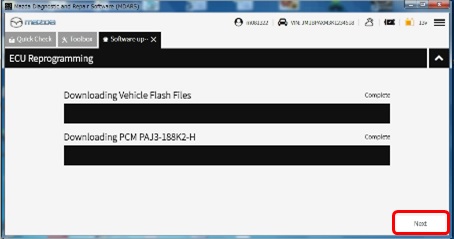
9. Wait for the download, then click “Next”.
NOTE: When reprogramming the BCM, downloading will occur twice.
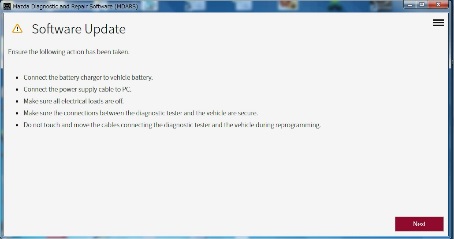
10. Read the screen instructions, then click “Next”.
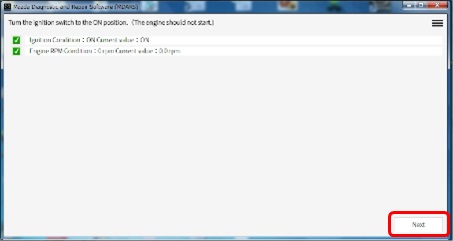
11. Follow the instructions on the screen, then click “Next”.
12. Wait for the reprogramming to complete.
NOTE:
- The progress bar will stay at 90% for 30 seconds. This is not a failure.
- When reprogramming the BCM, this process will occur twice.

AFTER REPROGRAMMING
NOTE:
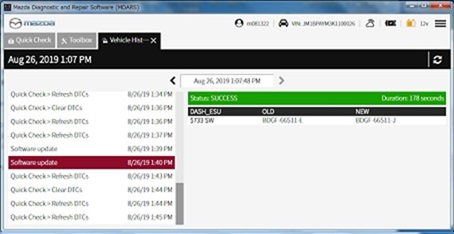
- Select “Vehicle History” under “Collect Diagnostic Information”, then click “Run”.
- Confirm the reprogramming on the screen and save the screen copy as a record.
WARRANTY INFORMATION
NOTE:
- If DTC B14F0:76 is stored and i-ACTIVSENSE warning light (Amber) turns on after BCM replacement, refer to TSB 15-19-03
- If the BCM or LFU has been replaced for warranty repair, claim an additional 0.1 labor hours using the labor operation number with “XRT” in place of the last three letters.
| Warranty repair | Without reprogramming the other ECU |
With reprogramming the other ECU |
| Replacing BCM | T0108ERX / 0.3 Hrs. | T0108XRT / 0.1 Hrs. |
| Replacing LFU | S1055XRX / 0.3 Hrs. | S1055XRT / 0.1 Hrs. |