FRONT DOOR GLASS RUN-CHANNEL REMOVAL/INSTALLATION [(US)]
FRONT DOOR GLASS RUN-CHANNEL REMOVAL/INSTALLATION [(US)]
SM2763806
id0912009110x1
1.Perform the front door glass preparation. (See FRONT DOOR GLASS REMOVAL/INSTALLATION.)
2.Disconnect the negative battery terminal. (See NEGATIVE BATTERY TERMINAL DISCONNECTION/CONNECTION [(US)].)
3.Remove the following parts:
- (1)Front door speaker grille (See SPEAKER GRILLE REMOVAL/INSTALLATION.)
- (2)Inner garnish (See INNER GARNISH REMOVAL/INSTALLATION.)
- (3)Power window main switch (to remove from driver’s side) (See POWER WINDOW MAIN SWITCH REMOVAL/INSTALLATION.)
- (4)Power window subswitch (front) (to remove from passenger’s side) (See POWER WINDOW SUBSWITCH REMOVAL/INSTALLATION.)
- (5)Front door trim (See FRONT DOOR TRIM REMOVAL/INSTALLATION [(US)].)
- (6)Front inner handle (See INNER HANDLE REMOVAL/INSTALLATION.)
- (7)Front door glass (See FRONT DOOR GLASS REMOVAL/INSTALLATION.)
- (8)Sail garnish (See SAIL GARNISH REMOVAL/INSTALLATION.)
- (9)Front beltline molding (See FRONT BELTLINE MOLDING REMOVAL/INSTALLATION.)
- (10)Front door garnish (See FRONT DOOR GARNISH REMOVAL/INSTALLATION.)
4.Remove the fasteners.
am3uuw00015301
|
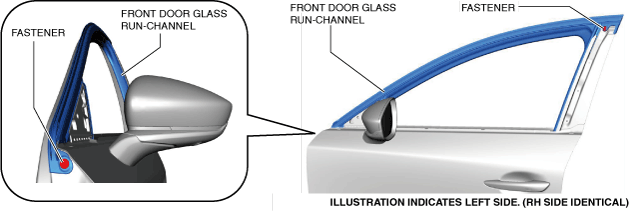
5.Partially peel back the front door glass run-channel.
am3uuw00015303
|
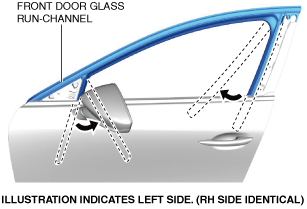
6.Move the front door glass run-channel in the order of arrows (1), (2), and (3) shown in the figure and remove it from the front door hooks.
am3zzw00027704
|

7.Remove the front door glass run-channel.
8.Install in the reverse order of removal.
9.Perform the power window system initialization procedure. (with auto open/auto close function) (See POWER WINDOW SYSTEM INITIALIZATION PROCEDURE.)