FLOOR COVERING REMOVAL/INSTALLATION [(US)]
FLOOR COVERING REMOVAL/INSTALLATION [(US)]
SM2566414
id0917008030x1
Front Floor Covering
1.Disconnect the negative battery terminal. (See NEGATIVE BATTERY TERMINAL DISCONNECTION/CONNECTION [(US)].)
2.Remove the following parts:
- (1)Joint cover (See STEERING WHEEL AND COLUMN REMOVAL/INSTALLATION [(US)].)
- (2)Accelerator pedal (See ACCELERATOR PEDAL REMOVAL/INSTALLATION [SKYACTIV-G (WITHOUT CYLINDER DEACTIVATION (US))].) (See ACCELERATOR PEDAL REMOVAL/INSTALLATION [SKYACTIV-G (WITH CYLINDER DEACTIVATION (US))].)
- (3)Front seat belt lower anchor (See FRONT SEAT BELT REMOVAL/INSTALLATION.)
- (4)Front seat (See FRONT SEAT BELT REMOVAL/INSTALLATION.)
- (5)Front side trim (See FRONT SIDE TRIM REMOVAL/INSTALLATION.)
- (6)Front scuff plate (See FRONT SCUFF PLATE REMOVAL/INSTALLATION.)
- (7)Rear scuff plate (See REAR SCUFF PLATE REMOVAL/INSTALLATION.)
- (8)B-pillar upper trim (See B-PILLAR UPPER TRIM REMOVAL/INSTALLATION.)
- (9)B-pillar lower trim (See B-PILLAR LOWER TRIM REMOVAL/INSTALLATION.)
- (10)Shift lever knob (MTX) (See SHIFT LEVER REMOVAL/INSTALLATION [C66M-R].)
- (11)Selector lever knob (ATX) (See SELECTOR LEVER COMPONENT REMOVAL/INSTALLATION.)
- (12)Shift panel (See SHIFT PANEL REMOVAL/INSTALLATION.)
- (13)Front console box (See FRONT CONSOLE BOX REMOVAL/INSTALLATION.)
- (14)Cup holder (See CUP HOLDER REMOVAL/INSTALLATION.)
- (15)Side wall (See SIDE WALL REMOVAL/INSTALLATION.)
- (16)Rear console (See REAR CONSOLE REMOVAL/INSTALLATION [(US)].)
- (17)Rear console bracket No.1 (See REAR CONSOLE REMOVAL/INSTALLATION [(US)].)
- (18)Shift lever component (MTX) (See SHIFT LEVER REMOVAL/INSTALLATION [C66M-R].)
- (19)Selector lever component (ATX) (See SELECTOR LEVER COMPONENT REMOVAL/INSTALLATION.)
- (20)SAS control module (See SAS CONTROL MODULE REMOVAL/INSTALLATION [STANDARD DEPLOYMENT CONTROL SYSTEM – MEXICO SPEC.].) (See SAS CONTROL MODULE REMOVAL/INSTALLATION [TWO-STEP DEPLOYMENT CONTROL SYSTEM – US/CANADA SPEC.].)
- (21)360° view monitor control module (with 360° view monitor system) (See 360°VIEW MONITOR CONTROL MODULE REMOVAL/INSTALLATION [(US)].)
- (22)Parking assist unit (with parking assist system) (See PARKING ASSIST UNIT (OPTICAL) REMOVAL/INSTALLATION [(US)].)
- (23)Audio amplifier (See AUDIO AMPLIFIER REMOVAL/INSTALLATION.)
- (24)Rear heat duct No.1 (See REAR HEAT DUCT REMOVAL/INSTALLATION [(US)].)
- (25)Dashboard bracket (See DASHBOARD REMOVAL [(US)].) (See DASHBOARD INSTALLATION [(US)].)
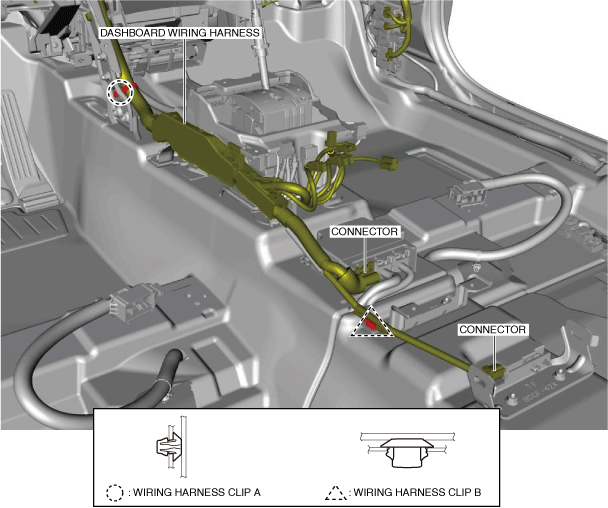
3.Disconnect the connectors and remove the wiring harness clip A, B.
am3zzw00030494
|
4.Remove the nuts.
am3zzw00027693
|
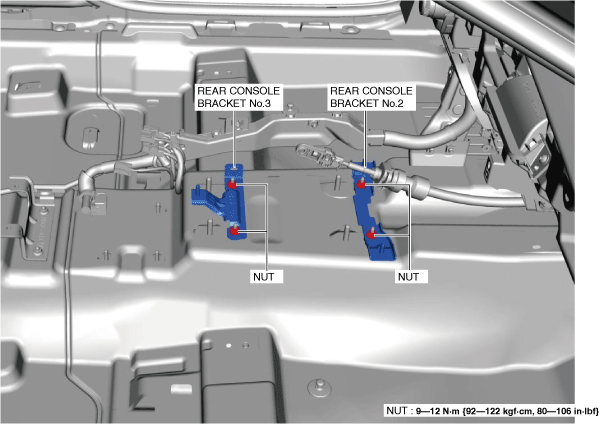
5.Remove the rear console bracket No.2.
6.Remove the rear console bracket No.3.
7.Remove the wiring harness clips shown in the figure.
am3zzw00018890
|
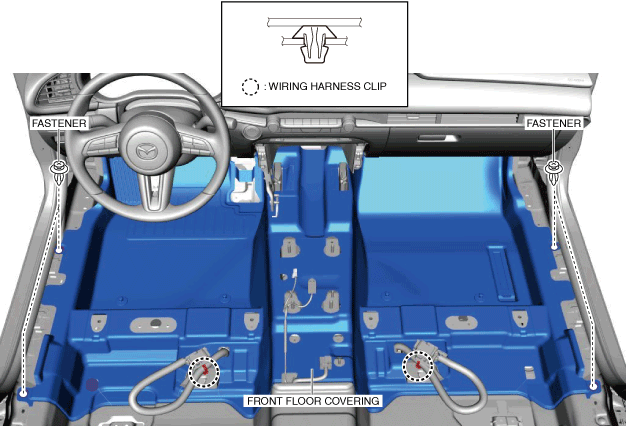
8.Remove the fasteners.
9.Take the out from the door opening.
10.Install in the reverse order of removal. (See Front Floor Covering Installation Note.)
11.Perform the 360° view monitor system aiming. (with 360° view monitor system) (See 360°VIEW MONITOR SYSTEM AIMING.)
Rear Floor Covering
1.Disconnect the negative battery terminal. (See NEGATIVE BATTERY TERMINAL DISCONNECTION/CONNECTION [(US)].)
2.Remove the following parts:
- (1)Front scuff plate (See FRONT SCUFF PLATE REMOVAL/INSTALLATION.)
- (2)Rear scuff plate (See REAR SCUFF PLATE REMOVAL/INSTALLATION.)
- (3)Front seat belt lower anchor (See FRONT SEAT BELT REMOVAL/INSTALLATION.)
- (4)Front seat (See FRONT SEAT BELT REMOVAL/INSTALLATION.)
- (5)B-pillar upper trim (See B-PILLAR UPPER TRIM REMOVAL/INSTALLATION.)
- (6)B-pillar lower trim (See B-PILLAR LOWER TRIM REMOVAL/INSTALLATION.)
- (7)Shift lever knob (MTX) (See SHIFT LEVER REMOVAL/INSTALLATION [C66M-R].)
- (8)Selector lever knob (ATX) (See SELECTOR LEVER COMPONENT REMOVAL/INSTALLATION.)
- (9)Shift panel (See SHIFT PANEL REMOVAL/INSTALLATION.)
- (10)Front console box (See FRONT CONSOLE BOX REMOVAL/INSTALLATION.)
- (11)Cup holder (See CUP HOLDER REMOVAL/INSTALLATION.)
- (12)Side wall (See SIDE WALL REMOVAL/INSTALLATION.)
- (13)Rear console (See REAR CONSOLE REMOVAL/INSTALLATION [(US)].)
- (14)360° view monitor control module (with 360° view monitor system) (See 360°VIEW MONITOR CONTROL MODULE REMOVAL/INSTALLATION [(US)].)
- (15)Parking assist unit (with parking assist system) (See PARKING ASSIST UNIT (OPTICAL) REMOVAL/INSTALLATION [(US)].)
- (16)Audio amplifier (See AUDIO AMPLIFIER REMOVAL/INSTALLATION.)
- (17)Rear seat cushion (See REAR SEAT CUSHION REMOVAL/INSTALLATION.)
3.Remove the nuts.
am3zzw00027694
|
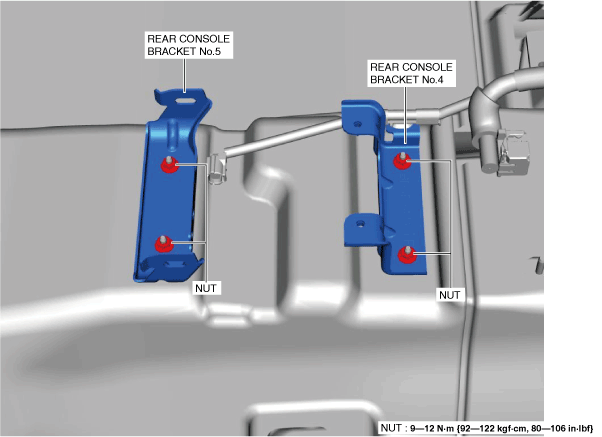
4.Remove the rear console bracket No.4.
5.Remove the rear console bracket No.5.
6.Remove the fasteners.
am3zzw00021866
|
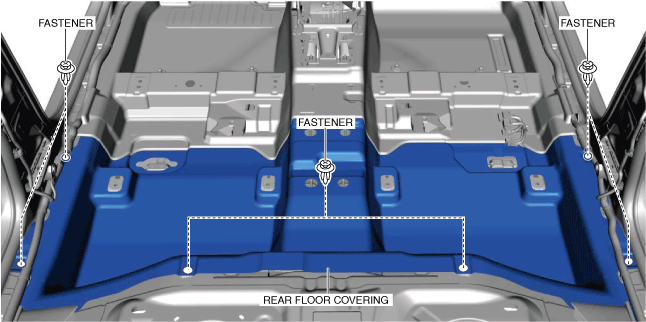
7.Take the out from the door opening.
8.Install in the reverse order of removal.
9.Perform the 360° view monitor system aiming. (with 360° view monitor system) (See 360°VIEW MONITOR SYSTEM AIMING.)
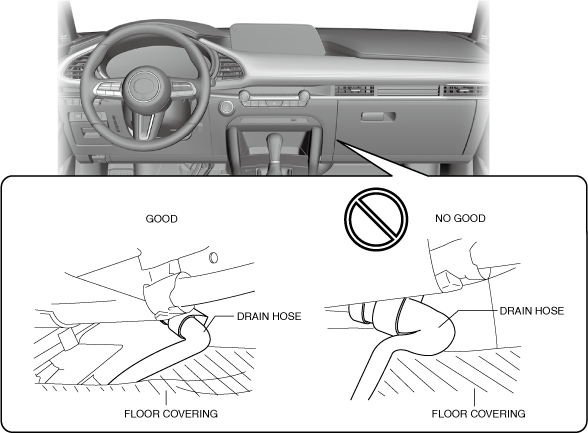
Front Floor Covering Installation Note
am3zzw00027695
|

-
Caution
-
• When installing the front floor covering, the front floor covering may press the A/C unit drain hose and deform it. When installing the front floor covering, align the front floor covering to the body to prevent deforming the A/C unit drain hose.
am3zzw00021867
|