DRIVE BELT AUTO TENSIONER REMOVAL/INSTALLATION [SKYACTIV-G (WITHOUT CYLINDER DEACTIVATION (US))]
DRIVE BELT AUTO TENSIONER REMOVAL/INSTALLATION [SKYACTIV-G (WITHOUT CYLINDER DEACTIVATION (US))]
SM2565597
id0110u0362500
-
Warning
-
• A hot engine can cause severe burns. Turn off the engine and wait until it is cool before servicing.
-
Caution
-
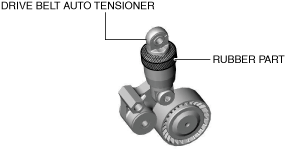
• If the rubber part of the drive belt auto tensioner is damaged by a screwdriver or other tool, oil in the hydraulic pressure unit could leak and the tensioner may not operate normally. Be careful not to damage the rubber part of the drive belt auto tensioner.
 ac9uuw00006554
1.Remove the plug hole plate. (See PLUG HOLE PLATE REMOVAL/INSTALLATION [SKYACTIV-G (WITH CYLINDER DEACTIVATION (US))].)
2.Remove the generator drive belt. (See DRIVE BELT REMOVAL/INSTALLATION [SKYACTIV-G (WITHOUT CYLINDER DEACTIVATION (US))].)
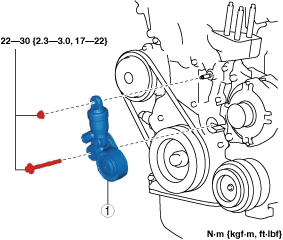
3.Remove in the order indicated in the table.
4.Install in the reverse order of removal.
am6xuw00008841
|
|
1
|
Drive belt auto tensioner
|
Drive Belt Auto Tensioner Installation Note
-
Caution
-
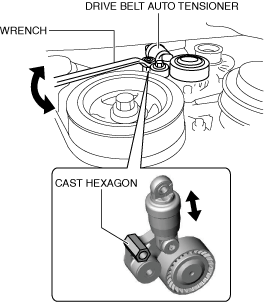
• To allow the drive belt auto tensioner to function correctly, always bleed the air from the drive belt auto tensioner using the following procedure after assembling the drive belt auto tensioner.
1.Install the drive belt auto tensioner to the engine.
-
Caution
-
• To prevent damage to the drive belt auto tensioner, do not apply excessive torque after the tensioner moves full-stroke.
2.Insert the wrench onto the cast hexagon on the drive belt auto tensioner, move the drive belt auto tensioner up and down at full-stroke three times to bleed the air.
ac9uuw00006557
|
-
Note
-
• By moving the drive belt auto tensioner up and down full-stroke three times, the piston inside the tensioner moves to bleed the air.