NOTIFICATION AND WARNING SPEAKER REMOVAL/INSTALLATION
NOTIFICATION AND WARNING SPEAKER REMOVAL/INSTALLATION
SM2336715
id092200052600
Front
1.Disconnect the negative battery terminal. (See NEGATIVE BATTERY TERMINAL DISCONNECTION/CONNECTION [(US)].)
2.Remove the following parts:
- (1)Shift lever knob (MTX) (See SHIFT LEVER REMOVAL/INSTALLATION [C66M-R].)
- (2)Selector lever knob (ATX) (See SELECTOR LEVER COMPONENT REMOVAL/INSTALLATION.)
- (3)Shift panel (See SHIFT PANEL REMOVAL/INSTALLATION.)
- (4)Front console box (See FRONT CONSOLE BOX REMOVAL/INSTALLATION.)
- (5)Cup holder (See CUP HOLDER REMOVAL/INSTALLATION.)
- (6)Side wall (See SIDE WALL REMOVAL/INSTALLATION.)
- (7)Rear console (See REAR CONSOLE REMOVAL/INSTALLATION [(US)].)
- (8)Driver-side front scuff plate (See FRONT SCUFF PLATE REMOVAL/INSTALLATION.)
- (9)Driver-side front side trim (See FRONT SIDE TRIM REMOVAL/INSTALLATION.)
- (10)Driver-side decoration panel (See DECORATION PANEL REMOVAL/INSTALLATION.)
- (11)Passenger-side decoration panel (See DECORATION PANEL REMOVAL/INSTALLATION.)
- (12)Hood release lever (See HOOD RELEASE LEVER AND RELEASE CABLE REMOVAL/INSTALLATION [(US)].)
- (13)Driver-side lower panel (See LOWER PANEL REMOVAL/INSTALLATION [(US)].)
- (14)Driver-side knee air bag module (See KNEE AIR BAG MODULE REMOVAL/INSTALLATION [STANDARD DEPLOYMENT CONTROL SYSTEM – MEXICO SPEC.].) (See KNEE AIR BAG MODULE REMOVAL/INSTALLATION [TWO-STEP DEPLOYMENT CONTROL SYSTEM – US/CANADA SPEC.].)
- (15)Center lower panel (See LOWER PANEL REMOVAL/INSTALLATION [(US)].)
- (16)Upper column cover (See COLUMN COVER REMOVAL/INSTALLATION.)
- (17)Lower column cover (See COLUMN COVER REMOVAL/INSTALLATION.)
3.Remove the screws.
am3zzw00024022
|
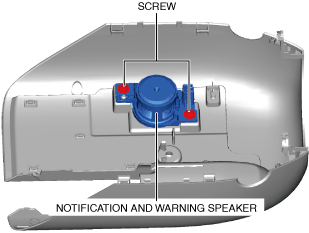
4.Remove the notification and warning speaker (front) from the lower column cover.
5.Install in the reverse order of removal.
Rear (4SD)
1.Disconnect the negative battery terminal. (See NEGATIVE BATTERY TERMINAL DISCONNECTION/CONNECTION [(US)].)
2.Remove the following parts:
- (1)Rear scuff plate (See REAR SCUFF PLATE REMOVAL/INSTALLATION.)
- (2)C-pillar trim (See C-PILLAR TRIM REMOVAL/INSTALLATION.)
- (3)Rear seat cushion (See REAR SEAT CUSHION REMOVAL/INSTALLATION.)
- (4)Rear seat back (See REAR SEAT BACK REMOVAL/INSTALLATION.)
- (5)Tire house trim (See TIRE HOUSE TRIM REMOVAL/INSTALLATION.)
- (6)Rear package trim (See REAR PACKAGE TRIM REMOVAL/INSTALLATION.)
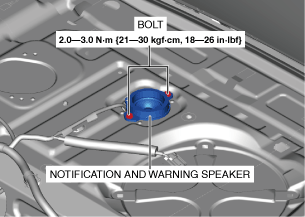
3.Remove the bolts. (See Bolt installation note.)
am3zzw00024023
|
4.Disconnect the connector.
am3zzw00024024
|

5.Remove the notification and warning speaker (rear).
6.Install in the reverse order of removal.
Bolt installation note
1.Temporarily tighten bolt A.
am3zzw00036650
|
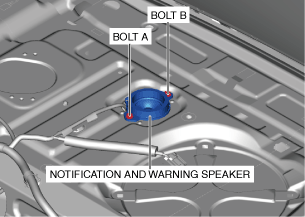
2.Temporarily tighten bolt B.
3.Completely tighten bolt A.
4.Completely tighten bolt B.
Rear (5HB)
1.Disconnect the negative battery terminal. (See NEGATIVE BATTERY TERMINAL DISCONNECTION/CONNECTION [(US)].)
2.Remove the following parts:
- (1)Liftgate upper trim (See LIFTGATE UPPER TRIM REMOVAL/INSTALLATION.)
- (2)Liftgate side trim (See LIFTGATE SIDE TRIM REMOVAL/INSTALLATION.)
- (3)Liftgate recess (See LIFTGATE RECESS REMOVAL/INSTALLATION.)
- (4)Door lock switch (with door lock switch (liftgate)) (See DOOR LOCK SWITCH REMOVAL/INSTALLATION [(US)].)
- (5)Liftgate lower trim (See LIFTGATE LOWER TRIM REMOVAL/INSTALLATION.)
- (6)Rear wiper arm and blade (See REAR WIPER ARM AND BLADE REMOVAL/INSTALLATION.)
- (7)Rear wiper motor (See REAR WIPER MOTOR REMOVAL/INSTALLATION.)
3.Remove the bolts. (See Bolt installation note.)
am3zzw00024025
|
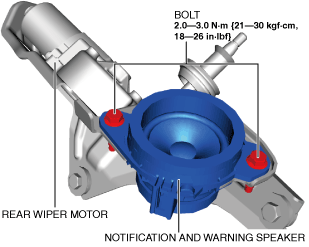
4.Remove the notification and warning speaker (rear).
5.Install in the reverse order of removal.
Bolt installation note
1.Temporarily tighten bolt A.
ac30zw00003092
|
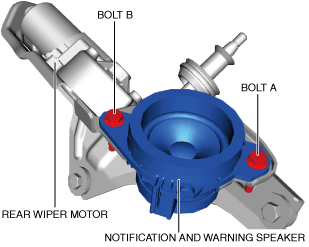
2.Temporarily tighten bolt B.
3.Completely tighten bolt A.
4.Completely tighten bolt B.