PARKING ASSIST UNIT (ULTRASONIC) REMOVAL/INSTALLATION
PARKING ASSIST UNIT (ULTRASONIC) REMOVAL/INSTALLATION
SM2336709
id092200042000
4SD
1.Disconnect the negative battery terminal. (See NEGATIVE BATTERY TERMINAL DISCONNECTION/CONNECTION [(US)].)
2.Remove the following parts:
- (1)Trunk covering (See TRUNK COVERING REMOVAL/INSTALLATION.)
- (2)Trunk board (See TRUNK BOARD REMOVAL/INSTALLATION [(US)].)
- (3)Trunk end trim (See TRUNK END TRIM REMOVAL/INSTALLATION.)
3.Pull away the trunk side trim (RH) enough to secure a space for a hand to be inserted between body panel and trunk side trim (RH).(See TRUNK SIDE TRIM REMOVAL/INSTALLATION [(US)].)
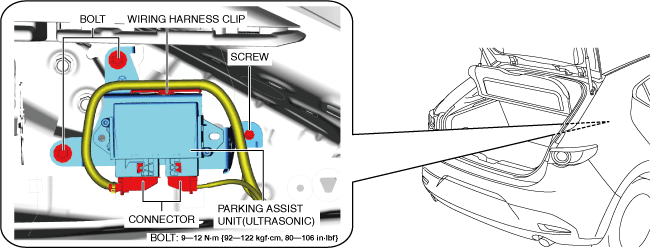
4.Disconnect the connectors.
am3zzw00029845
|

5.Remove the wiring harness clip.
6.Remove the bolts.
7.Remove the parking assist unit (ultrasonic) and the bracket as a single unit.
8.Remove the screws.
am3zzw00024586
|
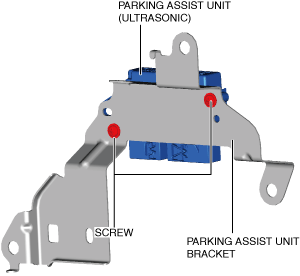
9.Remove the parking assist unit (ultrasonic) from the bracket.
10.Install in the reverse order of removal.
5HB
1.Disconnect the negative battery terminal. (See NEGATIVE BATTERY TERMINAL DISCONNECTION/CONNECTION [(US)].)
2.Remove the following parts:
- (1)Trunk covering (See TRUNK COVERING REMOVAL/INSTALLATION.)
- (2)Trunk board (See TRUNK BOARD REMOVAL/INSTALLATION [(US)].)
- (3)Trunk end trim (See TRUNK END TRIM REMOVAL/INSTALLATION.)
- (4)Trunk side upper trim (See TRUNK SIDE UPPER TRIM REMOVAL/INSTALLATION.)
3.Pull away the trunk side trim (RH) enough to secure a space for a hand to be inserted between body panel and trunk side trim (RH).(See TRUNK SIDE TRIM REMOVAL/INSTALLATION [(US)].)
4.Disconnect the connectors.
am3zzw00029846
|
5.Remove the wiring harness clip.
6.Remove the screw and bolts.
7.Remove the parking assist unit (ultrasonic) and the bracket as a single unit.
8.Remove the screws.
am3zzw00024588
|
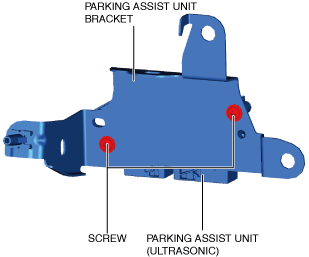
9.Remove the parking assist unit (ultrasonic) from the bracket.
10.Install in the reverse order of removal.