TRUNK LID REMOVAL/INSTALLATION
TRUNK LID REMOVAL/INSTALLATION
SM2336328
id091000801600
-
Warning
-
• Always perform the following procedure with at least one other person to prevent the trunk lid from falling. Otherwise, it may fall and cause injury.
Trunk Lid
1.Disconnect the negative battery terminal. (See NEGATIVE BATTERY TERMINAL DISCONNECTION/CONNECTION [(US)].)
2.Remove the trunk lid handle. (See TRUNK LID HANDLE REMOVAL/INSTALLATION.)
3.Remove the trunk lid trim. (See TRUNK LID TRIM REMOVAL/INSTALLATION.)
4.Remove the fasteners.
am3zzw00023219
|
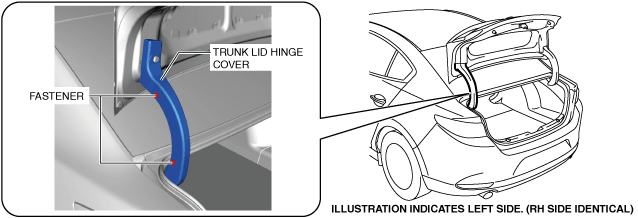
5.Remove the trunk lid hinge cover.
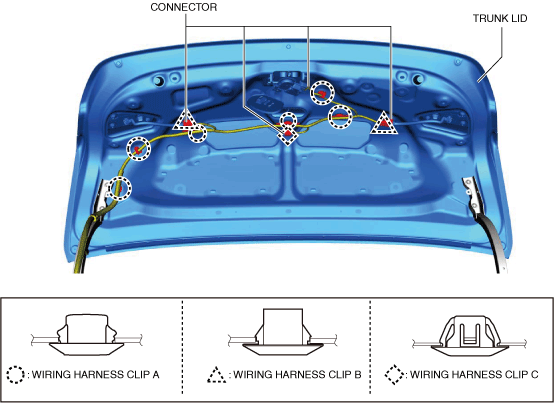
6.Disconnect the connectors and remove wiring harness clips A, B and C securing the trunk lid.
am3zzw00029589
|
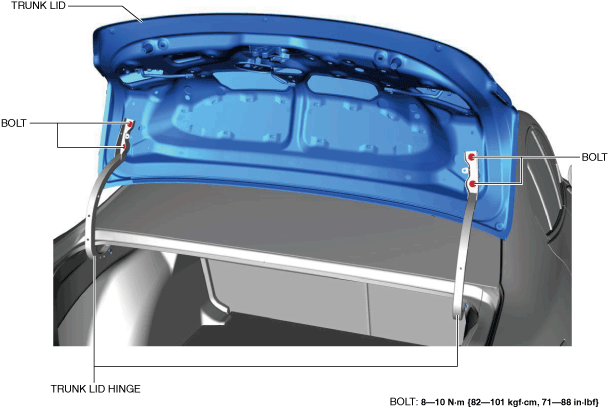
7.Remove the bolts, then remove the trunk lid.
am3zzw00023221
|
-
1. Remove the following parts:
-
1. Rear scuff plate (See REAR SCUFF PLATE REMOVAL/INSTALLATION.)2. C-pillar trim (See C-PILLAR TRIM REMOVAL/INSTALLATION.)3. Rear seat cushion (See REAR SEAT CUSHION REMOVAL/INSTALLATION.)4. Rear seat back (See REAR SEAT BACK REMOVAL/INSTALLATION.)5. Tire house trim (See TIRE HOUSE TRIM REMOVAL/INSTALLATION.)6. Rear package trim (See REAR PACKAGE TRIM REMOVAL/INSTALLATION.)7. Balance spring (See BALANCE SPRING REMOVAL/INSTALLATION.)
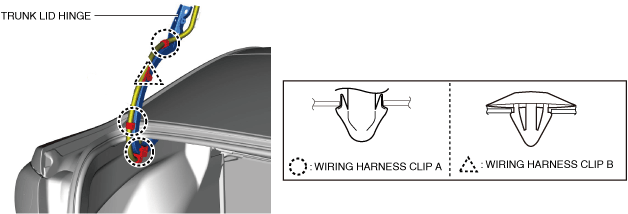
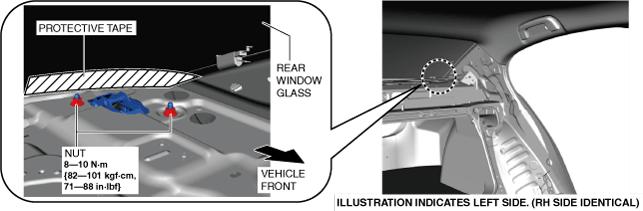
2. Remove wiring harness clips A and B securing the trunk lid hinge. am3zzw000232223. Affix protective tape to the positions shown in the figure and remove the nuts.am3zzw000232234. Remove the trunk lid hinge.
 -
8.Install in the reverse order of removal.
9.Adjust the trunk lid. (See TRUNK LID ADJUSTMENT.)
Parting Seal Weatherstrip
1.Remove the parting seal weatherstrip in the direction of the arrows shown in the figure while detaching the fasteners.
am3zzw00028825
|

2.Install in the reverse order of removal.