REAR BRAKE DISC REMOVAL/INSTALLATION
REAR BRAKE DISC REMOVAL/INSTALLATION
SM2335165
id041100000900
-
Note
-
• When in maintenance mode, the clearance between the disc pad and the disc plate expands.• When the maintenance mode is completed, perform the electric parking brake automatic adjustment.• With the electric parking brake automatic adjustment, the electric parking brake motor gear unit operation time is longer than normal.
1.Switch to the maintenance mode. (See MAINTENANCE MODE.)
2.Disconnect the negative battery terminal. (See NEGATIVE BATTERY TERMINAL DISCONNECTION/CONNECTION [(US)].)
3.Remove the wheel and tire. (See WHEEL AND TIRE REMOVAL/INSTALLATION.)
-
Caution
-
• Do not allow moisture, dust or foreign matter to penetrate the connector as it could cause the electric parking brake motor gear unit to malfunction.
4.Disconnect the electric parking brake motor gear unit connector. (See ELECTRIC PARKING BRAKE MOTOR GEAR UNIT REMOVAL/INSTALLATION.)
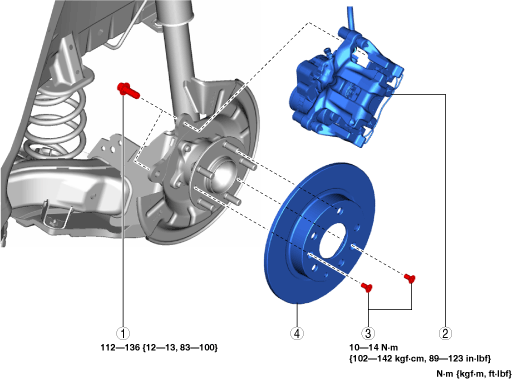
5.Remove in the order indicated in the table.
6.Install in the reverse order of removal.
7.End the maintenance mode. (See MAINTENANCE MODE.)
8.After installation, pump the brake pedal a few times and inspect the following:
-
― Brake drag
am3zzw00025028
|
|
1
|
Bolt
|
|
2
|
Rear brake caliper component
|
|
3
|
Screw
|
|
4
|
Disc plate
|
Rear Brake Caliper Component Removal Note
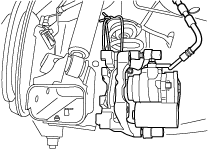
1.Remove the rear brake caliper component and suspend it in a place out of the way using a cable.
am3zzw00025029
|
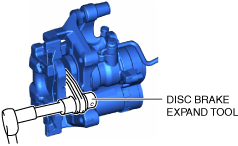
Rear Brake Caliper Component Installation Note
-
Caution
-
• If the piston is pushed into the rear brake caliper while rotating the piston, the rear brake caliper internal parts and dust seal could be damaged. Be careful not to rotate the piston when pushing the piston into the rear brake caliper.
1.Completely press in the piston using a commercially available disc brake expander tool.
am3zzw00025030
|
2.Install the rear brake caliper component.