Roof Garnish Replacement
| •
|
When prying with a flat-tip screwdriver,
wrap it with protective tape, and apply protective tape around
the related parts, to prevent
damage |
| •
|
Put on gloves to protect your
hands. |
| •
|
Take care not to scratch the body
surface. | |
| 1. |
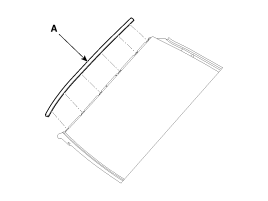
Using a screwdriver or remover, remove the
roof garnish (A).
| •
|
Replace any damaged roof
garnish. | |
|
| 2. |
Installation is the reverse of
removal.
| •
|
Replace any damaged
clips. | | |
Roof Garnish Replacement
| •
|
When prying with a flat-tip screwdriver,
wrap it with protective tape, and apply protective tape around
the related parts, to prevent
damage |
| •
|
Put on gloves to protect your
hands. |
| •
|
Take care not to scratch the body
surface. | |
| 1. |
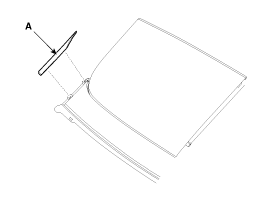
Open the movable glass
fully. |
| 2. |
Using a screwdriver or remover, remove the
roof garnish (A).
| •
|
Replace any damaged roof
garnish. | |
|
| 3. |
Installation is the reverse of
removal.
| •
|
Replace any damaged
clips. | | |
Front Wheel Guard Replacement
| •
|
When prying with a flat-tip screwdriver,
wrap it with protective tape, and apply protective tape around
the related parts, to prevent
damage |
| •
|
Put on gloves to protect your
hands. |
| •
|
Take care not to scratch the body
surface. | |
| 1. |
Remove the front
tire. |
| 2. |
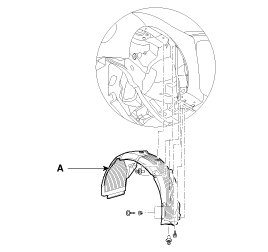
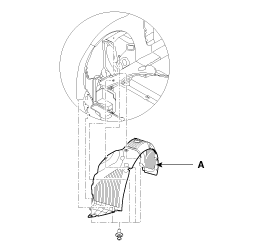
After loosening the mounting clips and screws,
then remove the front wheel guard (A).
[LH]
[RH]
|
| 3. |
Installation is the reverse of
removal.
| •
|
Replace any damaged
clips. | | |
Rear Wheel Guard Replacement
| •
|
When prying with a flat-tip screwdriver,
wrap it with protective tape, and apply protective tape around
the related parts, to prevent
damage |
| •
|
Put on gloves to protect your
hands. |
| •
|
Take care not to scratch the body
surface. | |
| 2. |
After loosening the mounting clips and screws,
then remove the rear wheel guard (A).
[LH]
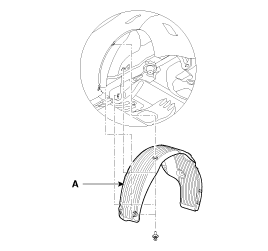
[RH]
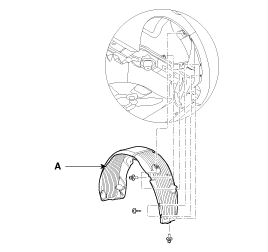
|
| 3. |
Installation is the reverse of
removal.
| •
|
Replace any damaged clips.
| | |
Hood Garnish Replacement
| •
|
When prying with a flat-tip screwdriver,
wrap it with protective tape, and apply protective tape around
the related parts, to prevent
damage |
| •
|
Put on gloves to protect your
hands. |
| •
|
Take care not to scratch the body
surface. | |
| 1. |
Remove the hood insulator pad.
(Refer to the BD group –
“Hood”) |
| 2. |
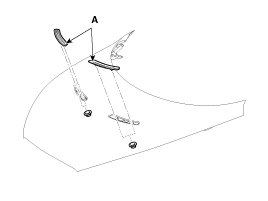
After loosening the mounting nuts, then remove
the hood garnish (A).
Tightening
torque :
3.9 ~ 4.4 N.m (0.4 ~ 0.45 kgf.m, 2.9 ~
3.3 lb-ft)
|
|
| 3. |
Installation is the reverse of
removal.
| •
|
Replace any damaged clips.
| | |
A Pillar Garnish Replacement
| •
|
When prying with a flat-tip screwdriver,
wrap it with protective tape, and apply protective tape around
the related parts, to prevent
damage. |
| •
|
Put on gloves to protect your
hands. |
| •
|
Take care not to scratch the body
surface. | |
| 1. |
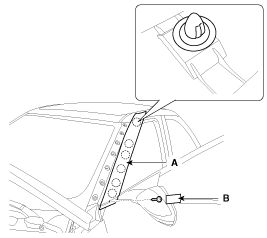
To remove the A pillar garnish (A), loosen the
mounting screw after removing the cap (B).
Tightening
torque :
0.5 ~ 1.0N.m (0.05 ~ 0.1kgf.m, 0.4 ~ 0.7
lb-ft)
|
|
| 2. |
Installation is the reverse of
removal.
| •
|
Replace any damaged clips.
| | |
Quarter Fixed Glass & Molding
Replacement
| •
|
When prying with a flat-tip screwdriver,
wrap it with protective tape, and apply protective tape around
the related parts, to prevent
damage. |
| •
|
Put on gloves to protect your
hands. |
| •
|
Take care not to scratch the body
surface. | |
| 1. |
Remove the following items.
| A. |
Rear seat
(Refer to the BD group - "Rear
Seat") |
| B. |
Front seat belt lower
anchor
(Refer to the BD group - "Front Seat
Belt") |
| C. |
Front door scuff trim
(Refer to the BD group - "Interior
Trim") |
| D. |
Center pillar lower trim
(Refer to the BD group - "Interior
Trim") |
| E. |
Center pillar upper trim
(Refer to the BD group - "Interior
Trim") |
| F. |
Luggage side trim
(Refer to the BD group - "Interior
Trim") |
| G. |
Rear pillar trim
(Refer to the BD group - "Interior
Trim") | |
| 2. |
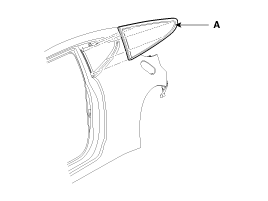
After loosening the mounting nuts, then remove
the quarter fixed glass & molding (A).
Tightening
torque :
3.9 ~ 4.4 N.m (0.4 ~ 0.45 kgf.m, 2.9 ~
3.3 lb-ft)
|
|
| 3. |
Installation is the reverse of
removal.
| •
|
Replace any damaged clips.
| | |
Rear Spoiler Replacement
| •
|
When prying with a flat-tip screwdriver,
wrap it with protective tape, and apply protective tape around
the related parts, to prevent
damage. |
| •
|
Put on gloves to protect your
hands. |
| •
|
Take care not to scratch the body
surface. | |
| 1. |
Remove the following items.
| A. |
Tail gate frame upper trim & Tail
gate center trim
(Refer to the BD group - "Tail
Gate") |
| B. |
Tail gate trim
(Refer to the BD group - "Tail
Gate") |
| C. |
Tail gate frame side trim
(Refer to the BD group - "Tail
Gate") | |
| 2. |
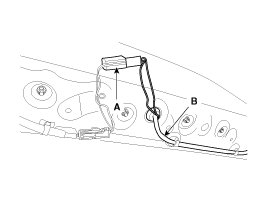
Disconnect the washer nozzle (B) and high
mounted stop lamp connector (A).
|
| 3. |
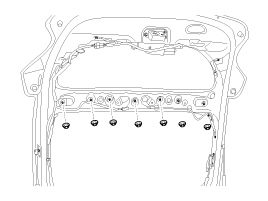
Loosen the rear spoiler mounting
nuts.
Tightening torque :
5.9 ~ 6.4 N.m (0.6 ~ 0.65 kgf.m, 4.3 ~
4.7 lb-ft)
|
|
| 4. |
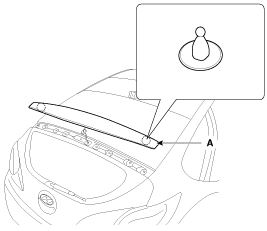
Remove the rear spoiler (A).
|
| 5. |
Installation is the reverse of
removal.
| •
|
Make sure the connector are
connected in properly. |
| •
|
Replace any damaged clips.
| | | |


