Menu +
Generic selectors
Exact matches only
Search in title
Search in content
Post Type Selectors

SEAT WARMER SYSTEM DOES NOT OPERATE [SEAT WARMER SYSTEM]

< Previous Next >

2016 – MX-5 – Body and Accessories

SEAT WARMER SYSTEM DOES NOT OPERATE [SEAT WARMER SYSTEM]

Description

The seat warmer does not warm up even if the seat warmer switch is turned on.

Possible Causes

  • Seat warmer switch malfunction

  • Seat warmer control unit power supply circuit malfunction

    • Short to ground in wiring harness between SEAT WARM 20 A fuse and seat warmer control unit terminal O

    • Short to ground in wiring harness between SEAT WARM 20 A fuse and seat warmer control unit terminal M

    • Open circuit in wiring harness between SEAT WARM 20 A fuse and seat warmer control unit terminal O

    • Open circuit in wiring harness between SEAT WARM 20 A fuse and seat warmer control unit terminal M

    • SEAT WARM 20 A fuse malfunction

    • Short to ground in wiring harness between C/U IG1 15 A fuse and seat warmer control unit terminal A

    • Open circuit in wiring harness between C/U IG1 15 A fuse and seat warmer control unit terminal A

    • C/U IG1 15 A fuse malfunction

  • Open circuit in wiring harness between the following terminals:

    • Seat warmer control unit terminal L and body ground

  • Malfunction in wiring harness between seat warmer control unit and indicator unit terminal I

    • Short to ground in wiring harness between seat warmer control unit terminal J and indicator unit terminal D

    • Open circuit in wiring harness between seat warmer control unit terminal J and indicator unit terminal D

  • Indicator unit malfunction

  • Seat warmer unit malfunction

  • Seat warmer control unit malfunction

  • Connector poor contact or terminal damage

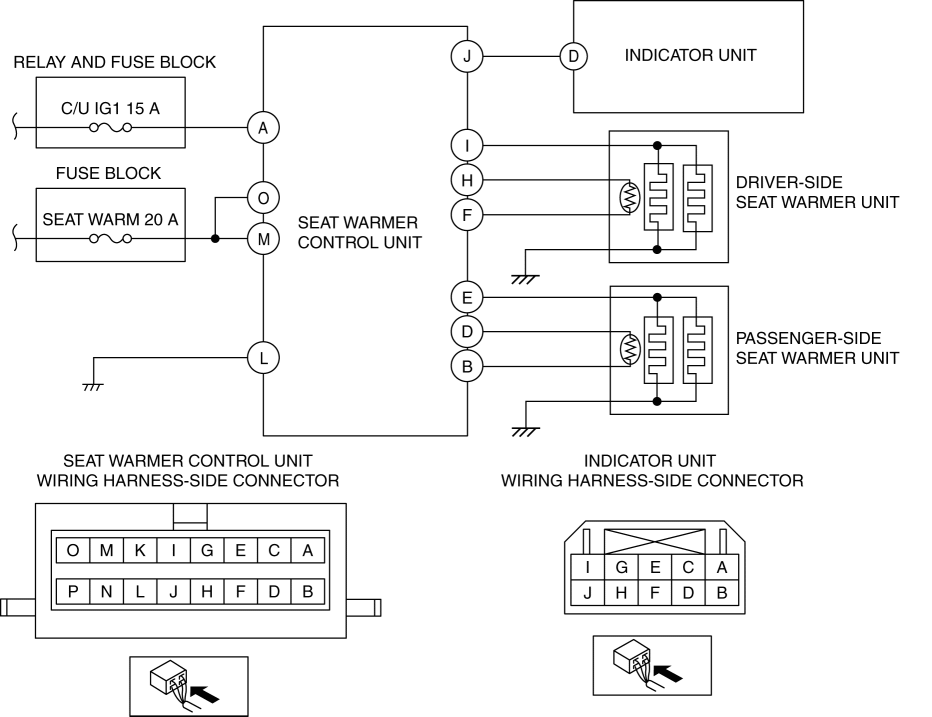
Diagnostic Procedure

Step

Inspection

Action

1

DETERMINE MALFUNCTION SYMPTOM

  • Operate the seat warmer switches on the driver and passenger sides to turn on the seat warmer system for the driver and passenger sides.

  • Does a malfunction occur with the seat warmer system on both sides?

Yes

Go to Step 8.

No

Go to the next step.

2

INSPECT SEAT WARMER CONTROL UNIT CONNECTOR AND SEAT WARMER UNIT CONNECTOR

  • Switch the ignition OFF (LOCK).

  • Disconnect the negative battery cable.

    (See NEGATIVE BATTERY CABLE DISCONNECTION/CONNECTION.)

  • Disconnect the seat warmer control unit connector and the seat warmer unit connector on the side which does not operate.

  • Inspect the connector engagement and connection condition, and inspect the terminals for damage, deformation, corrosion, or disconnection.

  • Is the connector normal?

Yes

Go to the next step.

No

Repair or replace the connector, then go to Step 11.

3

VERIFY IF MALFUNCTION CAUSE IS SEAT WARMER CONTROL UNIT POWER SUPPLY CIRCUIT

  • Verify that the seat warmer control unit connector is disconnected.

  • Connect the negative battery cable.

    (See NEGATIVE BATTERY CABLE DISCONNECTION/CONNECTION.)

  • Switch the ignition ON (engine off or on).

  • Measure the voltage at the following terminals (vehicle wiring harness side).

    • Seat warmer control unit terminal O

    • Seat warmer control unit terminal M

  • Is the voltage B+?

Yes

Go to the next step.

No

Inspect the SEAT WARM 20 A fuse.

    If the fuse is blown:

  • Refer to the wiring diagram and verify if there is a common wiring harness between the following terminals.

    • SEAT WARM 20 A fuse and seat warmer control unit terminal O

    • SEAT WARM 20 A fuse and seat warmer control unit terminal M

      • If there is a common connector:

      • Inspect the common connector and terminals for corrosion, damage, or disconnection and the common wiring harnesses for short to ground to determine the malfunctioning location.

      • Repair or replace the malfunctioning location.

        If there is no common connector:

      • Repair or replace the wiring harness which is shorted to ground.

      • Replace the fuse.

    If the fuse is damaged:

  • Replace the fuse.

    If the fuse is normal:

  • Refer to the wiring diagram and verify if there is a common wiring harness between the following terminals.

    • SEAT WARM 20 A fuse and seat warmer control unit terminal O

    • SEAT WARM 20 A fuse and seat warmer control unit terminal M

      • If there is a common connector:

      • Inspect the common connector and terminals for corrosion, damage, or disconnection and the common wiring harnesses for an open circuit to determine the malfunctioning location.

      • Repair or replace the malfunctioning location.

        If there is no common connector:

      • Repair or replace the wiring harness which has an open circuit.

Go to Step 11.

4

VERIFY IF MALFUNCTION CAUSE IS SEAT WARMER CONTROL UNIT POWER SUPPLY CIRCUIT

  • Verify that the seat warmer control unit connector is disconnected.

  • Connect the negative battery cable.

    (See NEGATIVE BATTERY CABLE DISCONNECTION/CONNECTION.)

  • Switch the ignition ON (engine off or on).

  • Measure the voltage at the following terminals (vehicle wiring harness side).

    • Seat warmer control unit terminal A

  • Is the voltage B+?

Yes

Go to the next step.

No

Inspect the C/U IG1 15 A fuse.

    If the fuse is blown:

  • Refer to the wiring diagram and verify if there is a common wiring harness between the following terminals.

    • C/U IG1 15 A fuse and seat warmer control unit terminal A

      • If there is a common connector:

      • Inspect the common connector and terminals for corrosion, damage, or disconnection and the common wiring harnesses for short to ground to determine the malfunctioning location.

      • Repair or replace the malfunctioning location.

        If there is no common connector:

      • Repair or replace the wiring harness which is shorted to ground.

      • Replace the fuse.

    If the fuse is damaged:

  • Replace the fuse.

    If the fuse is normal:

  • Refer to the wiring diagram and verify if there is a common wiring harness between the following terminals.

    • C/U IG1 15 A fuse and seat warmer control unit terminal A

      • If there is a common connector:

      • Inspect the common connector and terminals for corrosion, damage, or disconnection and the common wiring harnesses for an open circuit to determine the malfunctioning location.

      • Repair or replace the malfunctioning location.

        If there is no common connector:

      • Repair or replace the wiring harness which has an open circuit.

Go to Step 11.

5

VERIFY IF MALFUNCTION CAUSE IS OPEN CIRCUIT IN WIRING HARNESS BETWEEN SEAT WARMER CONTROL UNIT AND BODY GROUND

  • Switch the ignition OFF (LOCK).

  • Verify that the seat warmer control unit connector is disconnected.

  • Inspect for continuity between the following terminals (vehicle wiring harness side) and body ground.

    • Seat warmer control unit terminal L

  • Is there continuity?

Yes

Go to the next step.

No

  • Refer to the wiring diagram and verify if there is a common connector between the following terminals and body ground.

    • Seat warmer control unit terminal L

      • If there is a common connector:

      • Inspect the common connector and terminals for corrosion, damage, or disconnection and the common wiring harnesses for an open circuit to determine the malfunctioning location.

      • Repair or replace the malfunctioning location.

        If there is no common connector:

      • Repair or replace the wiring harness which has an open circuit.

  • Go to Step 11.

6

VERIFY IF MALFUNCTION CAUSE IS SHORT CIRCUIT TO GROUND IN WIRING HARNESS BETWEEN SEAT WARMER CONTROL UNIT AND INDICATOR UNIT

  • Verify that the seat warmer control unit connector is disconnected.

  • Disconnect the indicator unit connector.

  • Inspect for continuity between seat warmer control unit terminal J (vehicle wiring harness side) and body ground.

  • Is there continuity?

Yes

  • Refer to the wiring diagram and verify if there is a common connector between seat warmer control unit terminal J and indicator unit terminal D.

    • If there is a common connector:

    • Inspect the common connector and terminals for corrosion, damage, or disconnection and the common wiring harnesses for short to ground to determine the malfunctioning location.

    • Repair or replace the malfunctioning location.

      If there is no common connector:

    • Repair or replace the wiring harness which is shorted to ground.

  • Go to Step 11.

No

Go to the next step.

7

VERIFY IF MALFUNCTION CAUSE IS OPEN CIRCUIT IN WIRING HARNESS BETWEEN SEAT WARMER CONTROL UNIT AND INDICATOR UNIT

  • Verify that the seat warmer control unit connector and the indicator unit connector are disconnected.

  • Inspect the wiring harness for continuity between seat warmer control unit terminal J and indicator unit terminal D (vehicle wiring harness side).

  • Is there continuity?

Yes

Go to the next step.

No

  • Refer to the wiring diagram and verify if there is a common connector between seat warmer control unit terminal J and indicator unit terminal D.

    • If there is a common connector:

    • Inspect the common connector and terminals for corrosion, damage, or disconnection and the common wiring harnesses for an open circuit to determine the malfunctioning location.

    • Repair or replace the malfunctioning location.

      If there is no common connector:

    • Repair or replace the wiring harness which has an open circuit.

  • Go to Step 11.

8

VERIFY IF MALFUNCTION CAUSE IS SEAT WARMER UNIT

Yes

Go to the next step.

No

Replace the seat warmer unit which has a malfunction, then go to Step 11.

(See SEAT BACK TRIM REMOVAL/INSTALLATION.)

(See SEAT CUSHION TRIM REMOVAL/INSTALLATION.)

9

DETERMINE IF MALFUNCTION CAUSE IS INDICATOR UNIT

Yes

Go to the next step.

No

Replace the indicator unit, then go to Step 11.

(See INDICATOR UNIT REMOVAL/INSTALLATION.)

10

DETERMINE IF MALFUNCTION CAUSE IS SEAT WARMER CONTROL UNIT

  • Reconnect all the disconnected connectors.

  • Connect the negative battery cable.

    (See NEGATIVE BATTERY CABLE DISCONNECTION/CONNECTION.)

  • Switch the ignition ON (engine off or on).

  • Operate the seat warmer switch to turn on the seat warmer system.

  • Does the seat warmer system operate normally?

Yes

Go to the next step.

No

Replace the seat warmer control unit, then go to the next step.

(See SEAT WARMER CONTROL UNIT REMOVAL/INSTALLATION.)

11

VERIFY IF MALFUNCTION CAUSE IS CORRECTED

  • Operate the seat warmer switch to turn on the seat warmer system.

  • Does the seat warmer system operate normally?

Yes

Troubleshooting completed. (Explain the contents of the servicing to the customer.)

No

Verify the malfunction symptom in the symptom troubleshooting chart and perform the other applicable malfunction diagnosis.

(See SYMPTOM TROUBLESHOOTING [SEAT WARMER SYSTEM].)

< Previous Next >

© 2014 Mazda North American Operations, U.S.A.