STEERING GEAR AND LINKAGE REMOVAL/INSTALLATION
2016 – MX-5 – Steering
STEERING GEAR AND LINKAGE REMOVAL/INSTALLATION
WARNING:
-
The temperature of the steering gear (EPS motor) is high just after turning the steering mechanism from lock to lock repeatedly, and it may cause severe burns. Before performing the work, verify that the steering gear has cooled down.
CAUTION:
-
Performing the following procedures could cause an open circuit in the front ABS wheel-speed sensor wiring harness if it is pulled by mistake. Before servicing, disconnect the front ABS wheel-speed sensor and set it aside so that the wiring harness will not be pulled by mistake.
-
If the steering wheel rotates after the steering shaft and the steering gear are disconnected, the internal parts of the clock spring could be damaged. Secure the steering wheel using tape or a cable to prevent the steering shaft from rotating after disconnecting the steering shaft.
-
The EPS CM will not operate normally if the EPS configuration is not performed. If the EPS CM is replaced, always perform the EPS CM auto configuration so that the EPS operates normally.
-
If the steering gear is dropped it could result in internal damage to the EPS CM, therefore be careful not to drop it. If the steering gear receives an impact, replace the EPS CM.
NOTE:
-
The EPS CM prior to replacement stores the vehicle specification information.
-
A new EPS CM does not store any vehicle specification information.
-
When the ignition is switched ON (engine off or on) after the EPS CM is replaced, the EPS CM reads the vehicle specification information sent via CAN communication from the instrument cluster and stores it.
1. Disconnect the negative battery cable. (See NEGATIVE BATTERY CABLE DISCONNECTION/CONNECTION.)
2. Remove the front under cover. (See FRONT UNDER COVER REMOVAL/INSTALLATION.)
3. Disconnect the intermediate shaft from the steering gear and linkage. (See INTERMEDIATE SHAFT REMOVAL/INSTALLATION.)
4. Remove the front ABS wheel-speed sensor from the wheel hub component.
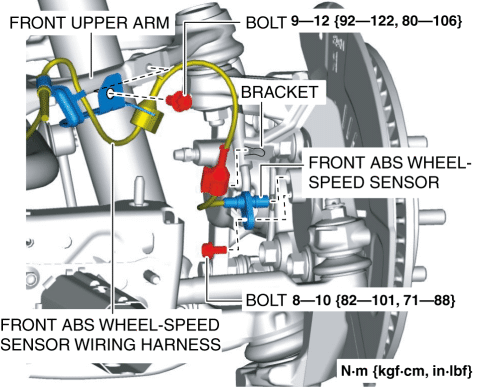
5. Remove the front ABS wheel-speed sensor wiring harness from the bracket and front upper arm and set it aside so that it does not interfere with the servicing.
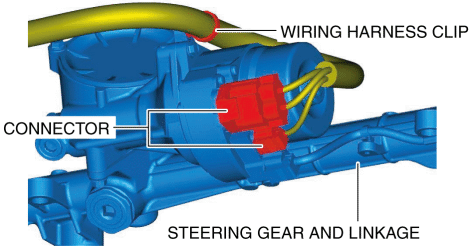
6. Detach the wiring harness clip and connectors shown in the figure.
7. Disconnect the tie-rod end from the steering knuckle. (See TIE-ROD END REPLACEMENT.)
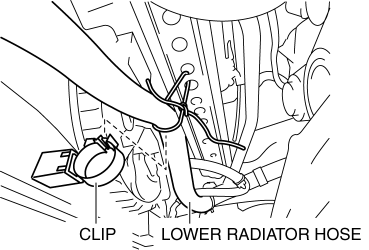
8. Disconnect the lower radiator hose from the cooling fan component clip and hang it using a cable in a place where it does not interfere with the servicing.
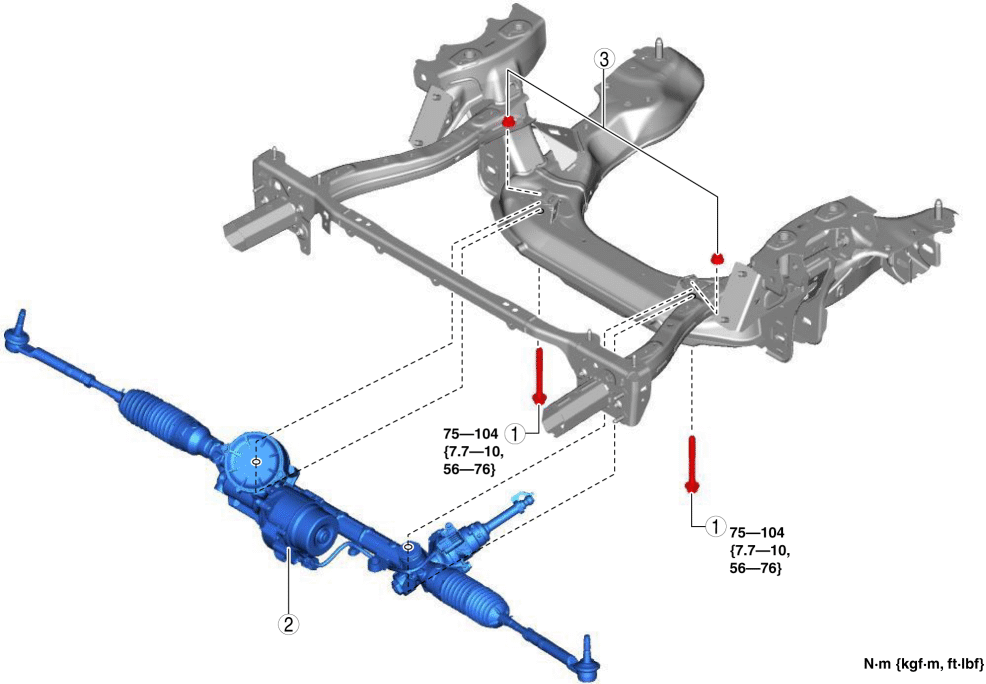
9. Remove in the order indicated in the table.
10. Install in the reverse order of removal.
11. After installation, inspect the front wheel alignment. (See FRONT WHEEL ALIGNMENT.)
12. If the EPS CM is replaced, perform the auto configuration using the following procedure.
a. Switch the ignition ON (engine off or on) and wait for 1 min or more.
b. Switch the ignition off and wait for 3 s or more.
c. Switch the ignition ON (engine off or on) and complete the EPS CM auto configuration.
d. Clear the DTC. (See CLEARING DTC [EPS CONTROL MODULE].)
e. Switch the ignition off and wait for 3 s or more.
f. Switch the ignition ON (engine off or on) and wait for 1 min or more.
g. Using the M-MDS, verify that DTCs U2300:54/U2300:55/U2300:56 are not displayed.
-
If DTCs U2300:54/U2300:55/U2300:56 are displayed, go to the DTC troubleshooting procedure. (See DTC U2300:54/U2300:55/U2300:56 [EPS CONTROL MODULE].)
|
1 |
Bolt (See Bolt Installation Note.) |
|
2 |
Steering gear and linkage |
|
3 |
Nut (See Nut Installation Note.) |
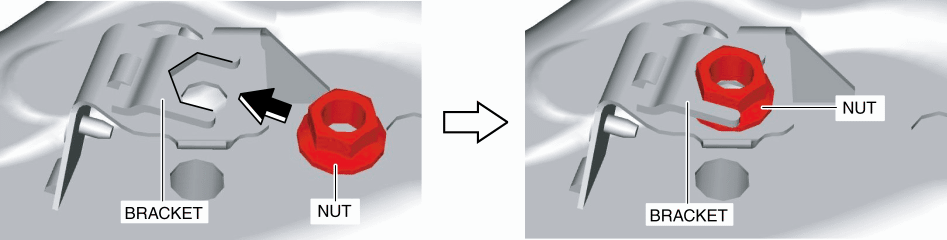
Nut Installation Note
1. Install the nut to the front crossmember bracket as shown in the figure.
Bolt Installation Note
1. Temporarily tighten the bolts.
2. Tighten the bolts to the specified torque.
-
Tightening torque
-
75???104 N·m {7.7???10 kgf·m, 56???76 ft·lbf}