DSC RELATED PARTS SENSOR INITIALIZATION PROCEDURE
2016 – MX-5 – Brakes
DSC RELATED PARTS SENSOR INITIALIZATION PROCEDURE
WARNING:
-
If the initialization procedure is not completed, the DSC will not operate properly and it might cause an unexpected accident. Therefore, after replacing the DSC HU/CM or SAS control module, always perform the initialization procedure to insure proper DSC operation.
When using M-MDS
NOTE:
-
Perform initialization on the sensors shown in the following table.
|
Replacement part |
Initialization items |
|||
|
Brake fluid pressure sensor |
Lateral Acceleration Sensor |
Yaw Rate Sensor |
Longitudinal Acceleration Sensor |
|
|
DSC HU/CM |
Implement |
Implement |
Implement |
Implement |
|
SAS control module |
— |
Implement |
Implement |
Implement |
1. Inspect the wheel alignment and the tire pressure. (See FRONT WHEEL ALIGNMENT.) (See REAR WHEEL ALIGNMENT.) (See WHEEL AND TIRE SPECIFICATION.)
-
If there is any malfunction, adjust the applicable part.
2. Position the vehicle on level ground.
3. Connect the M-MDS to DLC-2.
4. After the vehicle is identified, select the following items from the initial screen of the M-MDS.
-
Select “Chassis”.
-
Select “ABS/DSC”.
-
Select “Sensor Initialization”.
5. Then, select an item from the screen menu.
-
“Brake fluid pressure sensor”
-
“Lateral Acceleration Sensor”
-
“Yaw Rate Sensor”
-
“Longitudinal Acceleration Sensor”
6. Perform the procedure according to the directions on the screen.
7. Drive the vehicle.
8. After 5 min or more of driving, verify that the DSC system is normal.
When not using M-MDS
NOTE:
-
Depending on the nature of the servicing performed prior to implementing the initialization, a warning light may be illuminated.
1. Inspect the wheel alignment and the tire pressure. (See FRONT WHEEL ALIGNMENT.) (See REAR WHEEL ALIGNMENT.) (See WHEEL AND TIRE SPECIFICATION.)
-
If there is any malfunction, adjust the applicable part.
2. Position the vehicle on level ground.
3. Switch the ignition ON (engine off) and wait for 30 s or more.
4. With your left foot depressing the brake pedal, perform the following procedure within 30 s.
a. Operate the parking brake. (Brake system warning light illuminated)
b. Depress the accelerator pedal fully 2 times.
c. Release the parking brake. (Brake system warning light turns off)
d. Perform the same procedure one more time.
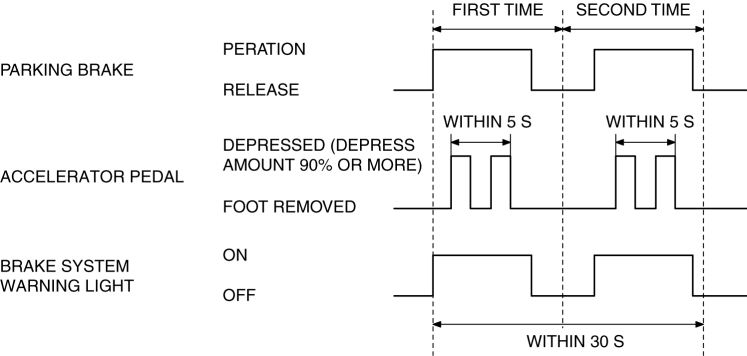
5. Release your foot from the brake pedal.
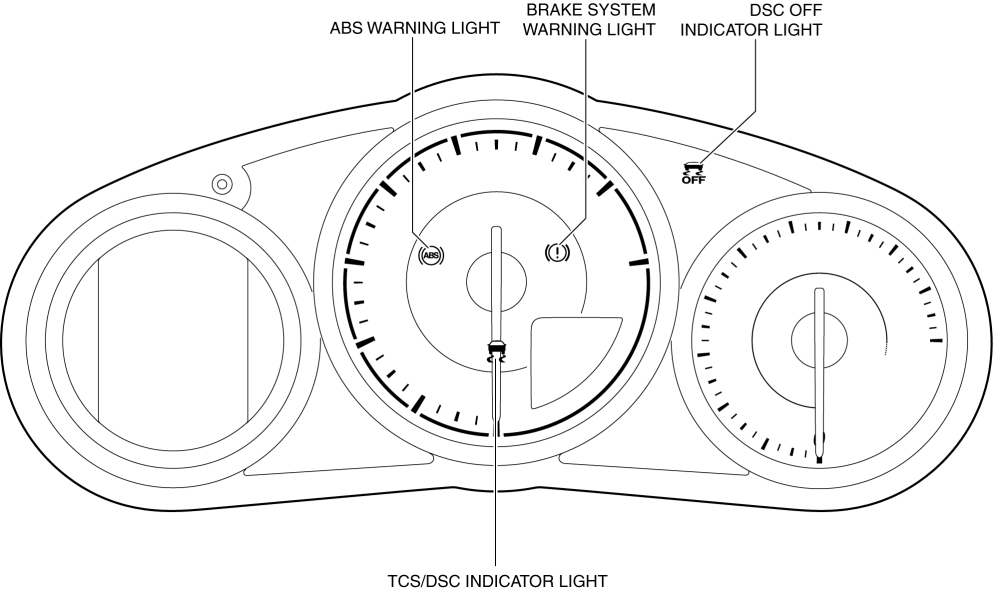
6. After 2 s, verify that the following warning lights/indicator lights turns off after approx. 3 s.
NOTE:
-
Depending on the nature of the work performed prior to implementing the initialization, a warning light may be illuminated.
-
BRAKE SYSTEM WARNING LIGHT
-
ABS WARNING LIGHT
-
TCS/DSC INDICATOR LIGHT
-
DSC OFF INDICATOR LIGHT
-
If each warning light/indicator light is not illuminated/does not turn off, switch the ignition off and repeat the procedure from the beginning.
7. Switch the ignition off.
8. Drive the vehicle.
9. After 5 min or more of driving, verify that the DSC system is normal.