Menu +
Generic selectors
Exact matches only
Search in title
Search in content
Post Type Selectors

DTC P0117:00 [PCM (SKYACTIV-G 2.0)]

< Previous Next >

2016 – MX-5 – Engine

DTC P0117:00 [PCM (SKYACTIV-G 2.0)]

DTC P0117:00

ECT sensor No.1 circuit low input

DETECTION CONDITION

  • The PCM monitors the ECT sensor No.1 signal. If the PCM detects that the ECT sensor No.1 voltage at the PCM terminal 1AK is below 0.2 V for 5 s, the PCM determines that the ECT sensor No.1 circuit has a malfunction.

    Diagnostic support note

  • This is a continuous monitor (engine cooling system).

  • The check engine light illuminates if the PCM detects the above malfunction condition during the first drive cycle.

  • FREEZE FRAME DATA/Snapshot data is available.

  • DTC is stored in the PCM memory.

FAIL-SAFE FUNCTION

  • Fixes the water temperature for the engine control at 40 °C {104 °F}, and for the idle air control at 80 °C {176 °F}.

  • Operates the cooling fan (high speed rotation).

  • Inhibits the fuel cut control during shift change.

POSSIBLE CAUSE

  • Engine overheating (cooling system malfunction)

  • ECT sensor No.1 connector or terminals malfunction

  • ECT sensor No.1 malfunction

  • Short to ground in wiring harness between ECT sensor No.1 terminal A and PCM terminal 1AK

  • PCM connector or terminals malfunction

  • ECT sensor No.1 signal circuit and ground circuit are shorted to each other

  • PCM malfunction

CAUTION:

  • Verify the malfunction symptom according to not only the PID value but also the symptom troubleshooting.

Related PIDs

Item (definition)

Unit/Condition

Definition

Condition/Specification (Reference)

ECT

°C, °F

Engine coolant temperature input from ECT sensor No.1

  • Displays ECT

V

ECT sensor No.1 voltage

    Ignition switched ON (engine off)

  • ECT is 92 °C {198 °F}: Approx. 0.65 V

    Idle (after warm up)

  • ECT is 93 °C {199 °F}: Approx. 0.64 V

    Racing (Engine speed is 2,000 rpm)

  • ECT is 92 °C {198 °F}: Approx. 0.66 V

    Racing (Engine speed is 4,000 rpm)

  • ECT is 93 °C {199 °F}: Approx. 0.64 V

Diagnostic Procedure

STEP

INSPECTION

ACTION

1

RECORD FREEZE FRAME DATA/SNAPSHOT DATA AND DIAGNOSTIC MONITORING TEST RESULTS TO UTILIZE WITH REPEATABILITY VERIFICATION

NOTE:

  • Recording can be facilitated using the screen capture function of the PC.

  • Record the FREEZE FRAME DATA/snapshot data and DIAGNOSTIC MONITORING TEST RESULTS (engine cooling system related) on the repair order.

???

Go to the next step.

2

VERIFY RELATED REPAIR INFORMATION AVAILABILITY

  • Verify related Service Bulletins and/or on-line repair information availability.

  • Is any related repair information available?

Yes

Perform repair or diagnosis according to the available repair information.

  • If the vehicle is not repaired, go to the next step.

No

Go to the next step.

3

VERIFY ENGINE CONDITION

  • Verify the engine condition.

  • Is the engine overheating?

Yes

Perform the symptom troubleshooting ???NO.17 COOLING SYSTEM CONCERNS-OVERHEATING???.

(See NO.17 COOLING SYSTEM CONCERNS-OVERHEATING [SKYACTIV-G 2.0].)

No

Go to the next step.

4

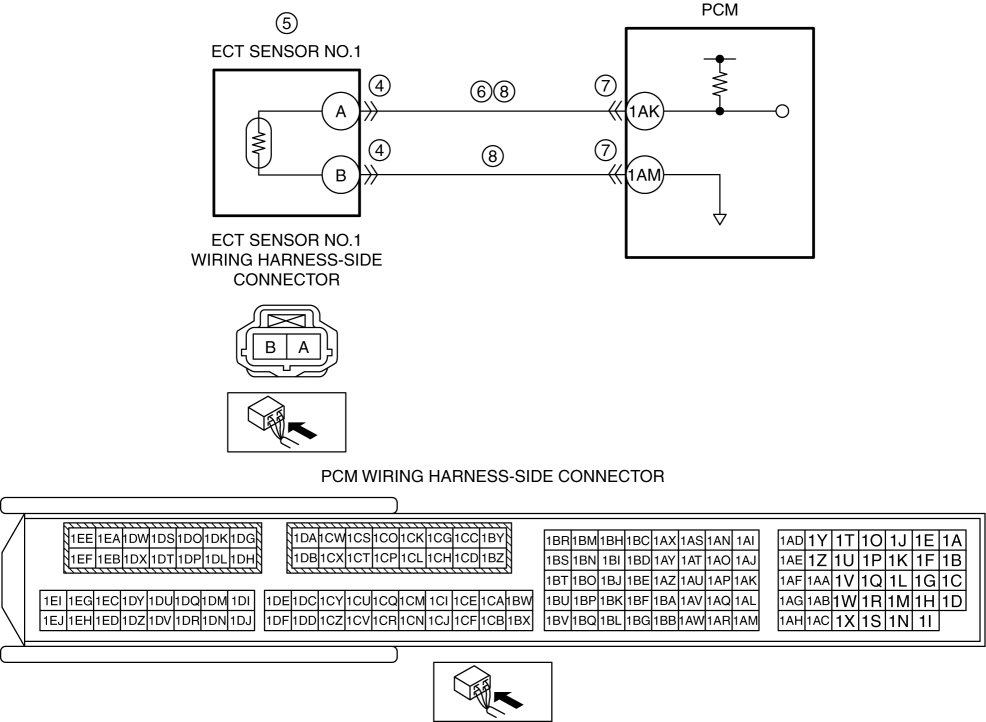
INSPECT ECT SENSOR NO.1 CONNECTOR CONDITION

  • Switch the ignition off.

  • Disconnect the ECT sensor No.1 connector.

  • Inspect for poor connection (such as damaged/pulled-out pins, corrosion).

  • Is there any malfunction?

Yes

Repair or replace the connector and/or terminals, then go to Step 9.

No

Go to the next step.

5

DETERMINE IF ECT SENSOR NO.1 OR WIRING HARNESS MALFUNCTION

  • Reconnect all disconnected connectors.

  • Access the ECT PID using the M-MDS.

    (See ON-BOARD DIAGNOSTIC TEST [PCM (SKYACTIV-G 2.0)].)

  • Verify the ECT PID value when disconnecting the ECT sensor No.1 connector.

  • Does the ECT PID value change?

Yes

Replace the ECT sensor No.1, then go to Step 9.

(See ENGINE COOLANT TEMPERATURE (ECT) SENSOR REMOVAL/INSTALLATION [SKYACTIV-G 2.0].)

No

Go to the next step.

6

INSPECT ECT SENSOR NO.1 SIGNAL CIRCUIT FOR SHORT TO GROUND

  • Verify that the ECT sensor No.1 connector is disconnected.

  • Switch the ignition off.

  • Inspect for continuity between ECT sensor No.1 terminal A (wiring harness-side) and body ground.

  • Is there continuity?

Yes

Disconnect the PCM connector and inspect the wiring harness for short to ground.

  • If the short to ground circuit could be detected in the wiring harness:

    • Refer to the wiring diagram and verify whether or not there is a common connector between ECT sensor No.1 terminal A and PCM terminal 1AK.

      • If there is a common connector:

      • Determine the malfunctioning part by inspecting the common connector and the terminal for corrosion, damage, or pin disconnection, and the common wiring harness for a short to ground.

      • Repair or replace the malfunctioning part.

        If there is no common connector:

      • Repair or replace the wiring harness which has a short to ground.

Go to Step 9.

No

Go to the next step.

7

INSPECT PCM CONNECTOR CONDITION

  • Disconnect the PCM connector.

  • Inspect for poor connection (such as damaged/pulled-out pins, corrosion).

  • Is there any malfunction?

Yes

Repair or replace the connector and/or terminals, then go to Step 9.

No

Go to the next step.

8

INSPECT ECT SENSOR NO.1 SIGNAL CIRCUIT AND GROUND CIRCUIT FOR SHORT TO EACH OTHER

  • Verify that the ECT sensor No.1 and PCM connectors are disconnected.

  • Inspect for continuity between ECT sensor No.1 terminals A and B (wiring harness-side).

  • Is there continuity?

Yes

Refer to the wiring diagram and verify whether or not there is a common connector between the following terminals:

  • ECT sensor No.1 terminal A???PCM terminal 1AK

  • ECT sensor No.1 terminal B???PCM terminal 1AM

    If there is a common connector:

  • Determine the malfunctioning part by inspecting the common connector and the terminal for corrosion, damage, or pin disconnection, and the common wiring harness for a short to each other.

  • Repair or replace the malfunctioning part.

    If there is no common connector:

  • Repair or replace the wiring harness which has a short to each other.

Go to the next step.

No

Go to the next step.

9

VERIFY DTC TROUBLESHOOTING COMPLETED

Yes

Repeat the inspection from Step 1.

Go to the next step.

No

Go to the next step.

10

VERIFY AFTER REPAIR PROCEDURE

Yes

Go to the applicable DTC inspection.

(See DTC TABLE [PCM (SKYACTIV-G 2.0)].)

No

DTC troubleshooting completed.

< Previous Next >

© 2014 Mazda North American Operations, U.S.A.