Menu +
Generic selectors
Exact matches only
Search in title
Search in content
Post Type Selectors

NO CD SOUND OUTPUT [ENTERTAINMENT SYSTEM [WITH CENTER DISPLAY]]

< Previous Next >

2016 – MX-5 – Body and Accessories

NO CD SOUND OUTPUT [ENTERTAINMENT SYSTEM [WITH CENTER DISPLAY]]

Description

NO CD SOUND OUTPUT

Radio, AUX audio, Bluetooth® audio, Internet radio, USB audio and guidance voice is output, but not CD sound

Possible Causes

  • CD malfunction

  • Connector poor contact or terminal damage

  • Open circuit in wiring harness between the following terminals:

    • Tuner and amp unit (TAU) terminal 1M and CD player terminal L

    • TAU terminal 1N and CD player terminal N

    • TAU terminal 1O and CD player terminal P

    • TAU terminal 1P and CD player terminal R

  • Short to ground in wiring harness between the following terminals:

    • TAU terminal 1M and CD player terminal L

    • TAU terminal 1N and CD player terminal N

    • TAU terminal 1O and CD player terminal P

    • TAU terminal 1P and CD player terminal R

  • Short to power supply in wiring harness between the following terminals:

    • TAU terminal 1M and CD player terminal L

    • TAU terminal 1N and CD player terminal N

    • TAU terminal 1O and CD player terminal P

    • TAU terminal 1P and CD player terminal R

  • CD player malfunction

  • TAU malfunction

  • Connectivity master unit (CMU) malfunction

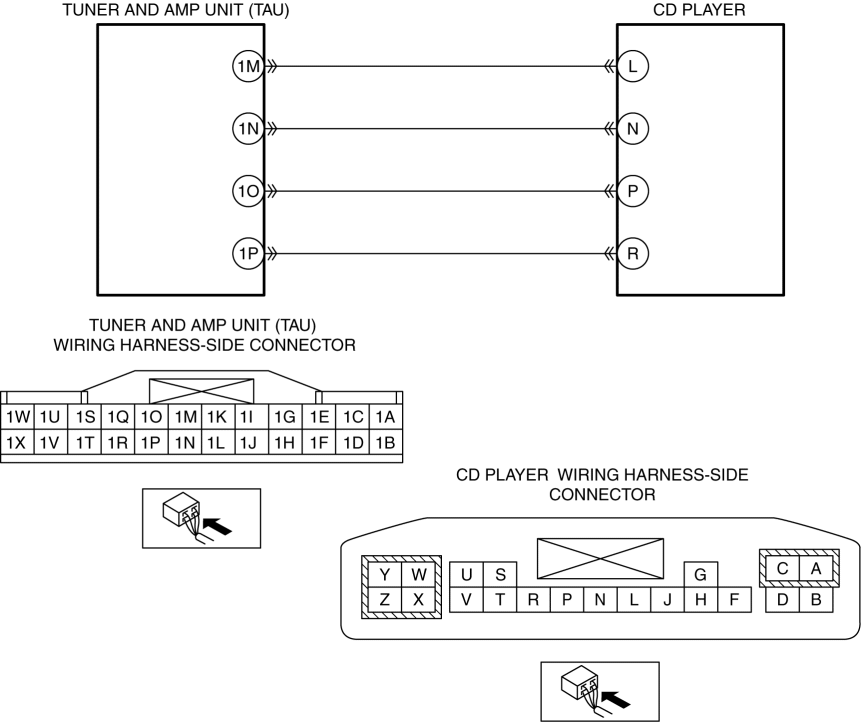
System Wiring Diagram

Diagnostic Procedure

Step

Inspection

Action

1

    DETERMINE IF MALFUNCTION CAUSE IS CD

  • After obtaining the customer’s consent, replace with a CD that was not used when the malfunction occurred.

  • Is CD sound produced?

Yes

System is normal. Explain to the customer that the CD cannot be played for any one of the following reasons.

  • Dirt or scratches on CD

  • Sound file not compatible

No

Go to the next step.

2

    INSPECT CD PLAYER CONNECTOR

  • Switch the ignition off.

  • Disconnect the negative battery cable.

    (See NEGATIVE BATTERY CABLE DISCONNECTION/CONNECTION.)

  • Disconnect the CD player connector.

  • Inspect the connector engagement and connection condition and inspect the terminals for damage, deformation, corrosion, or disconnection.

  • Is the connector normal?

Yes

Go to the next step.

No

Repair or replace the connector, then go to Step 9.

3

    INSPECT TAU CONNECTOR

  • Disconnect the TAU connector.

  • Inspect the connector engagement and connection condition and inspect the terminals for damage, deformation, corrosion, or disconnection.

  • Is the connector normal?

Yes

Go to the next step.

No

Repair or replace the connector, then go to Step 9.

4

    VERIFY IF MALFUNCTION CAUSE IS OPEN CIRCUIT IN WIRING HARNESS BETWEEN TAU AND CD PLAYER

  • Verify that the CD player and the TAU connector are disconnected.

  • Inspect the wiring harness for continuity between the following terminals (vehicle wiring harness side).

    • TAU terminal 1M and CD player terminal L

    • TAU terminal 1N and CD player terminal N

    • TAU terminal 1O and CD player terminal P

    • TAU terminal 1P and CD player terminal R

  • Is there continuity?

Yes

Go to the next step.

No

  • Refer to the wiring diagram and verify if there is a common connector between the following terminals.

    • TAU terminal 1M and CD player terminal L

    • TAU terminal 1N and CD player terminal N

    • TAU terminal 1O and CD player terminal P

    • TAU terminal 1P and CD player terminal R

      • If there is a common connector:

      • Inspect the common connector and terminals for corrosion, damage, or disconnection and the common wiring harnesses for an open circuit to determine the malfunctioning location.

      • Repair or replace the malfunctioning location.

        If there is no common connector:

      • Repair or replace the wiring harness which has an open circuit.

  • Go to Step 9.

5

    VERIFY IF MALFUNCTION CAUSE IS SHORT CIRCUIT TO GROUND IN WIRING HARNESS BETWEEN TAU AND CD PLAYER

  • Verify that the CD player and the TAU connector are disconnected.

  • Inspect for continuity between the following wiring harness terminals (vehicle wiring harness side) and body ground.

    • CD player terminal L

    • CD player terminal N

    • CD player terminal P

    • CD player terminal R

  • Is there continuity?

Yes

  • Refer to the wiring diagram and verify if there is a common connector between the following terminals.

    • TAU terminal 1M and CD player terminal L

    • TAU terminal 1N and CD player terminal N

    • TAU terminal 1O and CD player terminal P

    • TAU terminal 1P and CD player terminal R

      • If there is a common connector:

      • Inspect the common connector and terminals for corrosion, damage, or disconnection and the common wiring harnesses for short to ground to determine the malfunctioning location.

      • Repair or replace the malfunctioning location.

        If there is no common connector:

      • Repair or replace the wiring harness which is shorted to ground.

  • Go to Step 9.

No

Go to the next step.

6

    VERIFY IF MALFUNCTION CAUSE IS SHORT CIRCUIT TO POWER SUPPLY IN WIRING HARNESS BETWEEN TAU AND CD UNIT

  • Verify that the CD player and the TAU connector are disconnected.

  • Reconnect the negative battery cable.

    (See NEGATIVE BATTERY CABLE DISCONNECTION/CONNECTION.)

  • Switch the ignition to ACC or ON (engine off or on).

  • Measure the voltage at the following terminals (vehicle wiring harness side).

    • CD player terminal L

    • CD player terminal N

    • CD player terminal P

    • CD player terminal R

  • Is the voltage B+?

Yes

  • Refer to the wiring diagram and verify if there is a common connector between the following terminals.

    • TAU terminal 1M and CD player terminal L

    • TAU terminal 1N and CD player terminal N

    • TAU terminal 1O and CD player terminal P

    • TAU terminal 1P and CD player terminal R

      • If there is a common connector:

      • Inspect the common connector and terminals for corrosion, damage, or disconnection and the common wiring harnesses for a short to power supply.

      • Repair or replace the malfunctioning location.

        If there is no common connector:

      • Repair or replace the wiring harness which is shorted to the power supply.

  • Go to Step 9.

No

Go to the next step.

7

Yes

Troubleshooting completed (explain the contents of the servicing to the customer).

No

Go to the next step.

8

Yes

Troubleshooting completed (explain the contents of the servicing to the customer).

No

Replace the CMU, then go to the next step.

(See CONNECTIVITY MASTER UNIT (CMU) REMOVAL/INSTALLATION.)

9

    VERIFY IF MALFUNCTION CAUSE IS CORRECTED

  • Switch the ignition to ACC or ON (engine off or on).

  • Insert the CD when the malfunction occurred.

  • Is CD sound produced?

Yes

Troubleshooting completed (explain the contents of the servicing to the customer).

No

Verify the malfunction symptom in the symptom troubleshooting chart and perform the other applicable malfunction diagnosis.

(See SYMPTOM TROUBLESHOOTING [ENTERTAINMENT SYSTEM [WITH CENTER DISPLAY]].)

< Previous Next >

© 2014 Mazda North American Operations, U.S.A.