CAMSHAFT POSITION (CMP) SENSOR REMOVAL/INSTALLATION [SKYACTIV-G 2.0]
2016 – MX-5 – Engine
CAMSHAFT POSITION (CMP) SENSOR REMOVAL/INSTALLATION [SKYACTIV-G 2.0]
CAUTION:
-
When replacing the CMP sensor, make sure there is no foreign matter on it such as metal shavings. If it is installed with foreign matter, the sensor output signal will malfunction resulting from fluctuation in magnetic flux and cause a deterioration in engine control.
Intake CMP Sensor
1. Disconnect the negative battery cable. (See NEGATIVE BATTERY CABLE DISCONNECTION/CONNECTION.)
2. Remove the following parts:
a. Seal cover (See SEAL COVER REMOVAL/INSTALLATION [SKYACTIV-G 2.0].)
b. Front suspension tower bar (Vehicles with front suspension tower bar) (See FRONT SUSPENSION TOWER BAR REMOVAL/INSTALLATION.)
c. Intake manifold (See INTAKE-AIR SYSTEM REMOVAL/INSTALLATION [SKYACTIV-G 2.0].)
3. Disconnect the intake CMP sensor connector.
4. Remove the bolt.
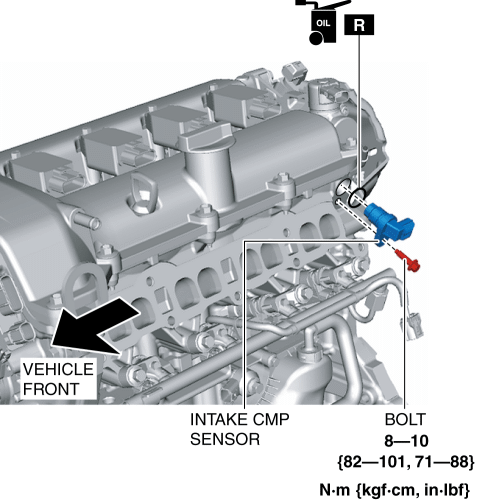
5. Remove the intake CMP sensor.
6. Install in the reverse order of removal.
Exhaust CMP Sensor
1. Disconnect the negative battery cable. (See NEGATIVE BATTERY CABLE DISCONNECTION/CONNECTION.)
2. Remove the front suspension tower bar (joint). (Vehicles with front suspension tower bar) (See FRONT SUSPENSION TOWER BAR REMOVAL/INSTALLATION.)
3. Disconnect the exhaust CMP sensor connector.
4. Remove the bolt.

5. Remove the exhaust CMP sensor.
6. Install in the reverse order of removal.