FUEL INJECTOR REMOVAL/INSTALLATION [SKYACTIV-G 2.0]
2016 – MX-5 – Engine
FUEL INJECTOR REMOVAL/INSTALLATION [SKYACTIV-G 2.0]
WARNING:
-
Highly pressurized fuel may spray out if the fuel line is cut. Due to the following dangers occurring with a fuel spray, always complete the “Fuel Line Safety Procedure” to prevent the fuel from spraying.
-
Fuel may cause irritation if it comes in contact with skin and eyes.
-
If fuel ignites and causes a fire, it may lead to serious injury or death, and damage to property and facilities.
-
A person charged with static electricity could cause a fire or explosion, resulting in death or serious injury. Before draining fuel, make sure to discharge static electricity by touching the vehicle body.
CAUTION:
-
Touching the end of the fuel injector by hand or pressing it to an object may cause a malfunction. Be very careful when handling the end of the fuel injector.
-
When the fuel distributor is removed, air tightness of the fuel injector will be lost. Always replace the stopper ring, O-ring, back-up ring, and teflon seal of the fuel injector with new ones.
-
Do not remove the fuel pressure sensor from the fuel distributor.
1. Complete the “BEFORE SERVICE PRECAUTION”. (See BEFORE SERVICE PRECAUTION [SKYACTIV-G 2.0].)
2. Disconnect the negative battery cable. (See NEGATIVE BATTERY CABLE DISCONNECTION/CONNECTION.)
3. Remove the seal cover. (See SEAL COVER REMOVAL/INSTALLATION [SKYACTIV-G 2.0].)
4. Remove the intake manifold. (See INTAKE-AIR SYSTEM REMOVAL/INSTALLATION [SKYACTIV-G 2.0].)
5. Remove in the order indicated in the table.
6. Install in the reverse order of removal.
7. Complete the “AFTER SERVICE PRECAUTION”. (See AFTER SERVICE PRECAUTION [SKYACTIV-G 2.0].)
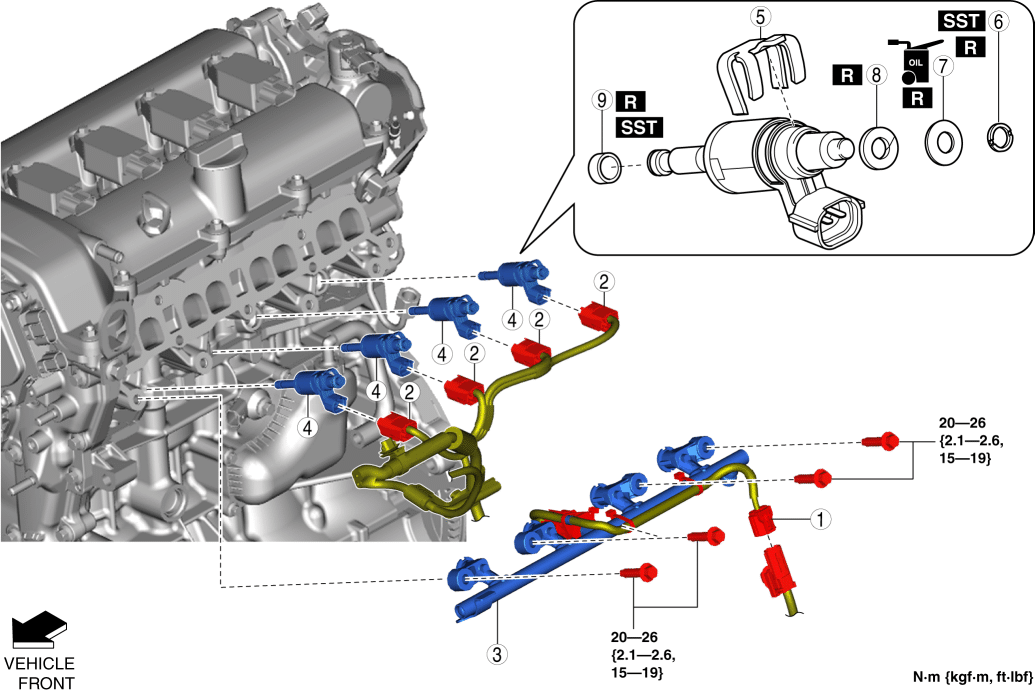
|
1 |
Short cord connector |
|
2 |
Fuel injector connector |
|
3 |
Fuel distributor |
|
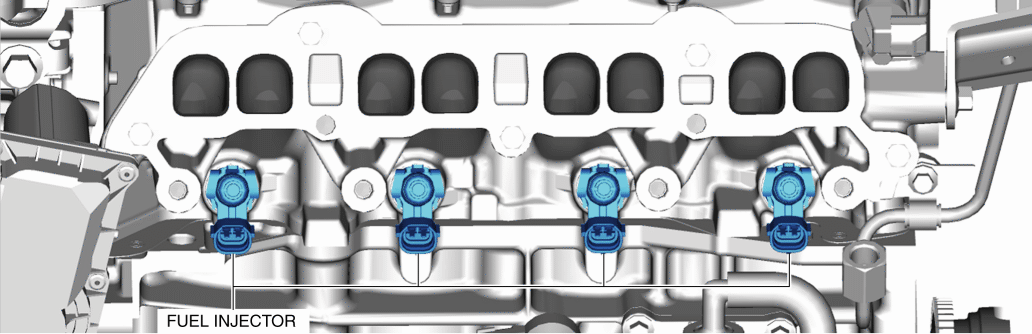
4 |
Fuel injector |
|
5 |
Spacer |
|
6 |
Stopper ring (See Stopper Ring Removal Note.) |
|
7 |
O-ring |
|
8 |
Back-up ring |
|
9 |
Teflon seal (See Teflon Seal Removal Note.) |
Fuel Distributor Removal Note
1. Remove the high pressure fuel pipe. (See HIGH PRESSURE FUEL PUMP REMOVAL/INSTALLATION [SKYACTIV-G 2.0].)
2. Remove the fuel distributor.
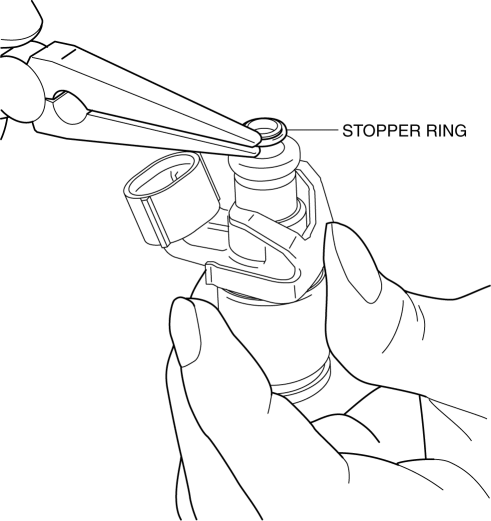
Stopper Ring Removal Note
NOTE:
-
When removing the stopper ring, do not damage the fuel injector with the tool.
1. Remove the stopper ring as shown in the figure.
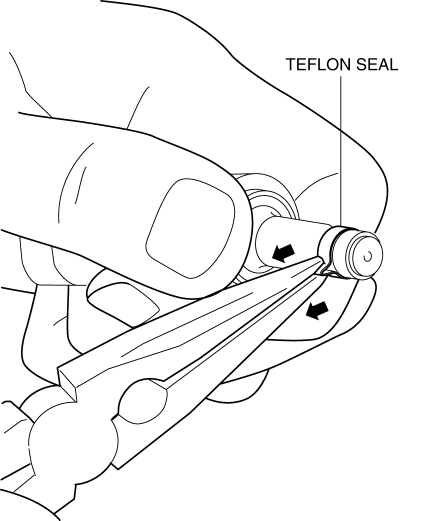
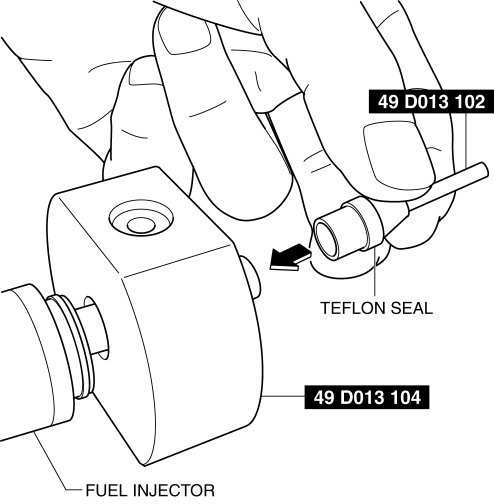
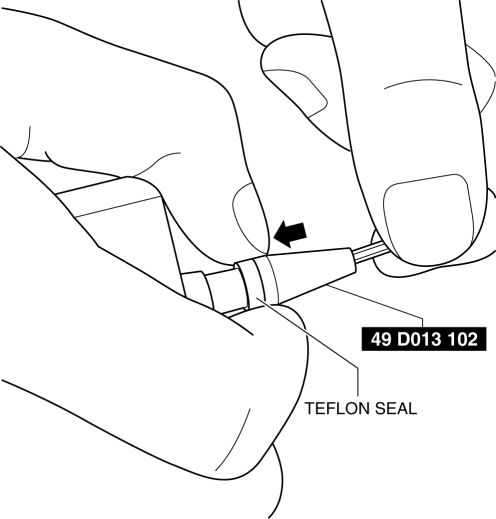
Teflon Seal Removal Note
NOTE:
-
When stretching the teflon seal, do not damage the fuel injector with the tool.
1. Stretch the teflon seal as shown in the figure.
2. Remove the teflon seal as shown in the figure.
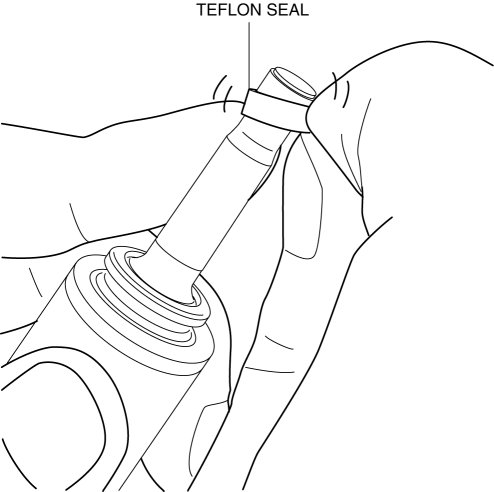
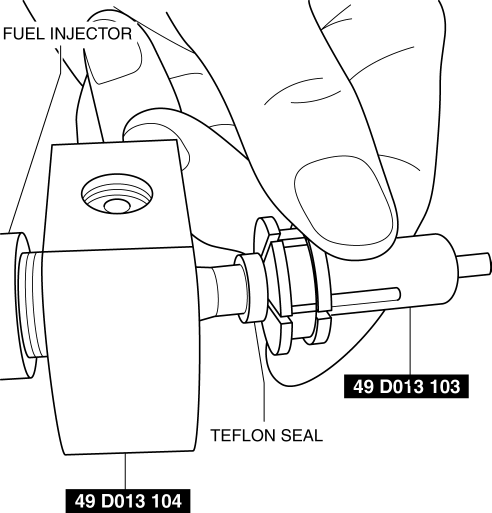
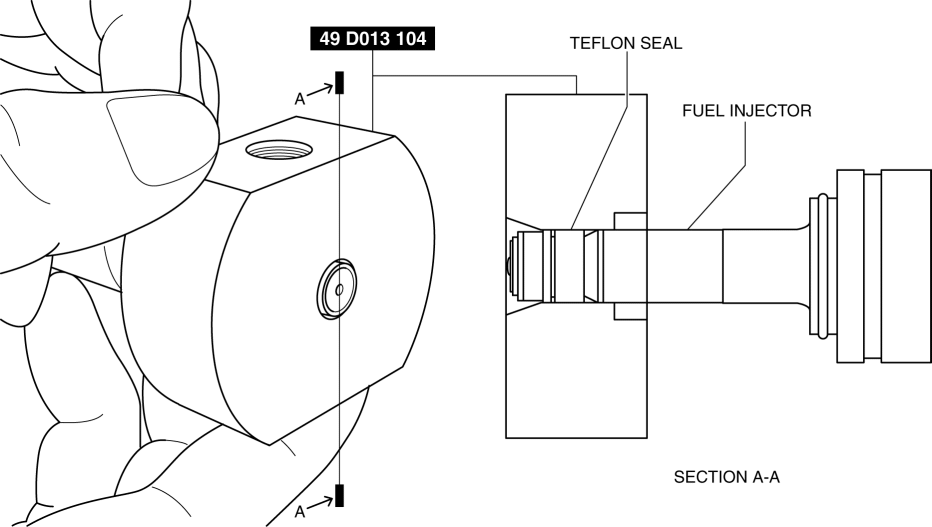
Teflon Seal Installation Note
NOTE:
-
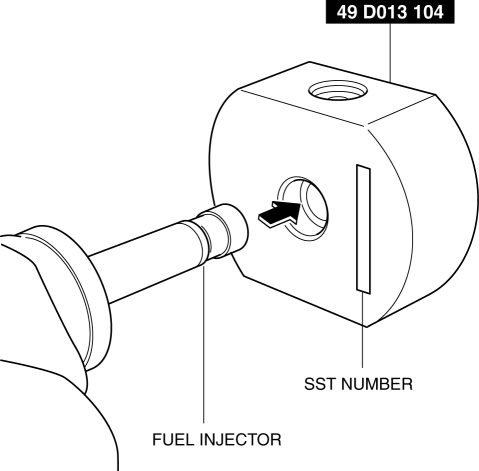
49 D013 102, 49 D013 103, and 49 D013 104 are component parts for 49 D013 1A0.
1. Apply engine oil to the SST.
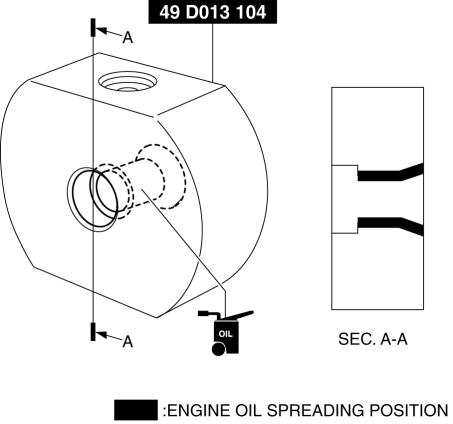
2. Install the SST with the mark on the SST facing the fuel injector.
3. Insert a new teflon seal onto the SST.

4. Install the SST equipped with the teflon seal to the end of the fuel injector.
5. Using the SST, press on the teflon seal to the fuel injector side.

6. Press on the teflon seal to the position indicated in the figure, then remove the SST.
7. Install the teflon seal to the fuel injector by hand and remove the SST.
8. Slide the SST to the end of the fuel injector.

9. Hold the SST at the position shown in the figure and correctly position the teflon seal for more than 30 sec.
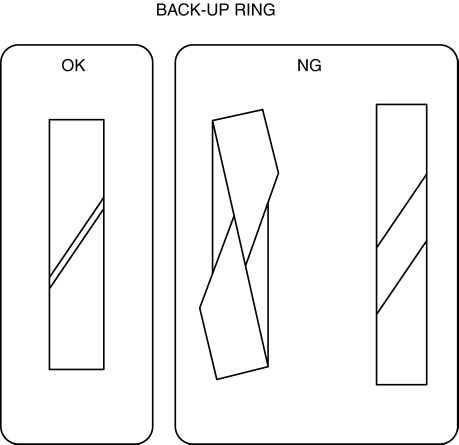
Back-up Ring Installation Note
1. Install the back-up ring being, making sure it is installed in the right direction.
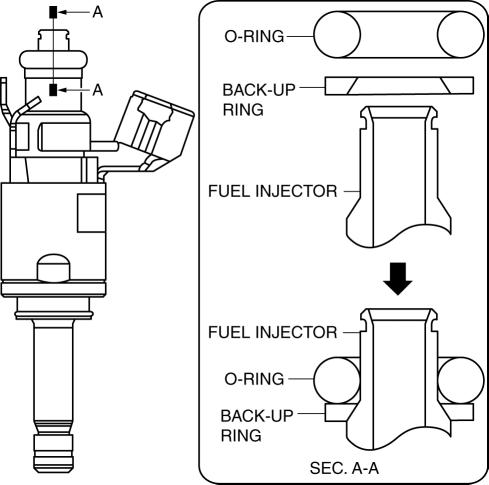
2. After installing the back-up ring, verify that it is installed correctly.
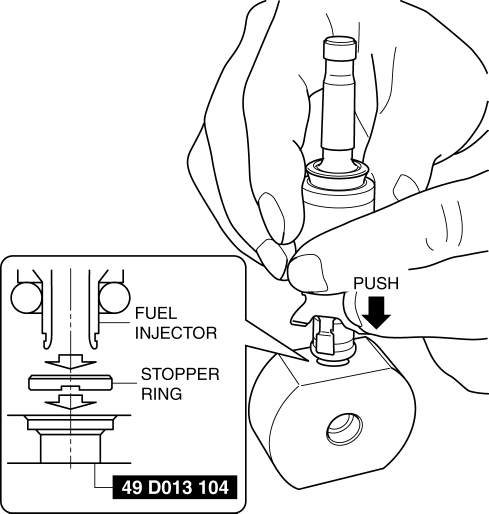
Stopper Ring Installation Note
NOTE:
-
Do not insert the stopper ring at an angle, and always press it on straight to the SST.
1. Set a new stopper ring on the SST as shown in the figure being careful of the stopper ring orientation, and press down the fuel injector until a click sound is heard.
Fuel Injector Installation Note
CAUTION:
-
If engine oil is applied to the fuel injector, it could adhere to the injection holes and inhibit the fuel injector function. To prevent this, apply engine oil to the cylinder head side.
1. Apply engine oil to the fuel injector installation holes.
2. Insert the fuel injectors to the installation holes one by one, being careful of the direction the fuel injectors are pointed.
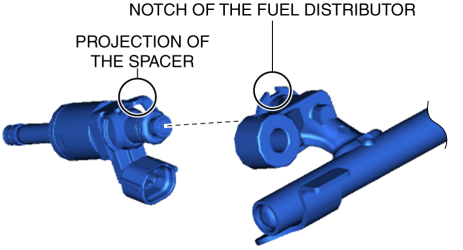
Fuel Distributor Installation Note
1. Install the fuel distributor to the fuel injectors while aligning the projection of the spacer to the notch of the fuel distributor.
2. Temporarily tighten the fuel distributor installation bolts until their heads contact the fuel distributors.
3. Turn the fuel distributor installation bolts a half a turn in the order shown in the figure.
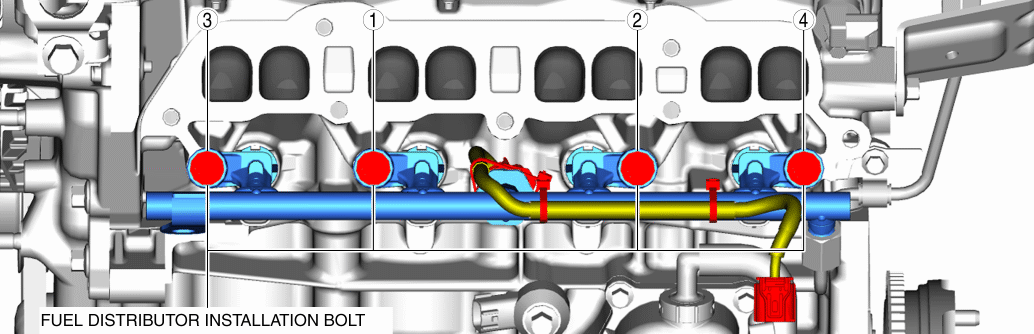
4. Turn the fuel distributor installation bolts another half a turn in the order shown in the figure (one turn including the half turn in Step 3).
5. Tighten the fuel distributor installation bolts in the order shown in the figure.
-
Fuel distributor installation bolt tightening torque
-
20—26 N·m {2.1—2.6 kgf·m, 15—19 ft·lbf}
6. Install the high pressure fuel pipe. (See HIGH PRESSURE FUEL PUMP REMOVAL/INSTALLATION [SKYACTIV-G 2.0].)