THERMOSTAT REMOVAL/INSTALLATION [SKYACTIV-G 2.0]
2016 – MX-5 – Engine
THERMOSTAT REMOVAL/INSTALLATION [SKYACTIV-G 2.0]
WARNING:
-
Never remove the cooling system cap or loosen the radiator drain plug while the engine is running, or when the engine and radiator are hot. Scalding engine coolant and steam may shoot out and cause serious injury. It may also damage the engine and cooling system.
-
Turn off the engine and wait until it is cool. Even then, be very careful when removing the cap. Wrap a thick cloth around it and slowly turn it counterclockwise to the first stop. Step back while the pressure escapes.
-
When you are sure all the pressure is gone, press down on the cap using the cloth, turn it, and remove it.
CAUTION:
-
If engine coolant remaining in the engine flows out, the electrical components, wiring harnesses and connectors might get wet. Therefore, set aside the electrical components, wiring harnesses and connectors or protect them from getting wet.
1. Disconnect the negative battery cable. (See NEGATIVE BATTERY CABLE DISCONNECTION/CONNECTION.)
2. Remove the air cleaner, air hose and resonance chamber No.1 as a single unit. (See INTAKE-AIR SYSTEM REMOVAL/INSTALLATION [SKYACTIV-G 2.0].)
3. Drain the engine coolant. (See ENGINE COOLANT REPLACEMENT [SKYACTIV-G 2.0].)
4. Remove the exhaust manifold insulator. (See EXHAUST SYSTEM REMOVAL/INSTALLATION [SKYACTIV-G 2.0].)
5. Remove in the order indicated in the table.
6. Install in the reverse order of removal.
7. Refill the engine coolant. (See ENGINE COOLANT REPLACEMENT [SKYACTIV-G 2.0].)
8. Inspect for engine coolant leakage. (See ENGINE COOLANT LEAKAGE INSPECTION [SKYACTIV-G 2.0].)
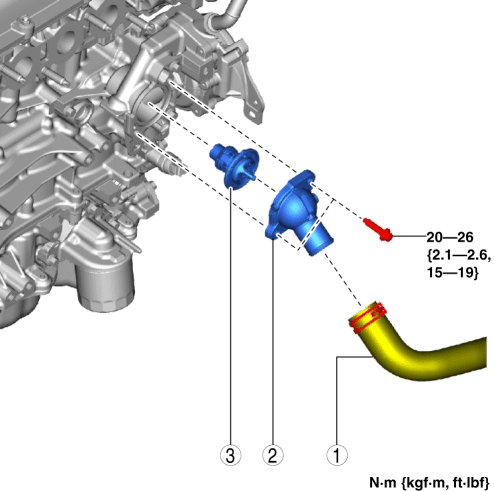
|
1 |
Lower radiator hose (Thermostat cover side) |
|
2 |
Thermostat cover |
|
3 |
Thermostat (See Thermostat Removal Note.) (See Thermostat Installation Note.) |
Thermostat Cover Removal Note
1. Remove the front crossmember under cover. (See FRONT CROSSMEMBER UNDER COVER REMOVAL/INSTALLATION.)
2. Disconnect the A/F sensor connector and set the wiring harness aside.
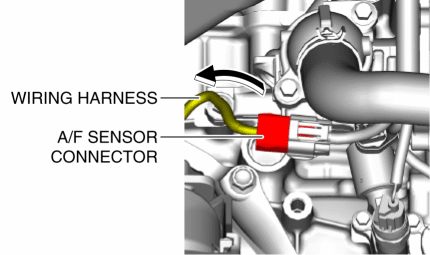
3. Remove the clip shown in the figure and set the wiring harness aside.

4. Place a container under the engine to collect the engine coolant remaining in the engine.
5. Loosen the two thermostat cover installation bolts and collect the draining engine coolant into a container.
CAUTION:
-
Do not remove the thermostat cover completely at this time because the engine coolant remaining in the engine will drain out.
6. After the engine coolant stops draining, remove the thermostat cover.
Thermostat Removal Note
1. Place a container under the engine to collect the engine coolant remaining in the engine.
2. Tilt the thermostat and collect the draining engine coolant into a container.
CAUTION:
-
Do not remove the thermostat completely at this time because the engine coolant remaining in the engine will drain out.
3. After the engine coolant stops draining, remove the thermostat.
Thermostat Installation Note
CAUTION:
-
Do not apply oil (such as engine oil, ATF) to the rubber seal part of the thermostat. Otherwise, the O-ring could swell causing a seal malfunction.
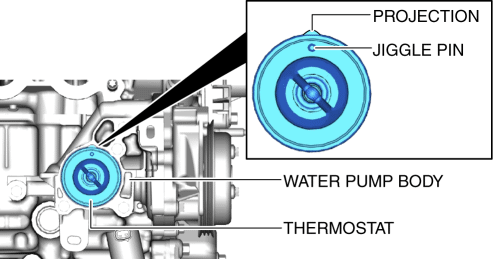
1. Install the thermostat with the jiggle pin aligned with the notch of the water pump body.